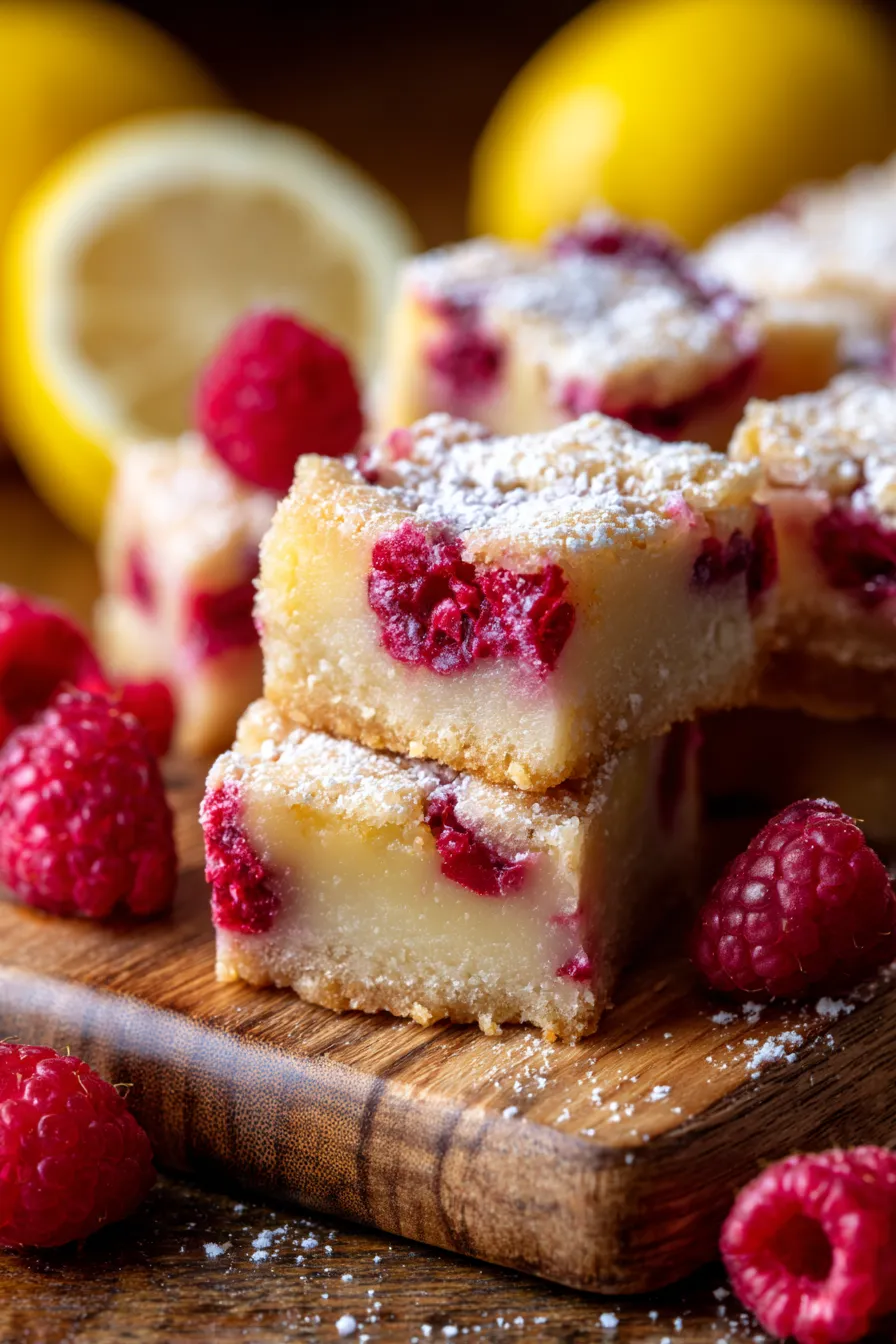
Zesty Raspberry Lemonade Bars: The Ultimate Summer Dessert Recipe My grandmother always said, “When life gives you lemons, make something sweet!” And on one particularly gloomy spring afternoon, feeling a little under the weather and craving sunshine, her words echoed in my kitchen. I was rummaging through my pantry, hoping to find inspiration, when I…
Zesty Raspberry Lemonade Bars: The Ultimate Summer Dessert Recipe
My grandmother always said, “When life gives you lemons, make something sweet!” And on one particularly gloomy spring afternoon, feeling a little under the weather and craving sunshine, her words echoed in my kitchen. I was rummaging through my pantry, hoping to find inspiration, when I spotted a forgotten bag of frozen raspberries and a bowl of bright yellow lemons. That’s when the idea for this vibrant Raspberry Lemonade Bars Recipe truly clicked. It instantly transported me back to sun-drenched picnics and carefree summer days.
This recipe has since become a comforting staple, a guaranteed mood-lifter, and an absolute showstopper at every gathering. I first perfected it for a neighborhood potluck last summer, and it disappeared from the dessert table faster than I could say “seconds!” Everyone raved about the perfect balance of sweet and tart, the luscious, creamy filling, and the delightful burst of fresh raspberries. It’s an easy dessert that truly tastes like sunshine.
You might think such an impressive treat would be complicated, but trust me, these bars are incredibly straightforward to make. They combine a buttery shortbread crust with a tangy lemon filling, crowned with juicy, bright raspberries, making it the ultimate refreshing bake. This tested, family-favorite recipe is ready to bring a little bit of that joyful summer feeling into your home, no matter the weather outside. Get ready for smiles all around!
Why You’ll Love This Recipe
- Perfectly Balanced Flavor: Imagine the ultimate marriage of sweet and tart. The zesty lemon filling cuts through the richness of the buttery shortbread crust, while the raspberries add a delightful fruity counterpoint. It’s a sophisticated flavor profile that appeals to everyone, from kids to adults.
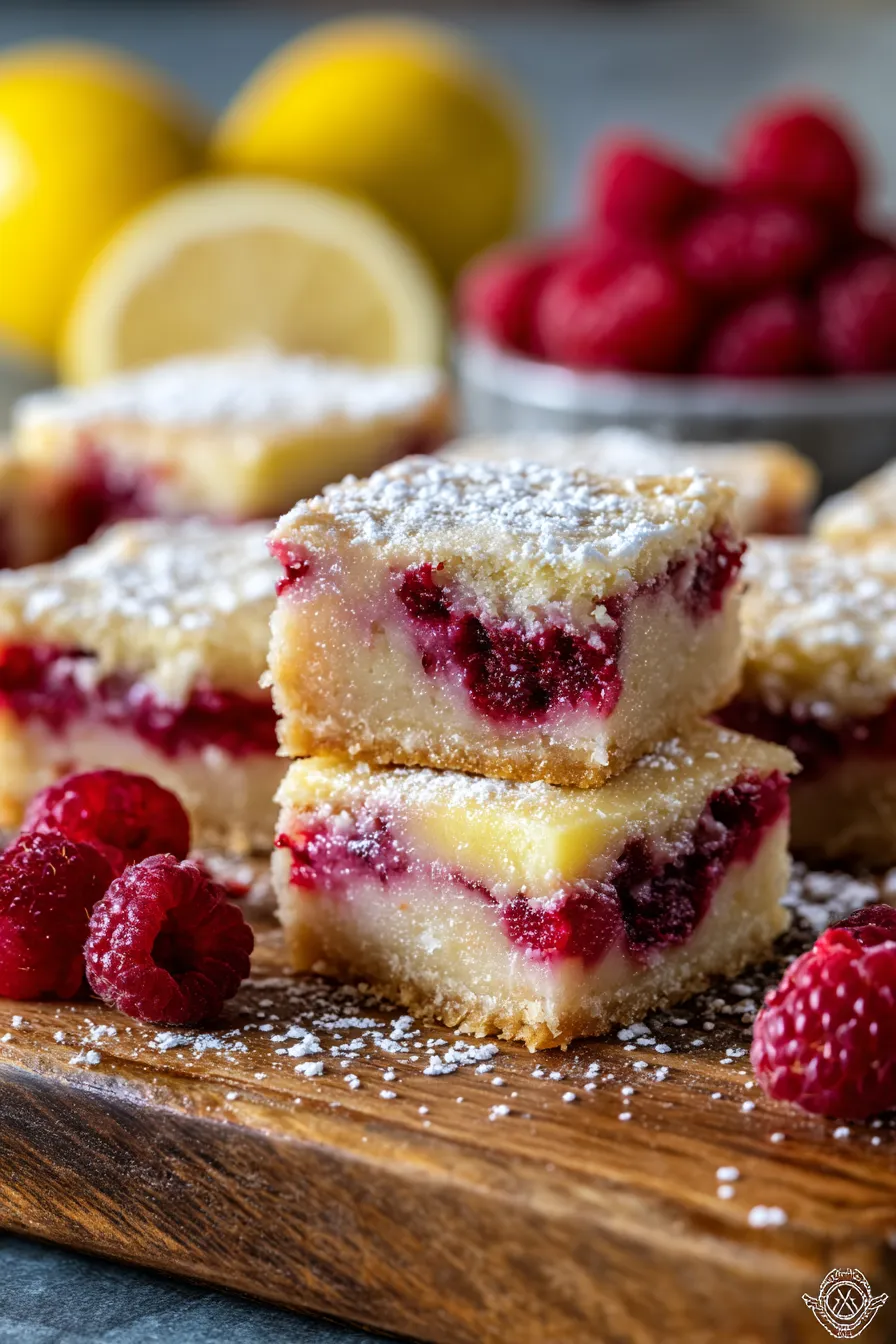
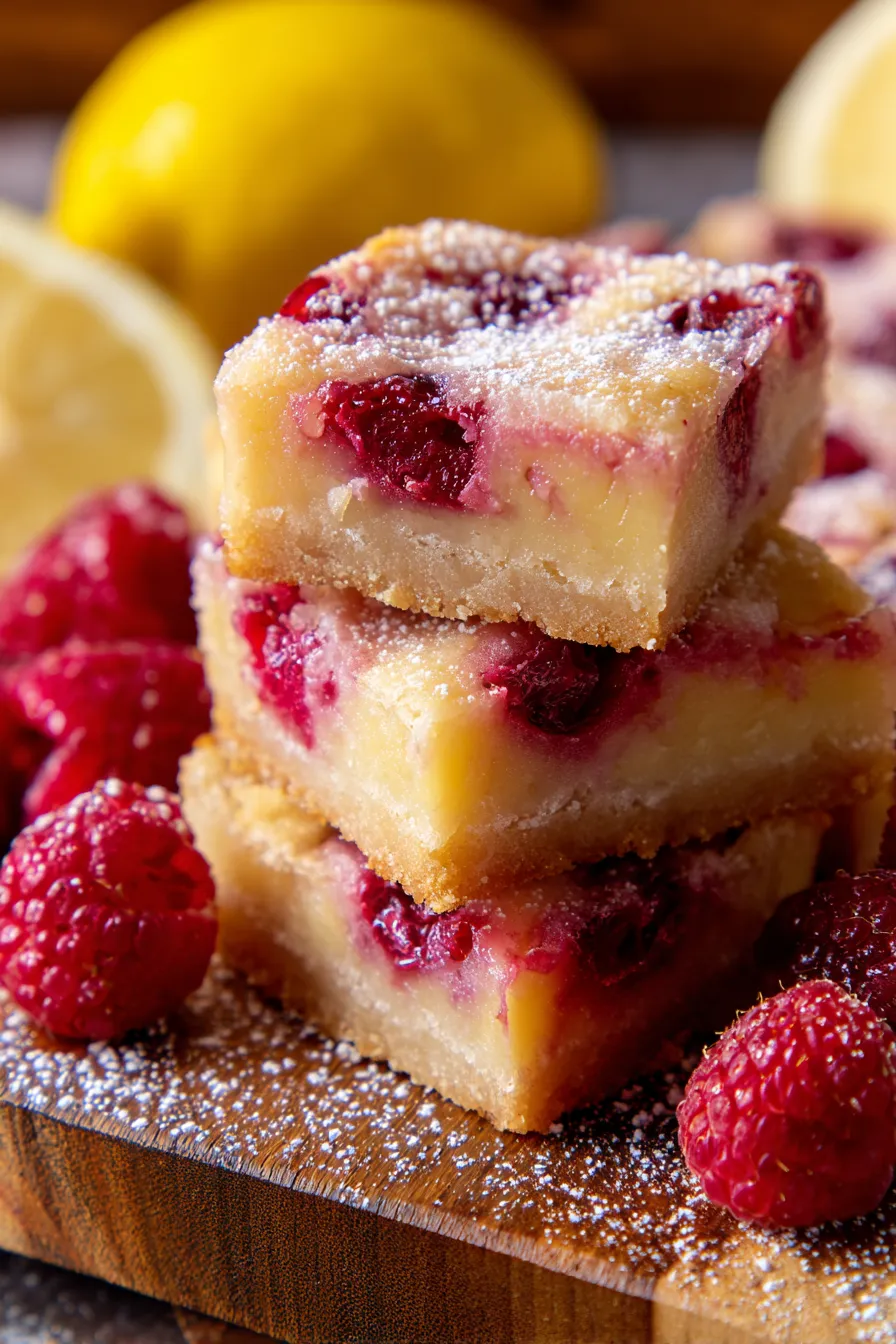
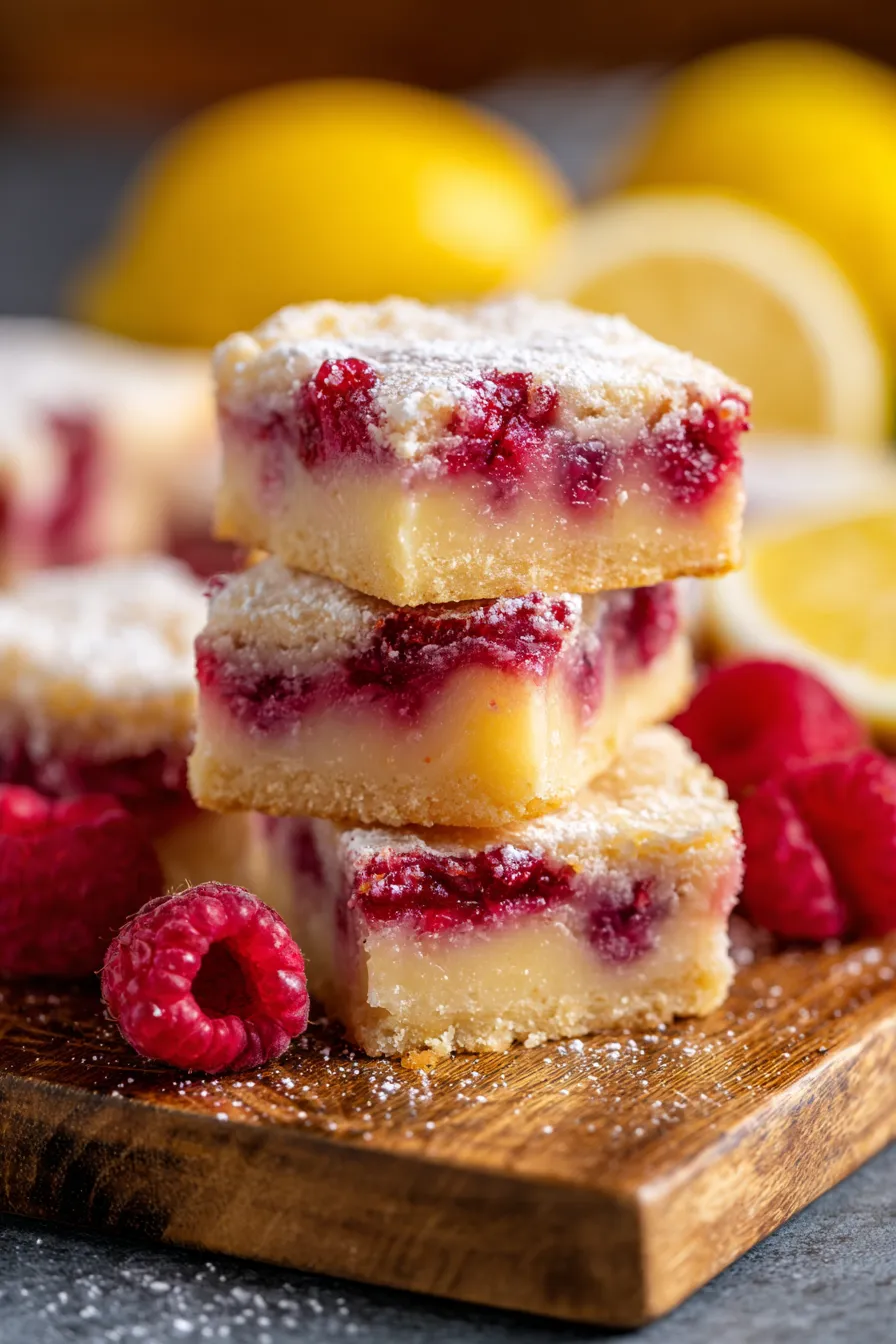
- Irresistible Texture Symphony: Each bite offers a delightful contrast. You get the crisp, tender crumble of the golden shortbread base, followed by the silken, creamy smoothness of the lemon curd-like filling, culminating in the juicy pop of fresh, vibrant raspberries. It’s a textural dream!
- Visually Stunning & Pinterest-Worthy: With their bright, cheerful colors – the golden crust, the sunny yellow lemon, and the vibrant pink-red raspberries – these bars are incredibly photogenic. They look like they came straight from a gourmet bakery, making them perfect for entertaining and sharing on social media.
- Surprisingly Easy to Make: Despite their elegant appearance and complex taste, this recipe is incredibly straightforward. With simple pantry ingredients and clear instructions, even novice bakers can achieve show-stopping results. No fancy equipment or advanced techniques needed!
- Crowd-Pleasing & Potluck Perfect: Whether you’re hosting a summer BBQ, heading to a picnic, or looking for a delightful treat to share with friends, these bars are always a hit. They travel well, are easy to serve, and disappear quickly from any dessert table. Everyone will ask for the recipe!
- Make-Ahead Friendly: These bars actually taste even better the next day after the flavors have had a chance to meld and chill thoroughly. This makes them an ideal dessert for planning ahead, freeing up your time on the day of your event.
- Versatile for Any Season: While they scream “summer” with their bright flavors, the comfort of the shortbread and the joy of fresh fruit make them a delightful treat any time of year. Use fresh berries in season or frozen ones when they’re not!
- Customizable Fun: Love a little extra sweetness? Prefer more tartness? This recipe is flexible, allowing you to adjust the sugar and lemon to your personal preference. Plus, there are endless ways to experiment with other fruits or toppings!
What You Need
You only need a few simple pantry staples for this recipe! We’re talking flour, sugar, butter, eggs, lemons, and raspberries – ingredients you likely already have on hand. Check the full printable recipe card below for detailed measurements and exact quantities for each delicious layer. You’ll be amazed at how such humble ingredients can create something so spectacular.
Expert Tips
- The Butter is Key for the Crust: For that perfectly tender, crumbly shortbread crust, ensure your butter is cold and cubed. This prevents overworking the dough and creates flaky pockets. Don’t overmix; as soon as it comes together, stop. A gentle hand makes for a tender crust.
- Chill Your Crust Dough: After pressing the shortbread dough into your pan, pop it in the freezer for 10-15 minutes or the fridge for 30 minutes before baking. This helps the butter firm up, preventing the crust from shrinking too much and ensuring a perfectly crisp base.
- Pre-Bake the Crust Properly: Don’t skip the blind-baking step for the crust. This ensures it’s fully cooked and golden brown before the wet filling goes in, preventing a soggy bottom. Bake until just lightly golden around the edges for optimal texture.
- Fresh Lemon Juice is Non-Negotiable: For the brightest, most vibrant lemon flavor, always use freshly squeezed lemon juice. Bottled juice simply doesn’t compare and will result in a duller, less zesty taste. You’ll need quite a few lemons, so pick out the juiciest ones!
- Zest Like a Pro: When zesting your lemons, only remove the bright yellow part. The white pith underneath is bitter and will negatively impact your filling’s delicate flavor. A microplane is your best friend here, creating fine, fragrant zest.
- Bring Eggs and Lemons to Room Temperature: Room temperature eggs emulsify better with other ingredients, creating a smoother, more uniform filling. Similarly, room temperature lemons yield more juice. Plan ahead for best results.
- Don’t Overcook the Lemon Filling: The filling should still have a slight “jiggle” in the center when you pull it from the oven. It will continue to set as it cools. Overbaking can lead to a rubbery texture instead of that luscious, creamy consistency.
- Gently Fold in Raspberries: Add the raspberries to the lemon filling just before pouring it over the crust. Don’t stir them vigorously; gently fold them in to distribute them evenly without crushing them too much. This preserves their shape and juicy burst.
- Cool Completely (Seriously!): This is perhaps the most crucial tip! These bars need to cool completely at room temperature, then chill in the refrigerator for at least 2-4 hours (or even overnight) before slicing. This allows the lemon filling to fully set, preventing a messy, runny bar. Patience is a virtue here!
- For Clean Slices: Once chilled, use a sharp, warm knife to cut your bars. Run the knife under hot water, wipe it dry, and then make your cuts. Repeat for each slice to get those perfectly clean, bakery-style edges. A long, thin slicing knife works wonders.
- Adjust Sweetness to Your Liking: If you prefer a more tart bar, you can slightly reduce the sugar in the lemon filling. If you like it sweeter, a light dusting of powdered sugar after cooling is a beautiful touch.
- Using Frozen Raspberries: If fresh raspberries aren’t available, you can absolutely use frozen ones! Do not thaw them first. Add them directly from the freezer to the lemon filling. They might release a little more liquid, but it won’t significantly affect the final texture.
- Enhance with Extracts: A tiny splash of pure vanilla extract in the shortbread crust can add a lovely depth of flavor. For the lemon filling, a drop or two of pure raspberry extract can amplify the berry notes if you wish.
- Pan Perfection: An 8×8 or 9×9-inch baking pan works best for these bars, providing good thickness. Line your pan with parchment paper, leaving an overhang on two sides. This creates “slings” that make it incredibly easy to lift the cooled bars out of the pan for clean cutting.
- Don’t Forget the Dusting: A final dusting of powdered sugar (confectioners’ sugar) right before serving adds a beautiful, professional finish and a touch more sweetness. It makes them look even more inviting!
Variations & Substitutions
Ready to get creative with your Raspberry Lemonade Bars? This recipe is wonderfully adaptable!
- Gluten-Free Option: Easily swap the all-purpose flour in the shortbread crust for your favorite 1:1 gluten-free baking flour blend. Ensure it contains xanthan gum for best results.
- Other Berry Bliss: Not a fan of raspberries? No problem! Try fresh blueberries, blackberries, or even sliced strawberries for a delightful twist. Adjust the amount based on your preference.
- Citrus Swap: While lemon is classic, you could experiment with lime for a zesty key lime-raspberry bar, or even a mix of lemon and orange for a sweeter, milder citrus note.
- Dairy-Free Crust: Use a high-quality plant-based butter substitute (like Miyoko’s Kitchen or Earth Balance sticks) in the shortbread crust to make it dairy-free.
- Vegan Option (Crust only): For a fully vegan bar, you’d need to replace the eggs in the filling with a plant-based alternative, which can be tricky for a lemon curd. However, a vegan shortbread crust is very achievable with plant-based butter.
- Add a Topping: Consider a light streusel topping over the raspberries for an extra layer of texture, or a drizzle of white chocolate after the bars have cooled completely.
Storage & Freezing
These beautiful bars store wonderfully, making them perfect for meal prep or enjoying throughout the week!
- Storage: Keep leftover Raspberry Lemonade Bars in an airtight container in the refrigerator for up to 4-5 days. The flavors actually deepen overnight, making them even more delicious the next day!
- Freezing: Yes, you can freeze these bars! Once completely cooled and chilled, cut them into individual squares. Wrap each bar tightly in plastic wrap, then place them in a freezer-safe airtight container or bag. They will keep well in the freezer for up to 2-3 months. Thaw them in the refrigerator overnight or at room temperature for a quick treat.
FAQ
Q: Can I use bottled lemon juice instead of fresh?
A: While you technically can, we strongly recommend fresh lemon juice for the best flavor. Bottled juice often contains preservatives and lacks the bright, vibrant taste that makes these bars so special.
Q: My lemon filling is runny, what went wrong?
A: The most common reasons are underbaking or not allowing the bars to cool and chill completely. The filling needs ample time in the refrigerator to fully set. Ensure it has a slight wobble, not a sloshy liquid center, when you remove it from the oven, and then be patient during the chilling process!
Q: Can I use frozen raspberries?
A: Absolutely! Add them directly from the freezer to the lemon filling; do not thaw them first. They may release a little extra liquid during baking, but this won’t significantly impact the final texture or taste.
Q: How do I prevent a soggy crust?
A: Make sure to pre-bake your shortbread crust until it’s lightly golden before adding the lemon filling. Also, ensure your butter is cold when making the crust, and chill the pressed crust before baking. This helps create a robust barrier against moisture.
Conclusion
There you have it – your new go-to recipe for the most delightful Raspberry Lemonade Bars! They are truly a bite of pure joy, bringing sunshine and smiles wherever they go. Whether you’re whipping them up for a special occasion or simply to brighten a mundane Tuesday, you won’t be disappointed. Don’t forget to pin this recipe for later and share your beautiful creations with us! Happy baking!

Zesty Raspberry Lemonade Bars: Ultimate Summer Dessert
Ingredients
- 1 1/2 cups all-purpose flour
- 1/2 cup granulated sugar
- 1/2 teaspoon salt
- 1 cup (2 sticks) unsalted butter, cold and cubed
- 4 large eggs
- 1 1/2 cups granulated sugar
- 1/2 cup fresh lemon juice (approx. 3-4 lemons)
- 2 tablespoons lemon zest
- 1 cup fresh or frozen raspberries
Instructions
- Step 1 Preheat oven to 350°F (175°C). Line an 8x8 or 9x9 inch baking pan with parchment paper, leaving an overhang.
- Step 2 For the crust: In a food processor, pulse flour, sugar, and salt. Add cold cubed butter and pulse until coarse crumbs form. Press mixture evenly into the prepared pan. Bake for 18-20 minutes, or until lightly golden.
- Step 3 For the filling: While crust bakes, whisk eggs, sugar, lemon juice, and lemon zest in a bowl until well combined.
- Step 4 Carefully pour the lemon filling over the warm baked crust. Gently fold in the raspberries.
- Step 5 Return the pan to the oven and bake for another 20-25 minutes, or until the filling is just set with a slight wobble in the center.
- Step 6 Remove from oven and let cool completely at room temperature, then transfer to the refrigerator to chill for at least 2-4 hours, or preferably overnight.
- Step 7 Once thoroughly chilled, use the parchment overhang to lift the bars from the pan. Slice into squares with a warm, sharp knife. Dust with powdered sugar if desired before serving.