The Ultimate Cherry Chocolate Black Forest Style Cake: A Decadent Dream! There are some desserts that just whisper ‘comfort’ and ‘celebration’ all at once, and for me, the Cherry Chocolate Black Forest Style Cake is at the very top of that list. I remember the first time I truly fell in love with this cake….
The Ultimate Cherry Chocolate Black Forest Style Cake: A Decadent Dream!
There are some desserts that just whisper ‘comfort’ and ‘celebration’ all at once, and for me, the Cherry Chocolate Black Forest Style Cake is at the very top of that list. I remember the first time I truly fell in love with this cake. It wasn’t in a fancy bakery, but at my grandmother’s house on a blustery autumn Sunday. The smell of rich chocolate and sweet cherries wafted from her kitchen, promising a treat that felt both grand and incredibly homely. She always made hers with a little extra love, and every bite felt like a warm hug.
That cherished memory sparked a lifelong quest to perfect my own version of this classic. After countless attempts and many happy taste-testers (my family never complains!), I’ve finally landed on a recipe that’s not just a showstopper, but also incredibly approachable for the home baker. This isn’t just any cake; it’s a tested, true, and deeply loved family favorite that brings pure joy with every single slice. If you’re looking for a truly decadent dessert that will impress everyone, look no further!
Get ready to create some magic in your kitchen. This Cherry Chocolate Black Forest Style Cake recipe is truly a comforting treat that you’ll want to make again and again.
Why You’ll Love This Recipe
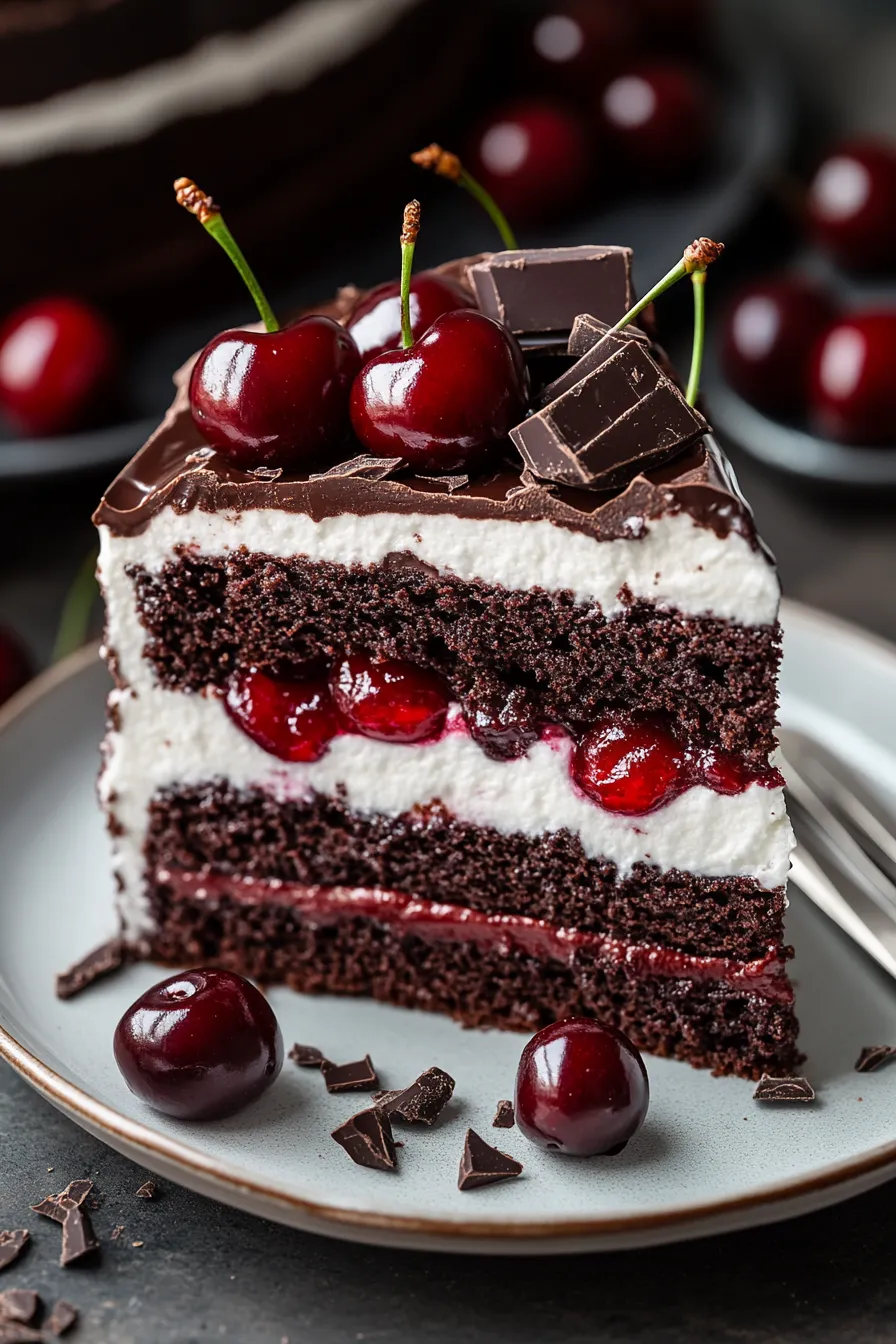
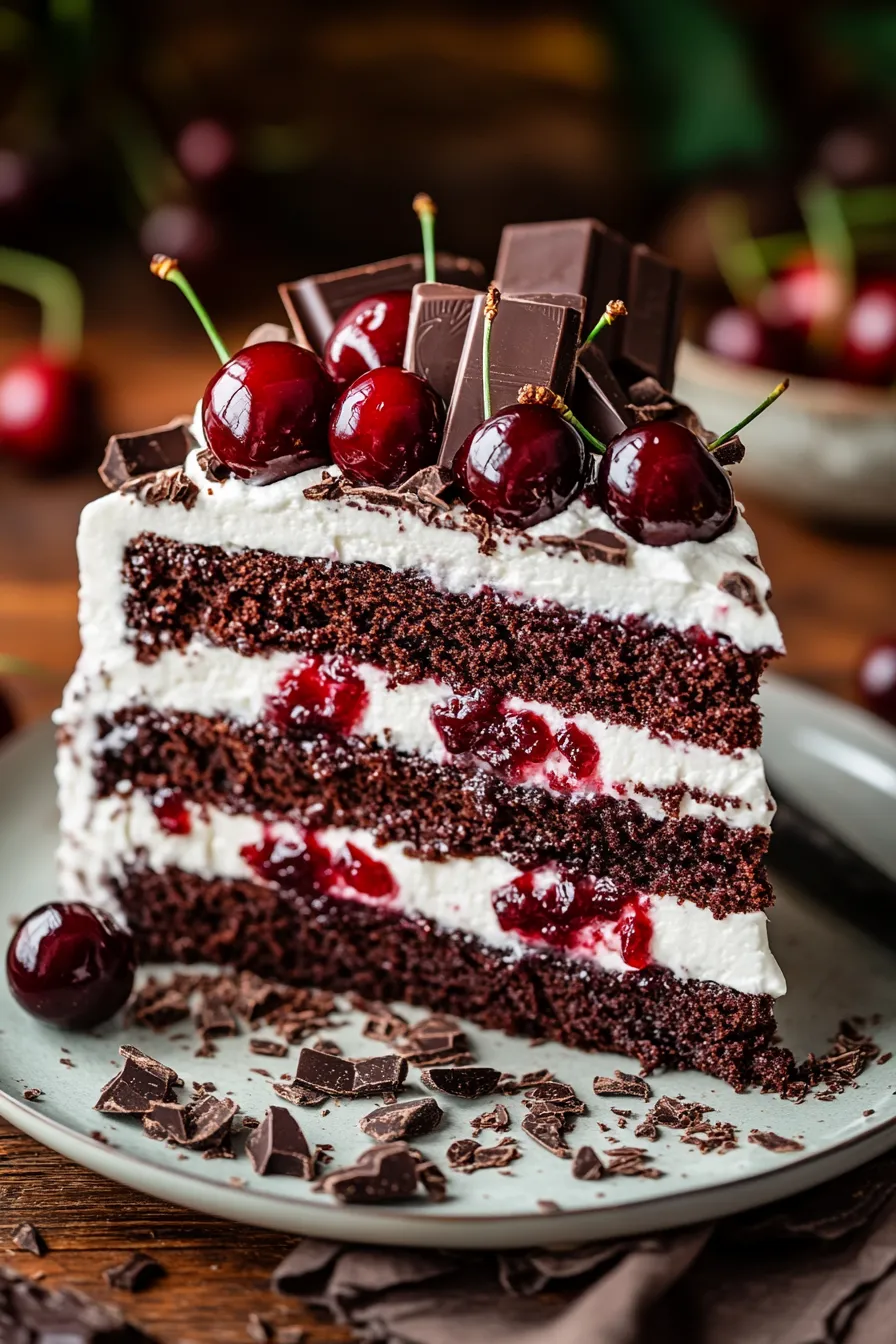
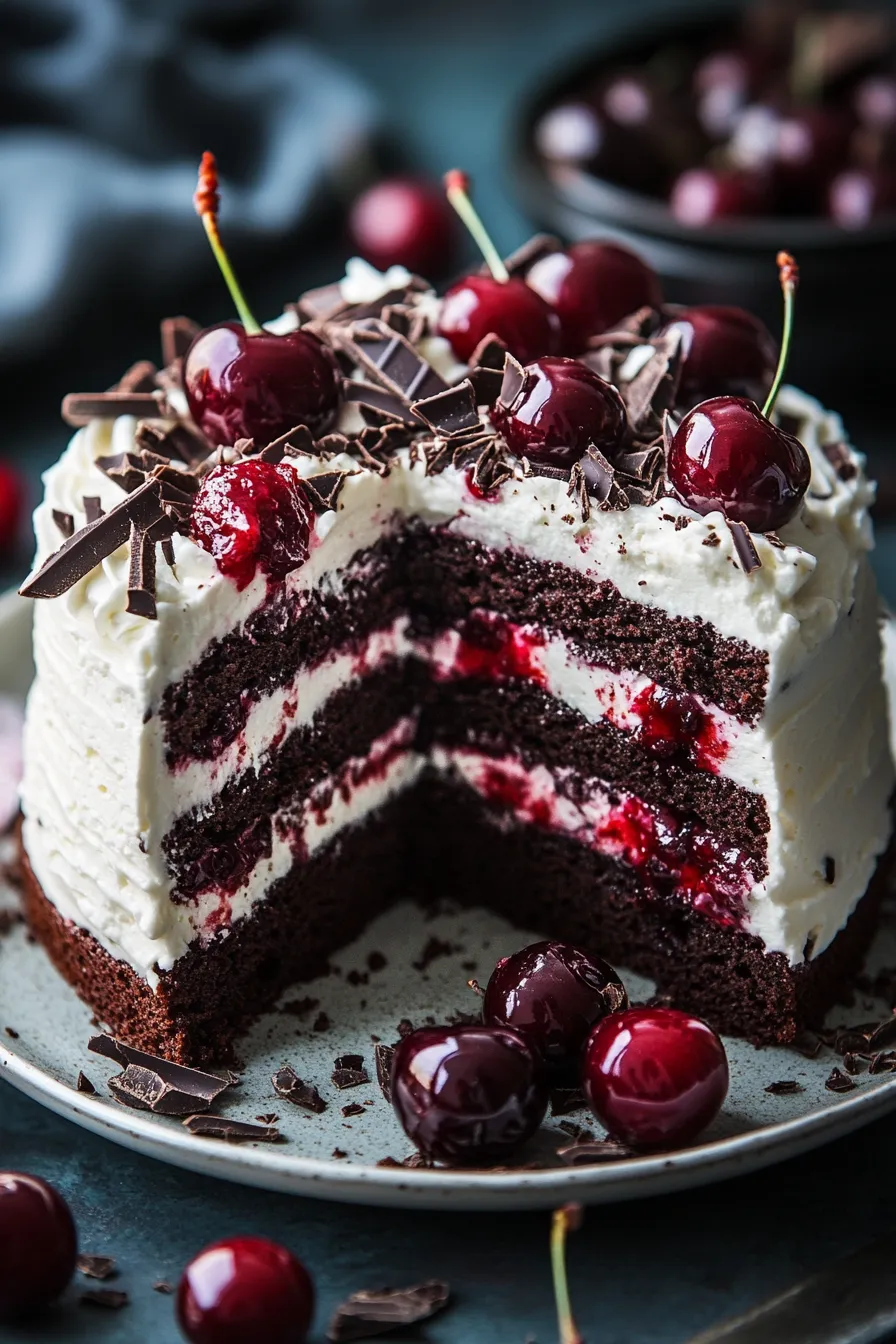
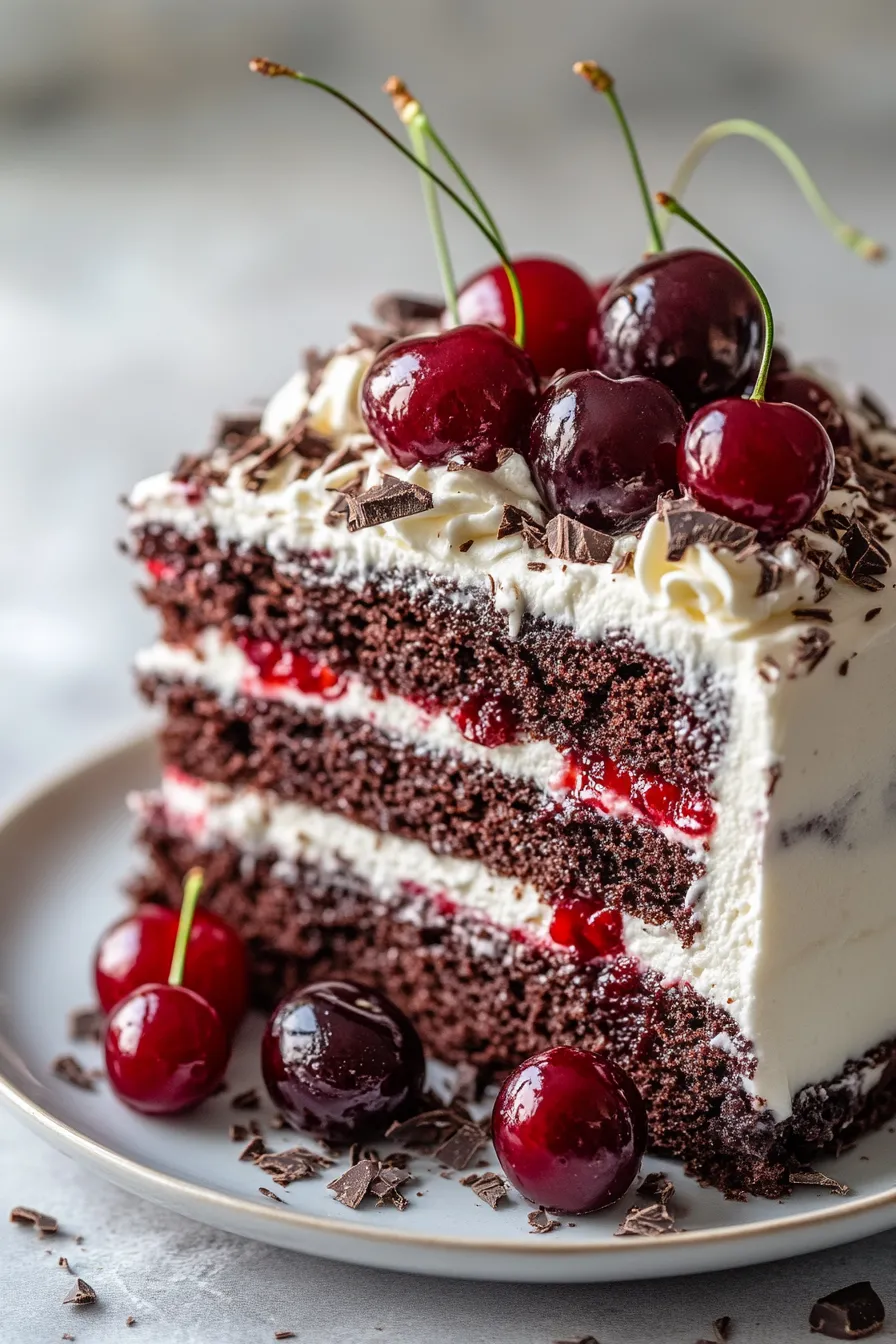
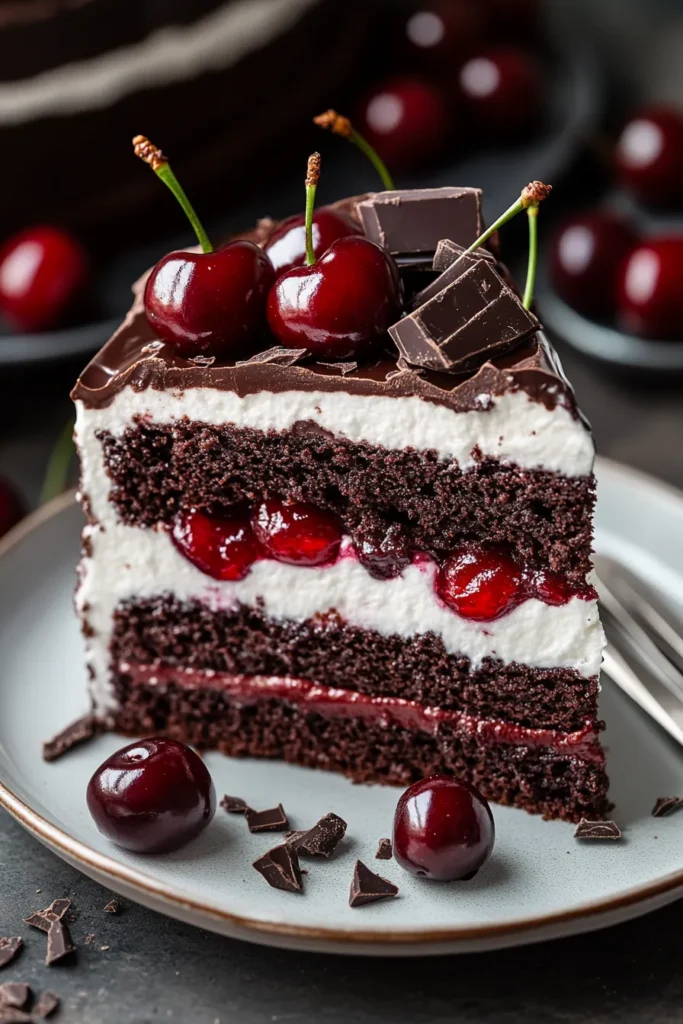
- Pure Decadence in Every Bite: This cake is a symphony of flavors and textures, featuring moist, rich chocolate cake layers perfectly complemented by luscious cherry filling and billowy, sweetened whipped cream. The dark chocolate shavings add a delightful bitter contrast and a touch of elegance that makes every mouthful an absolute dream. It truly feels like a gourmet experience crafted right in your own kitchen.
- Surprisingly Simple to Master: Don’t let its sophisticated appearance intimidate you! While it looks incredibly impressive, the steps for this Cherry Chocolate Black Forest Style Cake are broken down into manageable parts. Even if you’re a beginner baker, my detailed instructions and expert tips will guide you through creating a flawless dessert that looks like it came from a professional patisserie. It’s all about building layers of goodness.
- Perfect for Any Occasion: Whether it’s a special birthday, a holiday gathering, a romantic dinner, or just a cozy Sunday afternoon treat, this Black Forest style cake fits the bill. It’s a crowd-pleaser that consistently receives rave reviews, making it your go-to recipe when you want to truly spoil your loved ones or make a memorable impression.
- Customizable to Your Taste: We all have our preferences, and this recipe is wonderfully adaptable! Love a boozier kick? Add a generous splash of Kirsch (cherry brandy) to your cherry filling or brush it onto the cake layers. Prefer it non-alcoholic? Skip the Kirsch entirely or use cherry juice for added flavor. You can even adjust the sweetness level of the whipped cream to your liking, ensuring it’s just right for you.
- A Feast for the Eyes: Beyond its incredible taste, this Cherry Chocolate Black Forest Style Cake is a visual masterpiece. The vibrant red cherries peeking through the fluffy white cream, contrasted with the dark chocolate cake and elegant chocolate curls, make for an irresistible presentation. It’s the kind of dessert that elicits gasps of delight before the first slice is even cut, perfect for those Pinterest-worthy moments.
- Incredible Texture Harmony: The tender, airy crumb of the chocolate cake provides a wonderful base, which perfectly soaks up a hint of cherry liquid. This is beautifully contrasted by the soft, fresh whipped cream and the tender, slightly chewy cherries. Finally, the delicate crunch of chocolate shavings adds that perfect textural finish, ensuring every bite is dynamic and exciting.
- Freezer-Friendly & Make-Ahead: If you’re planning a party or just want to enjoy delicious cake whenever the craving strikes, this recipe is incredibly convenient. The cake layers can be baked ahead of time and frozen, and even the assembled cake freezes beautifully (minus the final chocolate shavings). This allows for easy prep, reducing stress on the day of your event and making dessert a breeze.
What You Need
You only need a few simple pantry staples and fresh ingredients for this recipe! From rich cocoa powder to fresh cherries and heavy cream, everything comes together beautifully. Check the full printable recipe card below for detailed measurements of all the ingredients needed to create this show-stopping Cherry Chocolate Black Forest Style Cake.
Expert Tips for Black Forest Cake Perfection
- Achieving the Perfect Chocolate Cake Layers: For a truly moist and tender chocolate cake, don’t overmix the batter once you add the dry ingredients. Mix until just combined to avoid developing too much gluten, which can lead to a tough cake. Using warm coffee or hot water in your chocolate cake batter can also bloom the cocoa powder, intensifying the chocolate flavor beautifully. Ensure your eggs and milk are at room temperature for better emulsion and a smoother batter.
- Preparing Your Cherries Like a Pro: While canned cherry pie filling is convenient, for a truly gourmet touch, consider making your own cherry filling from fresh or frozen pitted cherries. Cook them down with a little sugar, a squeeze of lemon juice, and a cornstarch slurry until thickened. If using Kirsch, add it at the very end off the heat to preserve its delicate flavor. Let the filling cool completely before assembling to prevent melting your cream.
- Whipping Cream for Stability: For sturdy whipped cream that holds its shape, start with very cold heavy cream (at least 36% fat content) and a chilled mixing bowl and whisk attachment. You can even place them in the freezer for 10-15 minutes beforehand. Whip on medium-high speed until firm peaks form, adding powdered sugar and vanilla extract once it starts to thicken. Be careful not to over-whip, or you’ll end up with butter!
- The Art of Layering: To ensure your cake layers are level, use a serrated knife or a cake leveler. Lightly brush each cake layer with a bit of the cherry syrup (or Kirsch if using) before spreading the cream and cherries. This adds extra moisture and flavor. Create a ‘dam’ of whipped cream around the edge of each layer before filling with cherries to prevent them from oozing out.
- Mastering Chocolate Shavings: For elegant chocolate shavings or curls, use a good quality dark chocolate bar (about 60-70% cocoa). Let the chocolate come to room temperature slightly if it’s too cold and brittle. Use a vegetable peeler or the edge of a sharp knife to scrape along the side of the chocolate bar. For curls, apply gentle, even pressure. If the chocolate gets too warm and sticky, chill it again briefly.
- The Crumb Coat Secret: A thin ‘crumb coat’ of whipped cream is essential for a professional-looking cake. After assembling your layers, apply a very thin layer of whipped cream all over the cake, sealing in any loose crumbs. Chill the cake for 20-30 minutes to set this layer before applying your final, thicker layer of whipped cream. This ensures a smooth, crumb-free finish.
- Don’t Rush the Cooling: Patience is key when baking! Allow your cake layers to cool completely in their pans on a wire rack for about 10-15 minutes before inverting them to cool completely on the rack. Attempting to frost or assemble warm cake layers will result in a messy, melting disaster. Ensure they are cool to the touch, ideally for at least an hour or two.
- Presentation Matters: A sprinkle of extra chocolate shavings, a few fresh cherries (pitted!) on top, or even a dusting of cocoa powder can elevate the look of your Cherry Chocolate Black Forest Style Cake. For a truly professional touch, pipe small rosettes of whipped cream around the top edge of the cake using a star tip before adding the final cherry and chocolate garnishes.
- Taste as You Go (Within Reason!): Always taste your cherry filling and whipped cream before assembly. Adjust sweetness levels as needed. Some cherries are tart, some are sweet, so a small adjustment can make a big difference in the overall balance of your cake. This ensures every component sings harmoniously.
Variations & Substitutions
This Cherry Chocolate Black Forest Style Cake recipe is incredibly versatile! Here are some ideas to make it your own:
- Gluten-Free Version: Easily swap out the all-purpose flour for a 1:1 gluten-free baking flour blend. Make sure your blend contains xanthan gum for the best texture.
- Dairy-Free/Vegan Option: For a plant-based twist, use a high-quality vegan butter substitute, plant-based milk (like almond or oat milk), and egg replacers for the cake. For the whipped cream, use chilled full-fat coconut cream (from a can, scoop out the thick cream) or a store-bought vegan whipped topping.
- Different Fruits: While cherries are classic, you can experiment with other berries! Raspberries, blackberries, or even sliced strawberries can make a delicious substitute for the cherry filling. Adjust sweetness as needed.
- Alcohol-Free: If you prefer to skip the Kirsch, simply omit it or replace it with an equal amount of cherry juice or a tablespoon of vanilla extract for extra flavor in the filling.
- Nutty Twist: Add a layer of toasted, chopped almonds or hazelnuts between the cake and cream for an extra crunch and nutty flavor dimension.
- Spice It Up: A pinch of cinnamon or a tiny dash of almond extract in the cake batter or cherry filling can add another layer of warm, inviting flavor that complements the chocolate and cherry beautifully.
Storage & Freezing
To keep your Cherry Chocolate Black Forest Style Cake fresh and delicious:
- Refrigeration: Because of the fresh whipped cream, this cake needs to be stored in the refrigerator. Place it in an airtight cake carrier or cover it loosely with plastic wrap. It will stay fresh and delicious for 3-4 days.
- Freezing Assembled Cake: You can freeze the entire assembled cake (without the final chocolate shavings, as they can become brittle). Place it on a baking sheet and freeze until solid, then wrap it tightly in several layers of plastic wrap, followed by a layer of aluminum foil. It can be frozen for up to 1 month.
- Freezing Cake Layers: For future baking, wrap individual cooled cake layers tightly in plastic wrap, then foil, and freeze for up to 2-3 months. Thaw them in the refrigerator overnight before assembling.
- Thawing: If freezing the entire cake, transfer it to the refrigerator to thaw overnight. Allow it to come to room temperature for about 30 minutes before serving for the best flavor and texture.
FAQ
Q: Can I use fresh cherries instead of canned pie filling?
A: Absolutely, and it’s highly recommended for an even more vibrant flavor! You’ll need to pit about 3-4 cups of fresh cherries, then cook them down with a little sugar (to taste), a splash of water, and a cornstarch slurry until thickened. Let it cool completely before using.
Q: Can I make this Cherry Chocolate Black Forest Style Cake ahead of time?
A: Yes! You can bake the cake layers a day or two in advance and store them tightly wrapped at room temperature or in the freezer. The cherry filling can also be made ahead and stored in the fridge. Assemble the cake no more than a day before serving to ensure the freshest whipped cream.
Q: What kind of chocolate is best for the shavings?
A: For the best results and flavor, use a high-quality dark chocolate bar with at least 60-70% cocoa content. This will give you a rich, slightly bitter note that balances the sweetness of the cherries and cream beautifully. Chocolate chips or baking chocolate wafers can also work in a pinch, but a good bar will yield better shavings.
Q: My cake layers came out dry. What went wrong?
A: Dry cake layers are usually a sign of overbaking. Ensure you’re not opening the oven door too frequently and check for doneness using a wooden skewer inserted into the center – it should come out with moist crumbs, not wet batter. Another common culprit is inaccurate measuring, especially of flour; always spoon flour into your measuring cup and level it off.
Q: How do I prevent my cake from becoming soggy?
A: To prevent sogginess, ensure your cherry filling is completely cooled before layering. If you’re using a generous amount of Kirsch or cherry syrup, apply it sparingly and evenly. Also, a thin crumb coat before the final frosting helps seal in moisture and prevents any liquid from penetrating too quickly into the cake layers.
Conclusion
There you have it – my tried-and-true recipe for a show-stopping Cherry Chocolate Black Forest Style Cake that will impress everyone who tries it. This isn’t just a dessert; it’s an experience, a memory in the making, and a testament to the simple joy of baking from scratch. The combination of rich chocolate, tart cherries, and fluffy cream is truly irresistible.
I genuinely hope you love making and sharing this cake as much as I do. It’s a recipe that warms the soul and delights the senses, bringing a little bit of that special Sunday feeling to any day of the week. Don’t be shy – dive in and create your own masterpiece!
Happy baking, and remember to pin this recipe for later so you can revisit this decadent delight whenever a craving strikes!
Decadent Cherry Chocolate Black Forest Style Cake Recipe
Ingredients
- 2 cups all-purpose flour
- ¾ cup unsweetened cocoa powder
- 2 cups granulated sugar
- 1½ tsp baking soda
- 1 tsp baking powder
- 1 tsp salt
- 2 large eggs, room temperature
- 1 cup milk, room temperature
- ½ cup vegetable oil
- 2 tsp vanilla extract
- 1 cup hot coffee (or hot water)
- 1 (21 oz) can cherry pie filling
- ¼ cup Kirsch (cherry brandy, optional)
- 4 cups heavy cream, very cold
- ½ cup powdered sugar
- 1 tsp vanilla extract
- 4 oz dark chocolate, for shavings
Instructions
- Step 1 Preheat oven to 350°F (175°C). Grease and flour two 8-inch round cake pans.
- Step 2 In a large bowl, whisk together flour, cocoa powder, sugar, baking soda, baking powder, and salt.
- Step 3 In a separate bowl, whisk together eggs, milk, oil, and vanilla extract.
- Step 4 Pour the wet ingredients into the dry ingredients and mix on low speed until just combined. Gradually add the hot coffee, mixing until the batter is smooth (it will be thin).
- Step 5 Divide batter evenly between prepared pans. Bake for 30-35 minutes, or until a wooden skewer inserted into the center comes out with moist crumbs.
- Step 6 Let cakes cool in pans for 10 minutes, then invert onto a wire rack to cool completely.
- Step 7 If using Kirsch, mix it with the cherry pie filling in a small bowl.
- Step 8 For the whipped cream, in a very cold bowl with a cold whisk attachment, beat heavy cream on medium-high speed until it begins to thicken. Add powdered sugar and vanilla, then continue beating until stiff peaks form. Be careful not to over-whip.
- Step 9 To assemble, level cooled cake layers if necessary. Place one cake layer on your serving plate. Lightly brush with a little Kirsch or cherry juice if desired. Spread about one-third of the whipped cream evenly over the cake layer, leaving a small border. Spoon half of the cherry filling over the cream.
- Step 10 Place the second cake layer on top. Repeat with another third of the whipped cream and the remaining cherry filling.
- Step 11 Top with the third cake layer. Use the remaining whipped cream to frost the top and sides of the cake. For a neat finish, apply a thin crumb coat first and chill for 15 minutes before applying the final layer of cream.
- Step 12 Using a vegetable peeler or sharp knife, make chocolate shavings from the dark chocolate bar and sprinkle generously over the top and sides of the cake. Garnish with a few fresh cherries if desired.
- Step 13 Refrigerate the cake for at least 1 hour before serving to allow it to set. Serve chilled and enjoy!