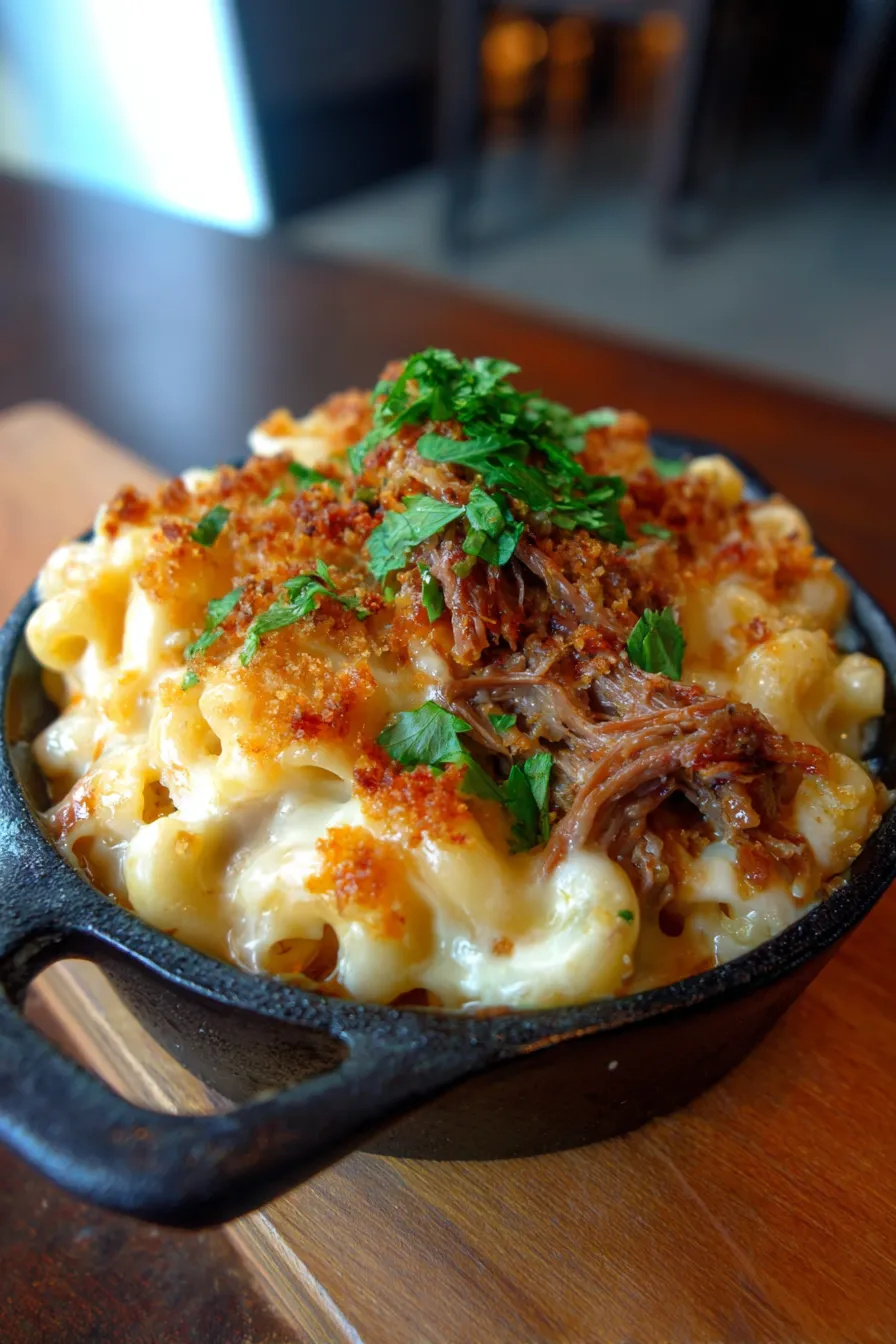
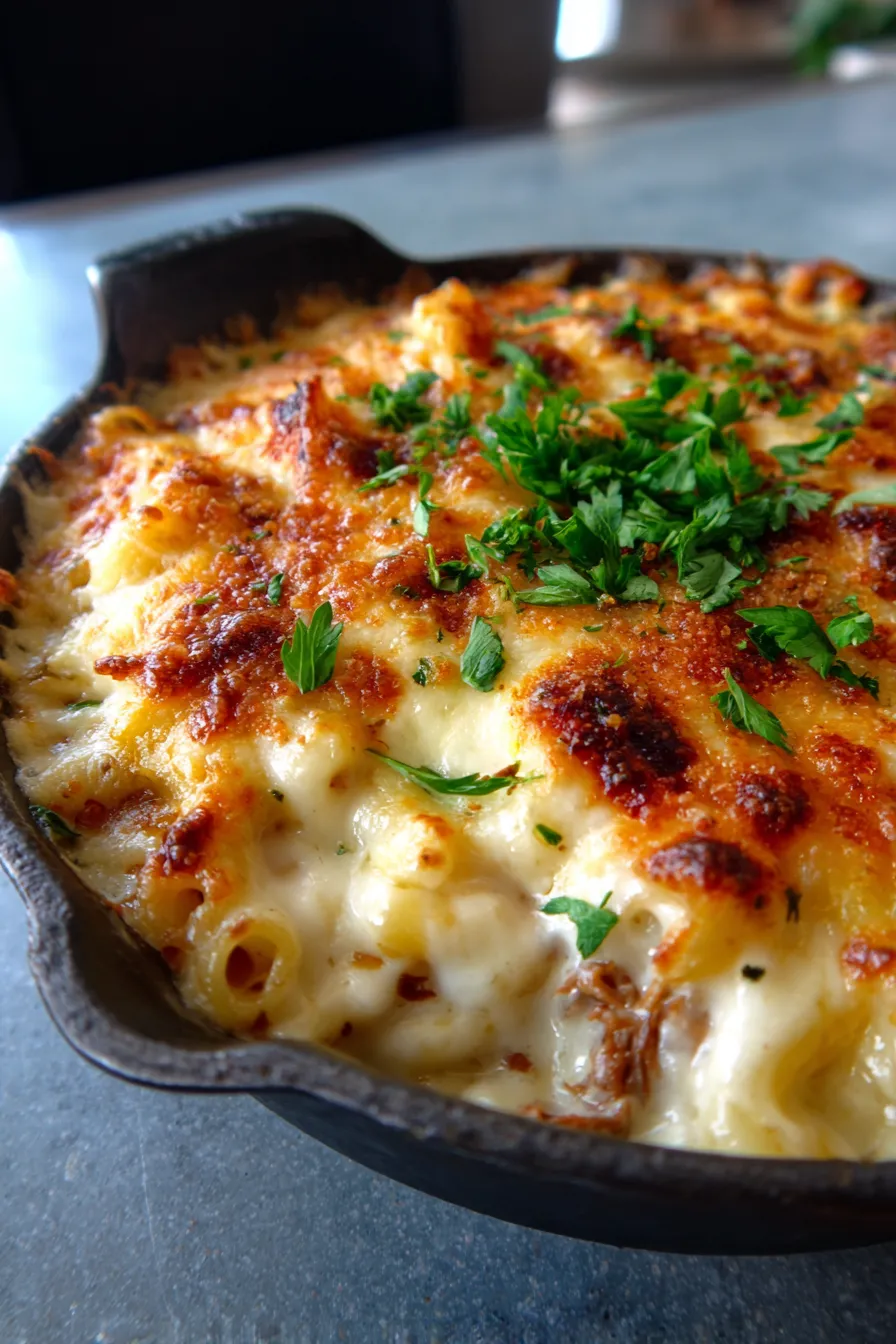
Ultimate Smoked Pulled Beef Mac & Cheese Bake Recipe There’s something magical about a cold, rainy Sunday afternoon that just begs for the ultimate comfort food. I remember one particular weekend, we had a fridge full of leftover smoked pulled beef from a backyard BBQ, and my kids were asking for mac and cheese. A…
Ultimate Smoked Pulled Beef Mac & Cheese Bake Recipe
There’s something magical about a cold, rainy Sunday afternoon that just begs for the ultimate comfort food. I remember one particular weekend, we had a fridge full of leftover smoked pulled beef from a backyard BBQ, and my kids were asking for mac and cheese. A lightbulb went off!
Combining the two was an experiment born out of necessity and a craving for something truly hearty. The first bite was a revelation: the creamy, dreamy cheese sauce perfectly complemented the tender, smoky pulled beef. It was an instant hit, quickly becoming a requested staple for family dinners and potlucks.
This tested recipe for **Mac and Cheese with Pulled Beef** isn’t just a meal; it’s an experience. It’s the perfect easy dinner solution for chilly evenings, a fantastic way to use up leftovers, and a true comfort food classic that guarantees smiles around the table.
Why You’ll Love This Recipe
- ❤️ **Unbeatable Flavor Fusion:** Imagine tender, savory, smoky pulled beef nestled in a rich, creamy, and perfectly seasoned cheese sauce. It’s a match made in culinary heaven, offering a complexity that takes classic mac and cheese to an entirely new level. The smoky notes of the beef cut through the richness of the cheese beautifully.
- ❤️ **Ultimate Comfort Food:** This dish wraps you in a warm hug with every spoonful. It’s the quintessential feel-good meal, perfect for cozy nights in, chilly weather, or simply when you need a little something extra special to brighten your day. It’s hearty, satisfying, and deeply soul-warming.
- ❤️ **Feeds a Crowd Effortlessly:** Whether you’re hosting a game day party, a family gathering, or a potluck, this casserole is a crowd-pleaser. It’s easy to scale up for larger groups and always disappears fast. Prepare for rave reviews and requests for the recipe!
- ❤️ **Fantastic for Leftovers:** Have leftover pulled pork or beef from your last BBQ? This recipe is its glorious second act! It transforms simple leftovers into an elevated gourmet experience, preventing food waste and creating a brand new, exciting meal. It’s also excellent for meal prepping.
- ❤️ **Customizable to Your Taste:** While the base is incredible, this recipe is incredibly versatile. Want more spice? Add jalapeños. Crave different cheeses? Go for it! You can adjust the seasonings, add veggies, or even try different kinds of pasta to make it truly your own signature dish.
- ❤️ **Surprisingly Simple to Make:** Don’t let the impressive presentation fool you. While it tastes like you’ve spent hours in the kitchen, the process is straightforward, especially if you have pre-cooked pulled beef. It’s an approachable recipe that delivers big on flavor without requiring advanced culinary skills.
- ❤️ **Kid-Friendly & Adult-Approved:** This dish truly pleases every palate at the table. Kids adore the cheesy pasta, and adults appreciate the depth of flavor from the pulled beef. It’s one of those rare meals that gets unanimous approval, making dinner time much easier and more enjoyable.
- ❤️ **Perfect for Make-Ahead:** You can assemble this casserole in advance, cover it, and bake it later, making it ideal for busy weekdays or entertaining. A little planning means less stress when it’s time to get dinner on the table.
What You Need
You only need a few simple pantry staples for this incredibly satisfying recipe! Most ingredients are probably already in your kitchen. Check the full printable recipe card below for detailed measurements and a complete list.
Expert Tips
- 💡 **Quality Pulled Beef Matters:** The star of the show! Use tender, flavorful pulled beef. If you’re making it from scratch, low and slow is the way to go for maximum tenderness. If using store-bought, look for high-quality, pre-seasoned options. Warm the beef slightly before adding to prevent cooling down the cheese sauce.
- 💡 **Choose Your Cheese Wisely:** A blend is always best for mac and cheese. I love sharp cheddar for its classic flavor and Gruyère for its nutty complexity and incredible melt. A touch of smoked Gouda or even some cream cheese can add extra creaminess and depth. Always grate your own cheese from blocks; pre-shredded cheeses contain anti-caking agents that can make your sauce gritty.
- 💡 **Master the Béchamel:** The foundation of your creamy sauce! Start with a proper roux (equal parts butter and flour cooked for a minute or two). Whisk in cold or room-temperature milk gradually to avoid lumps. Cook the béchamel until it’s thick enough to coat the back of a spoon, but still pourable. Don’t rush this step!
- 💡 **Seasoning is Key:** Don’t be shy with seasoning. Salt and freshly ground black pepper are essential. A dash of Dijon mustard and Worcestershire sauce adds a subtle tang and umami that elevates the cheese sauce without overpowering it. Taste and adjust before combining with the pasta and beef.
- 💡 **Al Dente Pasta is a Must:** Cook your macaroni a minute or two less than the package directions for al dente. It will continue to cook in the hot cheese sauce and then further in the oven. Overcooked pasta will become mushy in the baked casserole, and nobody wants that!
- 💡 **Sauce Consistency:** Your cheese sauce should be slightly looser than you think it needs to be when you combine it with the pasta. It will thicken considerably as it bakes and cools. A too-thick sauce will result in a dry casserole. If it seems too thick, a splash of warm milk can thin it out.
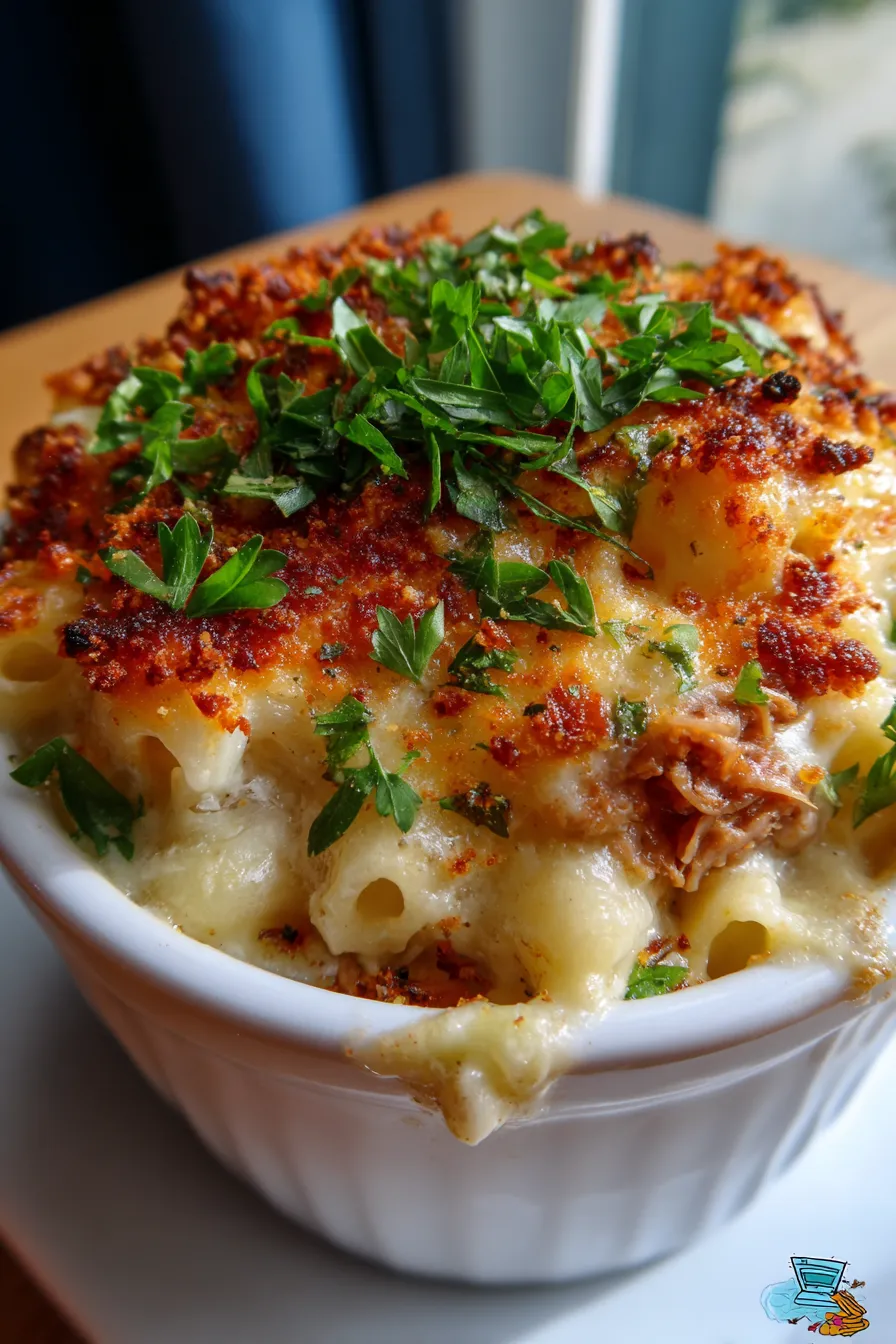
- 💡 **Layer for Perfection:** For optimal distribution, add about half of the pasta, then sprinkle half of the pulled beef, then cover with half of the remaining cheese sauce. Repeat with the rest, ensuring every bite gets a good mix of cheese, pasta, and beef.
- 💡 **The Golden Crust:** A crispy topping is non-negotiable! Mix Panko breadcrumbs with a little melted butter and a sprinkle of paprika for color. This adds a fantastic textural contrast to the creamy interior. You can also add a final layer of shredded cheese over the breadcrumbs for extra gooeyness.
- 💡 **Don’t Forget to Rest:** Once out of the oven, let the casserole rest for 10-15 minutes before serving. This allows the sauce to set slightly, making it easier to serve and preventing it from being too runny. It also keeps the dish piping hot.
- 💡 **Make Ahead Magic:** You can assemble the entire casserole, cover it tightly with foil, and refrigerate for up to 24 hours before baking. Let it come to room temperature for about 30 minutes before baking, and you might need to add an extra 10-15 minutes to the baking time.
Variations & Substitutions
This recipe is incredibly flexible, allowing you to adapt it to your taste or dietary needs:
- **Spice It Up:** Add a pinch of cayenne pepper, a dash of hot sauce to the cheese sauce, or finely diced jalapeños (fresh or pickled) with the pulled beef for a fiery kick.
- **Different Cheeses:** Experiment with other great melting cheeses like Fontina, Monterey Jack, Colby, or even a smoked cheddar for an extra layer of flavor. A small amount of Parmesan or Pecorino Romano can also add a salty, sharp finish.
- **Gluten-Free Option:** Simply swap traditional elbow macaroni for your favorite gluten-free pasta and use a gluten-free all-purpose flour for the roux.
- **Low-Carb Twist:** Replace the pasta with steamed or roasted cauliflower florets for a delicious, hearty low-carb alternative. You’ll still get all that amazing cheesy beef flavor!
- **Add Some Veggies:** Stir in some caramelized onions, sautéed mushrooms, roasted bell peppers, or a handful of fresh spinach during the last few minutes of mixing for added nutrition and flavor.
- **Alternative Meats:** While pulled beef is fantastic, you could also use leftover pulled pork, shredded chicken, or even slow-cooked short ribs for a gourmet touch.
- **Smoky Boost:** If your pulled beef isn’t very smoky, a few drops of liquid smoke (use sparingly!) in the cheese sauce or a pinch of smoked paprika can enhance that BBQ flavor.
Storage & Freezing
This Mac and Cheese with Pulled Beef is just as delicious the next day!
- **Refrigeration:** Store any leftovers in an airtight container in the refrigerator for up to 3-4 days.
- **Reheating:** For best results, reheat individual portions in the microwave, adding a splash of milk to help rehydrate the sauce. For larger portions, reheat in a preheated oven at 350°F (175°C), covered with foil, until warmed through (about 20-30 minutes).
- **Freezing:** This casserole freezes beautifully. Once completely cooled, you can freeze individual portions or the entire casserole (if baked in a freezer-safe dish). Wrap tightly in plastic wrap and then foil. It will keep for up to 3 months. Thaw overnight in the refrigerator before reheating as directed above.
FAQ
Can I use store-bought pulled beef for this recipe?
Absolutely! For convenience, store-bought pulled beef is a great option. Just make sure it’s a good quality brand and warm it up slightly before adding it to the pasta.
What kind of pasta works best?
Elbow macaroni is the classic choice, but other small, sturdy pasta shapes like shells, cavatappi, or even penne work wonderfully. Choose a pasta that can hold a lot of sauce!
My cheese sauce is lumpy, what went wrong?
Lumps usually happen if the milk is added too quickly or isn’t whisked vigorously. Add the milk slowly, a little at a time, whisking constantly until smooth. If lumps persist, you can always strain the sauce through a fine-mesh sieve before adding the cheese.
Can I make this without baking it in the oven?
Yes, you can make a stovetop version! Simply combine the cooked pasta, pulled beef, and cheese sauce in a large pot and stir until everything is hot and combined. However, baking it gives you that irresistible golden, crispy topping and allows the flavors to meld even more beautifully.
This Mac and Cheese with Pulled Beef isn’t just a recipe; it’s a new tradition waiting to happen in your home. It’s the ultimate expression of comfort, flavor, and pure deliciousness. Give it a try this week and prepare for rave reviews and empty casserole dishes!
Don’t forget to Pin this amazing recipe for later so you can come back to it again and again. Happy cooking!

Ultimate Smoked Pulled Beef Mac & Cheese Bake Recipe
Ingredients
- 1 lb elbow macaroni, or similar small pasta
- 4 cups whole milk
- 1/2 cup unsalted butter
- 1/2 cup all-purpose flour
- 4 cups shredded sharp cheddar cheese, freshly grated
- 2 cups shredded Gruyere cheese, freshly grated
- 1 tsp Dijon mustard
- 1 tsp Worcestershire sauce
- 1/2 tsp smoked paprika
- Salt and freshly ground black pepper to taste
- 3 cups cooked pulled beef, warmed and shredded
- 1 cup Panko breadcrumbs
- 2 tbsp melted unsalted butter (for topping)
- Fresh parsley, chopped, for garnish (optional)
Instructions
- Step 1 Preheat oven to 375°F (190°C). Grease a 9x13 inch baking dish.
- Step 2 Cook pasta according to package directions until al dente (1-2 minutes less than recommended). Drain and set aside.
- Step 3 In a large pot or Dutch oven, melt 1/2 cup butter over medium heat. Whisk in the flour and cook for 1-2 minutes, stirring constantly, to create a roux.
- Step 4 Gradually whisk in the milk, a little at a time, ensuring no lumps. Continue to whisk until the sauce thickens and coats the back of a spoon, about 5-7 minutes.
- Step 5 Remove from heat. Stir in the cheddar cheese, Gruyere cheese, Dijon mustard, Worcestershire sauce, and smoked paprika until smooth and melted. Season with salt and pepper to taste.
- Step 6 Add the cooked pasta and warm pulled beef to the cheese sauce. Stir gently until everything is evenly coated.
- Step 7 Pour the mixture into the prepared baking dish. Spread evenly.
- Step 8 In a small bowl, combine Panko breadcrumbs with 2 tbsp melted butter. Sprinkle evenly over the top of the mac and cheese.
- Step 9 Bake for 25-30 minutes, or until bubbly and the topping is golden brown and crispy. If the topping browns too quickly, cover loosely with foil.
- Step 10 Remove from oven and let rest for 10-15 minutes before serving. Garnish with fresh chopped parsley if desired.