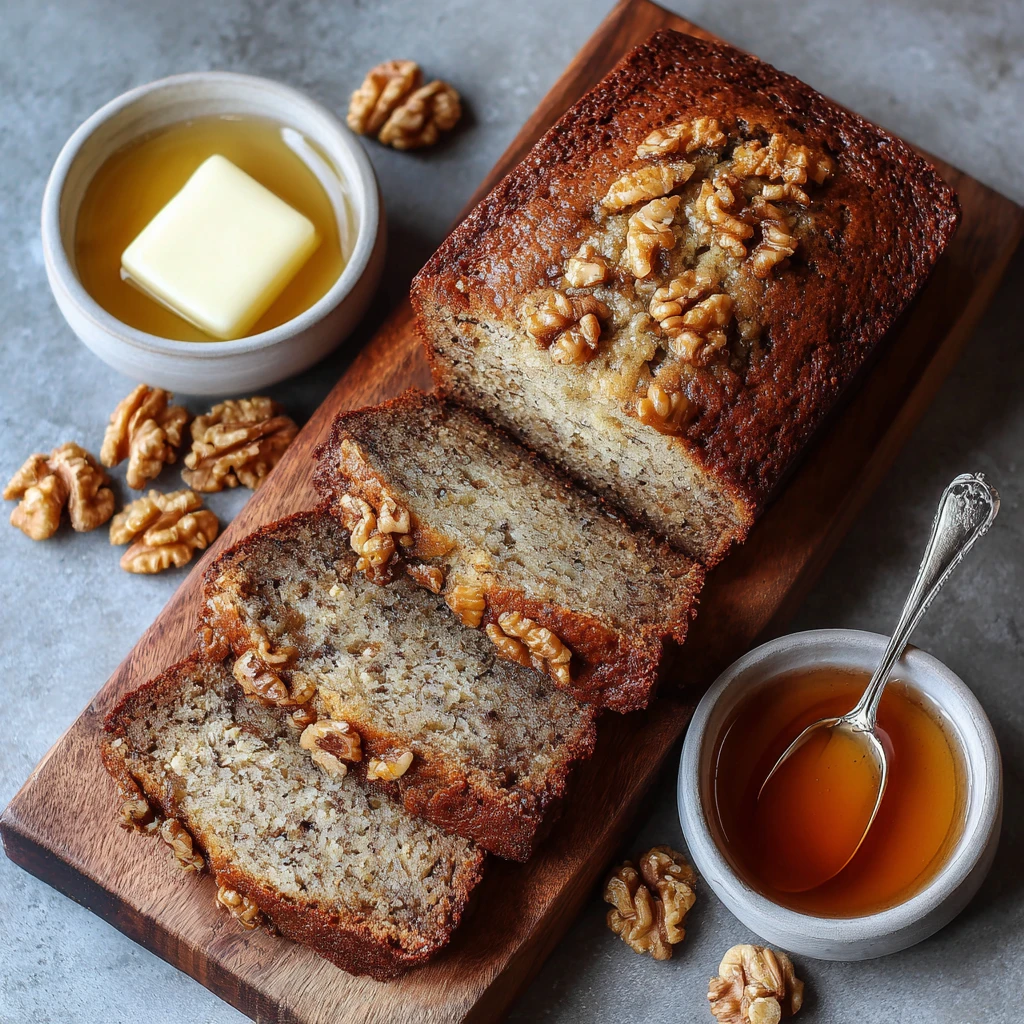
While classic banana bread is a beloved comfort staple, the simple addition of brown butter transforms this quick bread into a gourmet experience. By elevating the butter’s natural milk solids into toasted, nutty particles, beurre noisette lends deep notes of caramel and butterscotch that pair perfectly with the sweetness of overripe bananas and the earthy…
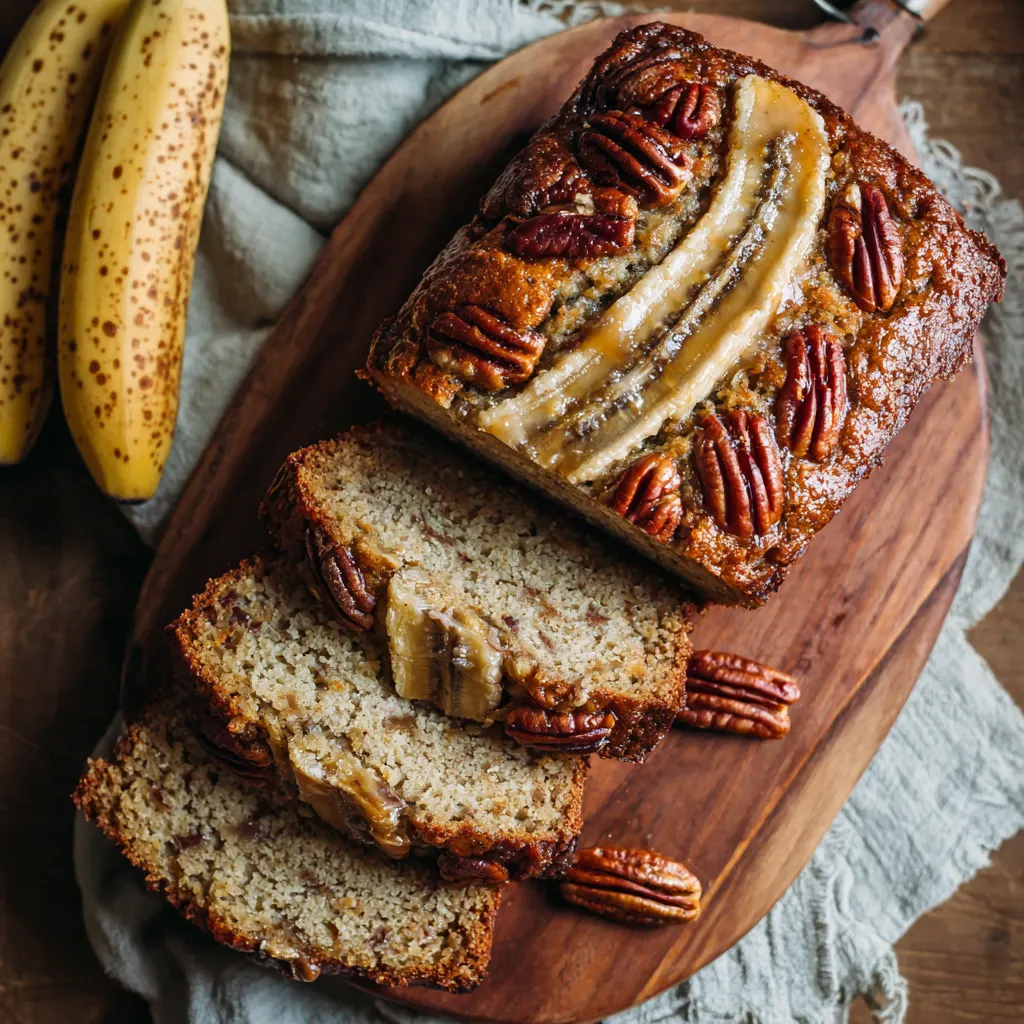
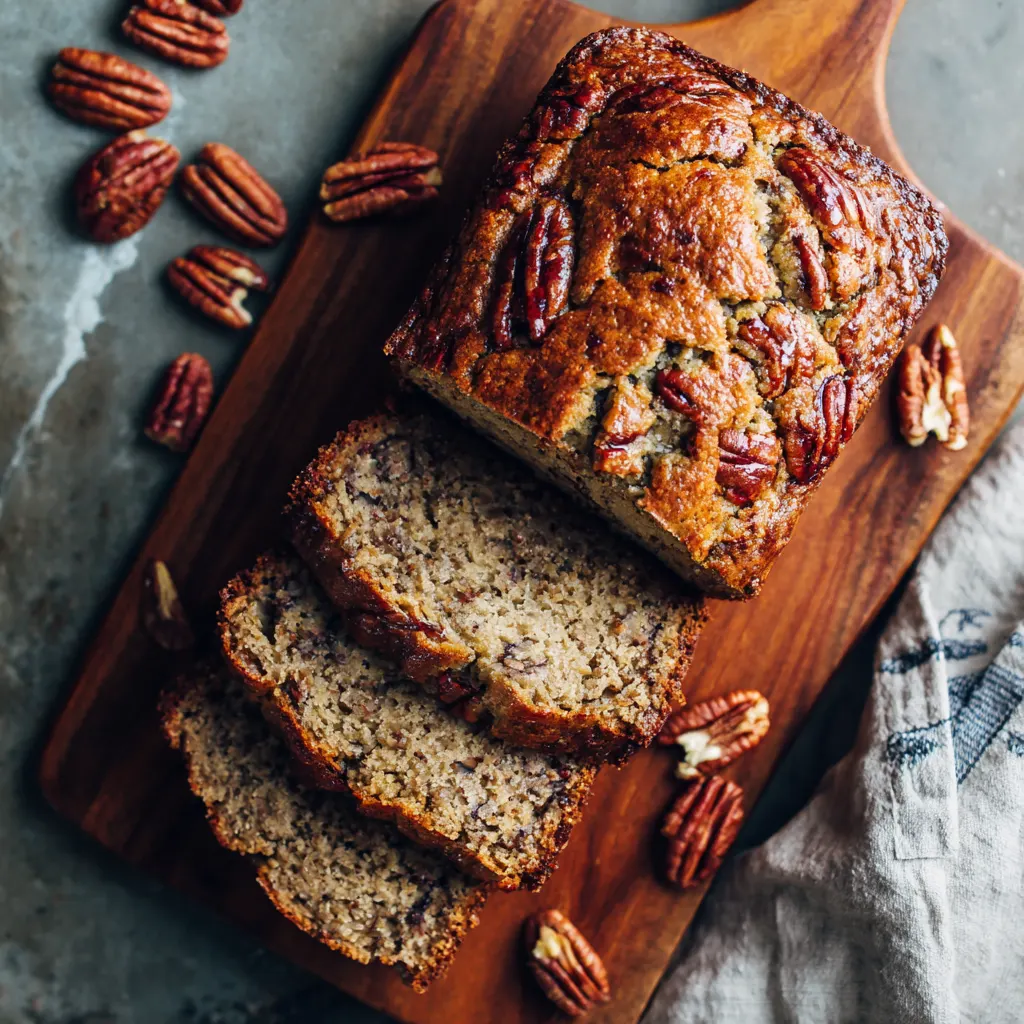
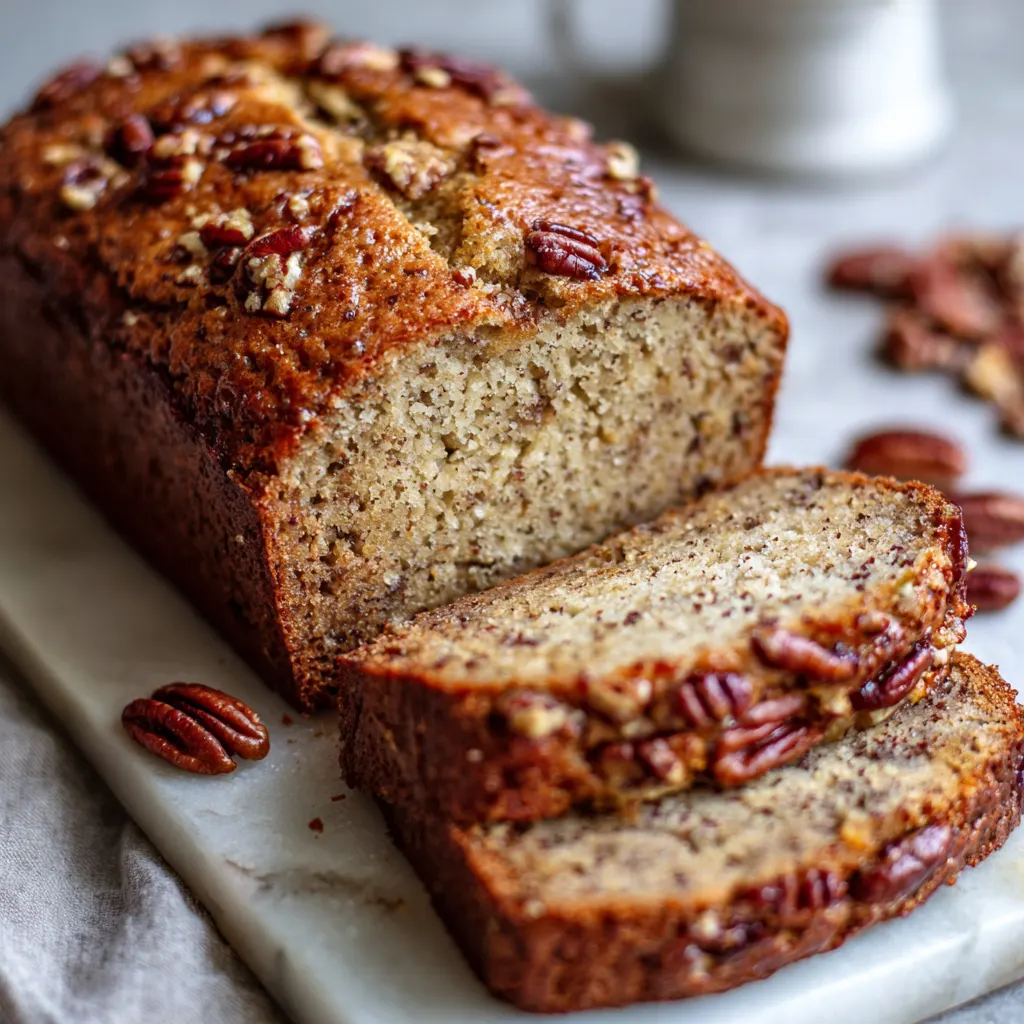
While classic banana bread is a beloved comfort staple, the simple addition of brown butter transforms this quick bread into a gourmet experience. By elevating the butter’s natural milk solids into toasted, nutty particles, beurre noisette lends deep notes of caramel and butterscotch that pair perfectly with the sweetness of overripe bananas and the earthy crunch of toasted pecans. The result is a loaf that is intensely moist, structurally perfect, and rich in complex, layered flavor—a true upgrade worthy of any breakfast, brunch, or dessert spread.
Ingredients
For the Brown Butter Banana Pecan Bread:
-
Dry Ingredients:
-
1 ¾ cups All-Purpose Flour (spooned and leveled)
-
1 tsp Baking Soda
-
½ tsp Kosher Salt
-
1 tsp Ground Cinnamon
-
¼ tsp Ground Nutmeg (optional)
-
-
Wet Ingredients:
-
½ cup (1 stick) Unsalted Butter, for browning
-
½ cup Granulated Sugar
-
½ cup Packed Light Brown Sugar
-
2 Large Eggs, room temperature
-
1 tsp Pure Vanilla Extract
-
1 ½ cups Mashed Overripe Bananas (about 3-4 medium bananas)
-
⅓ cup Plain Greek Yogurt or Sour Cream (room temperature is best)
-
1 cup Pecans, roughly chopped (divided)
-
Instructions
Step 1: Prepare the Brown Butter In a light-bottomed saucepan, melt the butter over medium heat. Continue cooking, stirring occasionally, as the butter melts, then foams. Once the foaming subsides, watch closely for small, golden-brown specks to form on the bottom of the pan, and a rich, nutty aroma (like toasted hazelnuts) will fill the air. Immediately remove the pan from the heat and pour the brown butter, including the toasted solids, into a large mixing bowl to cool slightly (about 10 minutes). Do not let the butter burn.
Step 2: Toast the Pecans (Optional but Recommended) While the brown butter cools, spread the pecans on a small baking sheet and toast in the preheated oven (350°F/175°C) for 5-7 minutes, until fragrant. Reserve ¼ cup for topping and set the rest aside to fold into the batter.
Step 3: Combine Wet Ingredients Preheat the oven to 350°F (175°C). Grease and line a 9×5 inch loaf pan with parchment paper, leaving an overhang on the sides for easy removal. Once the brown butter has cooled slightly (it should still be liquid but not hot), whisk in the granulated sugar and brown sugar until smooth. Add the eggs one at a time, followed by the vanilla extract, mashed bananas, and Greek yogurt (or sour cream). Whisk until the mixture is uniform.
Step 4: Combine Dry and Wet Ingredients In a separate medium bowl, whisk together the flour, baking soda, salt, cinnamon, and nutmeg (if using). Add the dry mixture to the wet mixture. Using a rubber spatula, fold the ingredients together just until the flour streaks disappear. Do not overmix, as this will develop gluten and result in a tough loaf.
Step 5: Add Pecans and Bake Gently fold ¾ cup of the chopped, toasted pecans into the batter. Pour the batter into the prepared loaf pan and sprinkle the remaining ¼ cup of pecans over the top. Bake for 55–75 minutes. The bread is done when a toothpick inserted into the center comes out with only a few moist crumbs attached, but no wet batter. If the top begins to brown too quickly, loosely tent the loaf with aluminum foil for the last 10–15 minutes of baking.
Step 6: Cool and Serve Allow the bread to cool in the pan for 10-15 minutes, which helps it firm up. Use the parchment paper overhang to lift the loaf onto a wire rack to cool completely before slicing.
The Science and Art of Brown Butter (Beurre Noisette)
The difference between a good banana bread and a truly exceptional one lies in the preliminary step of browning the butter, a technique known as beurre noisette by the French, referring to its hazelnut-like color and aroma. This simple transformation is purely chemical, yet it yields a profound depth of flavor that cannot be achieved with plain melted butter.
Butter is approximately 80% fat, 18% water, and 2% milk solids (protein and lactose). When heated, the water evaporates first, causing the familiar foaming. Once the water is gone, the temperature rises rapidly, causing the milk solids to toast through a process called the Maillard reaction. This is the same chemical reaction responsible for the browning and deep savory flavors in seared meats and toasted bread. The milk solids transition from white to golden to a rich, chestnut brown, releasing deep, nutty, and highly aromatic compounds that taste distinctly of caramel and toffee.
Essential Browning Tips:
-
Use Unsalted Butter: Unsalted butter provides greater control over the final salt content in the recipe, and the foaming is less aggressive, making it easier to track the color change.
-
The Right Pan: Always use a light-colored or stainless steel saucepan. Dark pans mask the subtle color changes, making it easy to accidentally burn the solids.
-
Watch Like a Hawk: The transition from perfectly browned to burned happens in mere seconds. Once the foam subsides and the nutty smell emerges, remove the pan from the heat immediately. The residual heat will continue to cook the butter for a few moments.
-
Cooling is Crucial: Brown butter must be cooled slightly before mixing with the sugars and eggs. Adding hot butter to the sugar mixture will melt the sugar excessively, and adding it directly to the eggs can cook them, leading to a scramble-like consistency instead of a smooth batter base.
Achieving Peak Flavor: Bananas, Pecans, and Spices
The signature characteristics of a high-quality banana bread—its deep, sweet flavor and moist crumb—are highly dependent on the quality and preparation of the primary ingredients. Optimization starts long before the mixing bowl.
The Power of Overripe Bananas
The mantra for baking banana bread is: the riper the better. Bananas should be deeply freckled with brown spots, nearing an all-over brown or black exterior. As bananas ripen, their starches convert to sugars, intensifying their sweetness and natural flavor. Furthermore, the pectin in the fruit breaks down, turning the texture soft and mushy, which integrates seamlessly into the batter.
-
Quantity Control: Standard recipes often call for 1.5 cups of mashed banana. This equates to approximately three to four medium, very ripe bananas. Using too few results in a dry loaf; using too many can make the bread dense, gummy, and cause it to sink in the center.
-
Quick Ripening Technique: If you are short on overripe fruit, place yellow, unpeeled bananas on a baking sheet and bake at 300°F (150°C) for 15-30 minutes, until the peels are shiny black. While this caramelizes some sugars, it does not fully replicate the complex flavor of natural ripening, but it is an excellent alternative in a pinch.
Enhancing Pecan Crunch and Flavor
Pecans are the perfect complement to the nutty notes of brown butter. They provide essential texture contrast to the moist, soft crumb. Toasting the pecans amplifies their natural, earthy flavor, preventing them from becoming bland in the baked loaf.
-
Toasting Options: You can toast the pecans separately in the oven for 5-7 minutes, or, for an ultimate flavor boost, toast the chopped pecans directly in the butter while you brown it (as suggested by some expert recipes). If using the latter method, drain the butter immediately after browning to prevent the pecans from burning.
-
Moisture Management: The inclusion of an acidic dairy product, typically Greek yogurt, sour cream, or buttermilk, is key to developing a tender crumb. The acid interacts with the baking soda to provide lift, while the high fat content adds moisture without thinning the batter, ensuring a soft, melt-in-your-mouth texture.
Mastering the Bake: Techniques for a Perfect Crumb
Quick breads are designed to be fast and forgiving, but a few scientific principles govern whether your loaf rises high and remains moist. Proper mixing and baking awareness are critical to avoiding common pitfalls.
The Mixing Method
The most common mistake when making banana bread is overmixing the batter.
-
The Gluten Rule: Flour contains gluten-forming proteins. Excessive mixing develops these proteins, leading to a tough, elastic texture, which is desirable in yeast breads but detrimental to quick breads.
-
The Folding Technique: After combining the wet and dry ingredients, use a gentle folding motion with a rubber spatula, stopping the moment the last streaks of flour disappear. A few small lumps are acceptable—even preferable—as it ensures the gluten remains underdeveloped.
-
Ingredient Temperature: Ensure eggs and dairy (yogurt/sour cream) are at room temperature. This allows them to emulsify properly with the fats and sugars, creating a more uniform batter that bakes evenly and yields a higher, lighter loaf.
Baking Execution and Troubleshooting
The journey of the loaf in the oven requires vigilance, particularly near the end of the baking time.
-
Prepping the Pan: Always grease and line the loaf pan (9×5 inches is standard) with parchment paper. This prevents sticking and ensures a clean, attractive release. Some bakers recommend sprinkling the prepared pan with a tablespoon of granulated or sparkling sugar instead of flour for a slightly caramelized crust.
-
Testing for Doneness: Due to the dense, moist nature of banana bread, the bake time is long (55–75 minutes). Test for doneness by inserting a wooden skewer or toothpick into the center of the loaf. It should emerge with a few moist crumbs clinging to it; a clean pick indicates the loaf is dry, while a batter-coated pick means it needs more time.
-
Preventing Overbrowning: If the top of the loaf reaches a deep golden brown before the center is cooked, create a loose tent using aluminum foil and place it over the bread for the remaining baking time. This reflects heat away from the surface, allowing the center to finish cooking without burning the crust.
Elevating Your Loaf: Glazes, Variations, and Professional Storage
Once you have mastered the essential loaf, consider small modifications and serving suggestions that maximize its flavor profile and extend its life.
Glazes and Flavor Variations
The rich, nutty notes of the brown butter and pecans serve as an ideal foundation for complementary flavors.
-
Brown Butter Glaze: For an extra layer of decadence, reserve 1-2 tablespoons of brown butter before mixing the batter. Combine this cooled brown butter with powdered sugar, a splash of milk, and a small amount of vanilla extract to create a thick, pourable glaze. Drizzle over the fully cooled loaf.
-
Spice Boost: Enhance the warm spice profile by doubling the cinnamon and nutmeg, or adding a pinch of ground cloves or allspice, particularly during colder months.
-
Chocolate Infusion: Fold ½ cup of dark chocolate chips or chopped chocolate chunks into the batter alongside the pecans. The bitterness of the dark chocolate provides a beautiful counterpoint to the bread’s sweetness.
-
Salt Finish: Just after removing the loaf from the oven, sprinkle a light dusting of coarse sea salt flakes (like Maldon) over the top. This simple addition brightens all the flavors and adds a professional touch.
Serving and Storage Guidelines
Proper storage ensures the loaf maintains its moisture and flavor for days.
-
Room Temperature: Store the cooled, uncut loaf in an airtight container at room temperature for up to three days. You may include a paper towel inside the container to help absorb excess moisture.
-
Refrigeration: For longer storage, tightly wrap the loaf in plastic wrap and store it in the refrigerator for up to five days.
-
Freezing: Banana bread freezes exceptionally well. Once the loaf is completely cool, wrap it tightly in plastic wrap, followed by a layer of aluminum foil, or place individual slices in a freezer-safe bag. It can be stored for up to three months. To thaw, simply unwrap and leave it on the counter overnight, or refresh slices in a toaster oven.