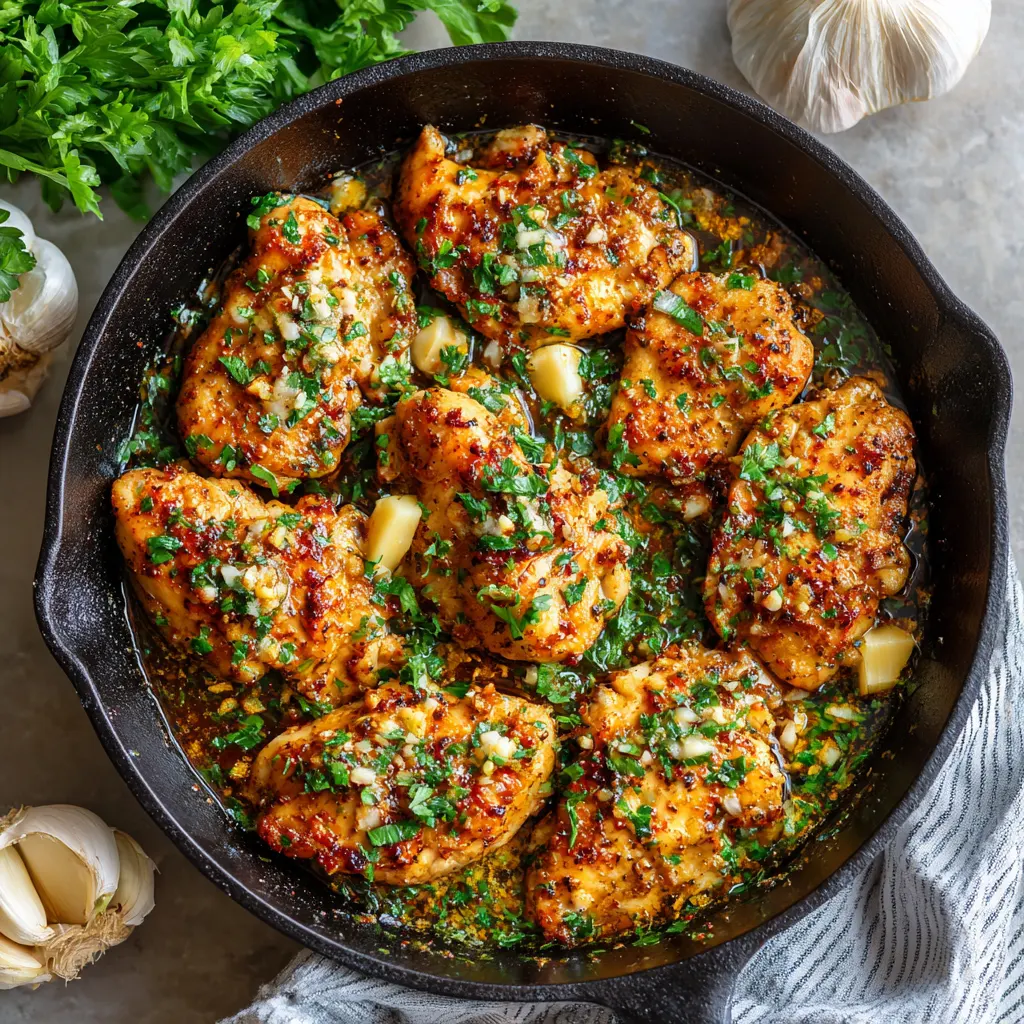
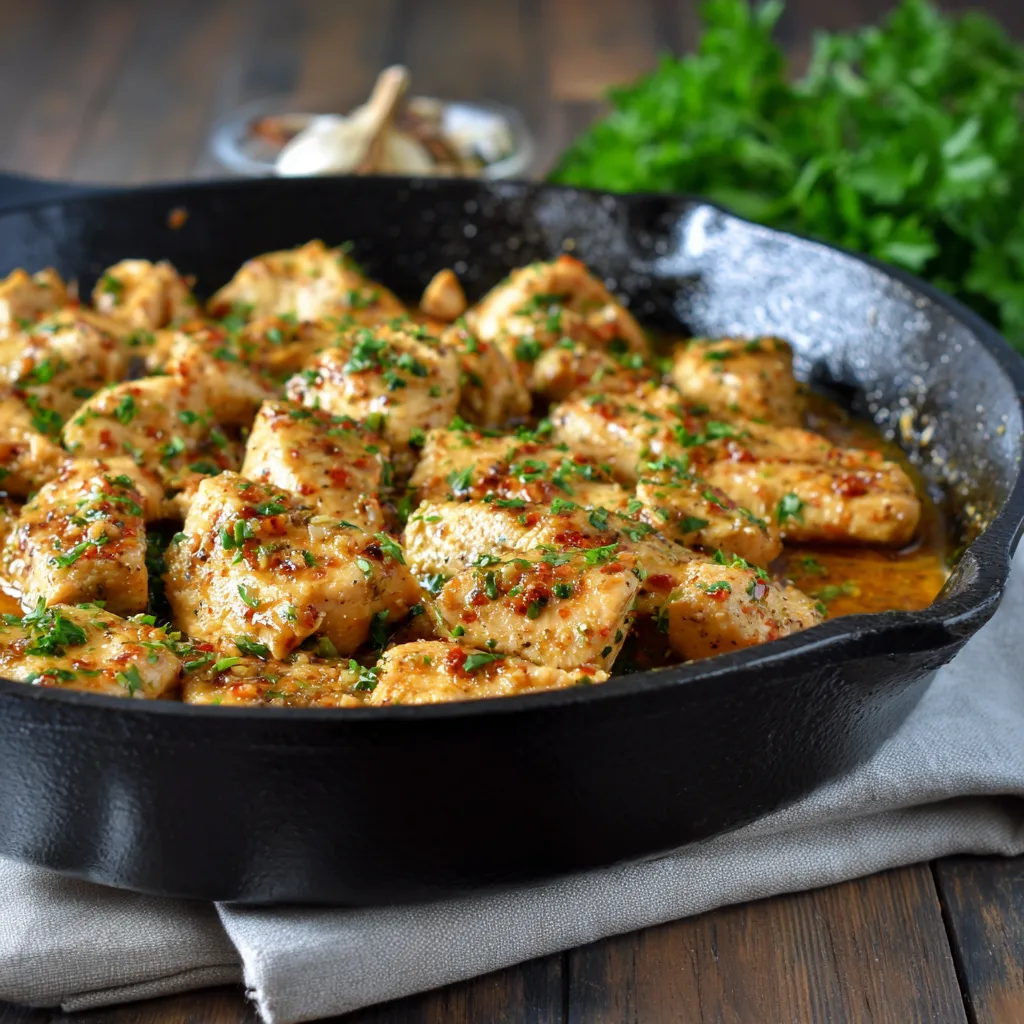
The Garlic Butter Chicken Skillet is the undisputed champion of weeknight meals—a perfect balance of savory, rich, and intensely aromatic flavors, ready in under 30 minutes with minimal cleanup. This dish takes humble chicken and transforms it into tender, restaurant-quality fare, utilizing a technique that ensures maximum juiciness and a luscious, golden-brown crust. The magic…
The Garlic Butter Chicken Skillet is the undisputed champion of weeknight meals—a perfect balance of savory, rich, and intensely aromatic flavors, ready in under 30 minutes with minimal cleanup. This dish takes humble chicken and transforms it into tender, restaurant-quality fare, utilizing a technique that ensures maximum juiciness and a luscious, golden-brown crust. The magic lies in the high-heat sear, which locks in moisture and develops a rich fond on the pan, which then becomes the intensely flavorful base for the simple yet spectacular garlic butter sauce. This comprehensive guide provides the definitive recipe, followed by expert techniques and troubleshooting tips to ensure flawless results every time.
Ingredients
For the Chicken and Seasoning
-
1.5 lbs boneless, skinless chicken breasts or thighs, sliced in half horizontally to create cutlets (or pounded to ¾-inch thickness)
-
1 Tbsp olive oil (or other high smoke point oil like avocado oil)
-
1 tsp kosher salt, divided
-
½ tsp black pepper, divided
-
1 tsp garlic powder
-
1 tsp onion powder
-
½ tsp dried Italian seasoning or dried thyme
For the Garlic Butter Sauce
-
4 Tbsp unsalted butter, divided
-
6 cloves fresh garlic, finely minced (about 2 Tbsp)
-
½ cup low-sodium chicken broth (or dry white wine)
-
1 Tbsp fresh lemon juice (optional, for brightness)
-
2 Tbsp fresh parsley, finely chopped, for garnish
-
¼ tsp red pepper flakes (optional, for heat)
Step-by-Step Instructions
-
Prep and Season the Chicken: Pat the chicken cutlets or thighs completely dry with paper towels—this is crucial for a good sear. In a medium bowl, combine the chicken with the olive oil, ½ teaspoon of the kosher salt, ¼ teaspoon of the black pepper, garlic powder, onion powder, and Italian seasoning. Toss until every piece is evenly coated.
-
Heat the Skillet: Place a large, heavy-bottomed skillet (cast iron or stainless steel is ideal) over medium-high heat. Allow the pan to heat for 2-3 minutes. Add 1 tablespoon of the butter and let it melt until foamy, ensuring the entire bottom of the pan is coated.
-
Sear the Chicken: Place the chicken pieces in the hot skillet in a single layer, ensuring not to crowd the pan. If necessary, work in two batches. Sear the chicken undisturbed for 3-4 minutes per side until deeply golden brown and a crisp crust has formed. The chicken should reach an internal temperature of 165°F (74°C).
-
Rest the Chicken: Once cooked through, transfer the chicken to a clean plate and cover loosely with foil. Allow it to rest while you prepare the sauce; this keeps the chicken juicy.
-
Deglaze the Pan: Reduce the heat to medium-low. Pour the chicken broth (or wine) into the hot skillet. Use a wooden spoon or spatula to scrape up all the browned, caramelized bits (the fond) from the bottom of the pan. Let the liquid bubble and reduce for about 1 minute.
-
Create the Garlic Butter Sauce: Add the remaining 3 tablespoons of butter and the minced fresh garlic to the deglazed pan. Cook for 1 minute, stirring constantly, until the garlic is fragrant. Be careful not to let the garlic brown or burn. Stir in the remaining salt, pepper, red pepper flakes (if using), and lemon juice (if using).
-
Finish and Serve: Return the seared chicken and any accumulated resting juices from the plate to the skillet. Turn the chicken to coat both sides completely in the rich garlic butter sauce. Garnish generously with fresh parsley and serve immediately, spooning the pan sauce over the top of the chicken.
Mastering the Sear: Achieving Juicy Chicken Every Time
The difference between a good garlic butter chicken skillet and a great one lies almost entirely in the searing process. Since chicken breast can easily become dry when overcooked, achieving a high-quality crust quickly, while locking in internal moisture, is paramount.
Chicken Preparation: The Thickness Factor
The biggest obstacle to juicy chicken is uneven cooking. Most standard chicken breasts are much thicker on one end than the other.
-
Pound: Place the chicken breasts between two pieces of plastic wrap and use the flat side of a meat tenderizer or a rolling pin to pound them to an even ¾-inch thickness. This ensures the entire piece finishes cooking at the exact same moment.
-
Cutlets: Alternatively, slice thick breasts horizontally to create two thinner, faster-cooking cutlets. Thinner pieces maximize the surface area for the delicious crust.
Choosing and Heating Your Skillet
A quality skillet is essential for heat retention and developing flavor.
-
Cast Iron Skillets are excellent because they maintain high heat steadily, promoting an even sear and a dark crust.
-
Stainless Steel Skillets are also highly recommended, especially because they make it easy to see the color of the fond developing, which is key for the sauce. Avoid nonstick pans if possible, as they inhibit the formation of the crucial browned bits that flavor the sauce.
-
The Heat Test: Always let the pan and the oil heat up before adding the chicken. The oil should be shimmering (not smoking) just before you add the meat. If the chicken sticks aggressively to the pan, the pan was not hot enough. Once a proper sear is established, the chicken should release easily when flipped.
Avoiding the Crowd
To achieve a sear instead of a steam, it is vital to cook the chicken in a single layer with space between each piece. If the chicken is too crowded, the temperature of the pan will drop dramatically, and the released moisture will steam the chicken, resulting in a pale, rubbery exterior. If necessary, cook in two or even three batches, adding a little extra oil and butter as needed, and resting the finished chicken under foil.
The Secret is in the Sauce: Perfecting the Garlic Butter Glaze
The luscious, savory glaze is what truly defines this skillet meal. While the ingredients are simple, the technique for combining them is crucial for maximizing richness and aroma without burning the delicate aromatics.
The Art of Deglazing
Deglazing is the step that pulls the full flavor of the chicken into the sauce. After removing the chicken, the bottom of the pan will have flavorful browned bits—the fond. Adding a cold liquid, typically chicken broth or a dry white wine (like Pinot Grigio or Sauvignon Blanc), stops the cooking process and allows you to scrape these bits up with a wooden spoon. This concentrate of chicken flavor is the backbone of the sauce. If using wine, allow it to reduce by half to cook off the alcohol and deepen the flavor before adding the butter.
Handling the Garlic
Garlic is the star, but it can turn bitter if scorched.
-
Timing: Always add the minced garlic after the deglazing liquid has reduced and the heat has been lowered. If you add garlic to an excessively hot pan, it will instantly burn.
-
Heat Control: Cook the garlic for just 60 to 90 seconds, stirring constantly, until it is intensely fragrant and just starting to lose its raw edge—it should never turn brown. If it burns, the entire sauce will taste bitter, and you should discard the sauce and start this step over.
-
Double the Flavor: For an optimal garlic punch, consider seasoning the raw chicken with garlic powder and then finishing the sauce with fresh minced garlic. This dual approach provides both a deep, foundational flavor and a bright, aromatic finish.
Finishing the Glaze
Once the garlic is fragrant, add the remaining butter and stir until it melts and emulsifies with the chicken broth and fat in the pan, creating a smooth, cohesive glaze. A squeeze of fresh lemon juice at the end cuts through the richness, balancing the flavor profile and adding a brightness that elevates the entire dish.
Elevating Your Skillet: Variations and Perfect Pairings
The versatility of the Garlic Butter Chicken Skillet allows for endless customization, easily transforming the classic recipe to accommodate different preferences, nutritional needs, or seasonal ingredients.
Delicious Variations
-
Creamy Garlic Butter Chicken: For an indulgent twist, stir in ⅓ to ½ cup of heavy cream (or half-and-half) immediately after the butter and garlic have cooked, before returning the chicken to the pan. Reduce the sauce slightly until it coats the back of a spoon. This yields a velvety, thick sauce perfect for spooning over pasta.
-
Lemon-Herb Skillet: Maximize the brightness by adding the zest of one lemon along with the juice, and incorporate hearty herbs like fresh rosemary or thyme sprigs during the butter melting stage. The herbs will infuse their oils directly into the sauce.
-
One-Pan Chicken and Veggies: This is an excellent vehicle for tender, quick-cooking vegetables.
-
Asparagus or Green Beans: Add trimmed vegetables to the skillet after the chicken has been removed and slightly before deglazing. Cook them until they are crisp-tender, then proceed with the sauce steps, returning the chicken and vegetables together to coat.
-
Spinach: Stir in 4-5 cups of fresh spinach at the very end when the chicken is returned to the pan; cover the skillet for 1-2 minutes until the spinach is wilted.
-
The Perfect Side Dishes
The rich, savory sauce necessitates a side that can soak up the excess glaze.
-
Starches:
-
Garlic Butter Rice: Cooked white or brown rice is the classic pairing.
-
Mashed Potatoes or Cauliflower Mash: Their creamy texture is perfect for absorbing the buttery sauce.
-
Pasta: Tossed with reserved sauce, especially fettuccine or angel hair, makes this meal an instant comfort food favorite.
-
-
Low-Carb and Keto Options:
-
Cauliflower Rice: An ideal low-carb substitute for traditional rice.
-
Zucchini Noodles (Zoodles): Light, fresh, and perfectly coated by the pan sauce.
-
Simple Side Salad: A fresh, crisp green salad dressed with a light vinaigrette provides a necessary contrast to the richness of the chicken.
-
FAQs and Troubleshooting: Your Guide to a Flawless Finish
Even the simplest recipes can present challenges. Addressing common concerns ensures you move beyond just cooking the dish to mastering it, making it a reliable staple in your rotation.
How do I prevent my chicken from drying out?
The number one rule is to use a meat thermometer. Chicken breast is finished when it reaches an internal temperature of 165°F (74°C). The second most important step is to rest the chicken. When you remove the chicken from the pan, the internal juices are reabsorbed into the fibers, keeping the meat moist. If you slice it immediately, all the moisture will run out. Resting also gives you the time needed to build the perfect sauce.
Can I use chicken thighs instead of breasts?
Absolutely. Boneless, skinless chicken thighs are naturally juicier and more forgiving than breasts due to their higher fat content. They also do not require pounding to an even thickness. However, they will need a longer cooking time—typically 5-7 minutes per side—and should be cooked to an internal temperature of 175°F (80°C) to allow the fat to properly render and infuse the meat.
Why did my garlic burn and taste bitter?
This is caused by high heat. Garlic has a low smoke point. If you add it while the pan is still sizzling hot from searing the chicken or reducing the deglazing liquid, it will burn almost instantly. The fix: Always reduce the heat to medium-low or low just before adding the minced garlic, and stir continuously for no more than 90 seconds.
How should I store and reheat leftovers?
Store cooled leftovers in an airtight container in the refrigerator for up to 3-4 days. To reheat, the best method is to slice the chicken and place it in a skillet with the remaining garlic butter sauce. Heat gently over low heat, covered, until warmed through. Microwaving is possible but risks drying out the chicken. Adding a tablespoon of extra chicken broth or water to the pan during reheating will help restore moisture to the sauce.