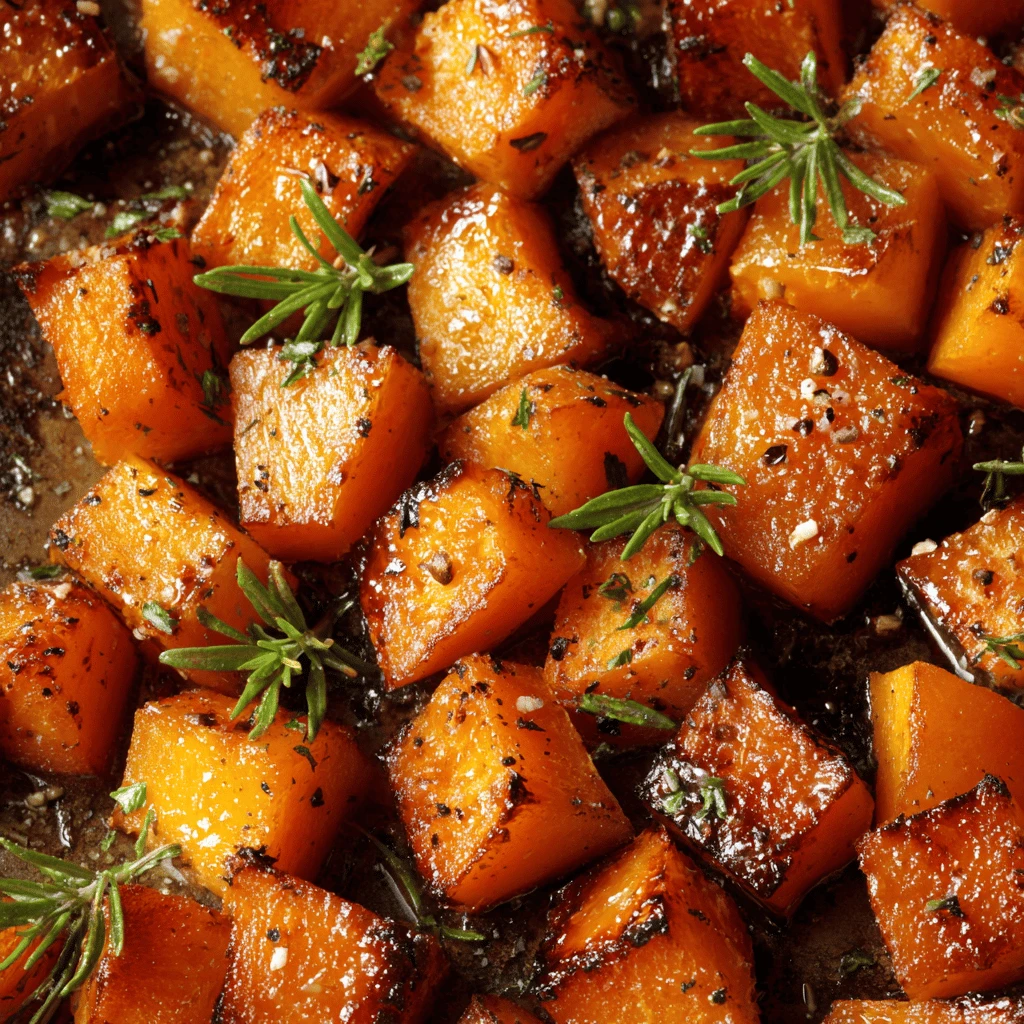
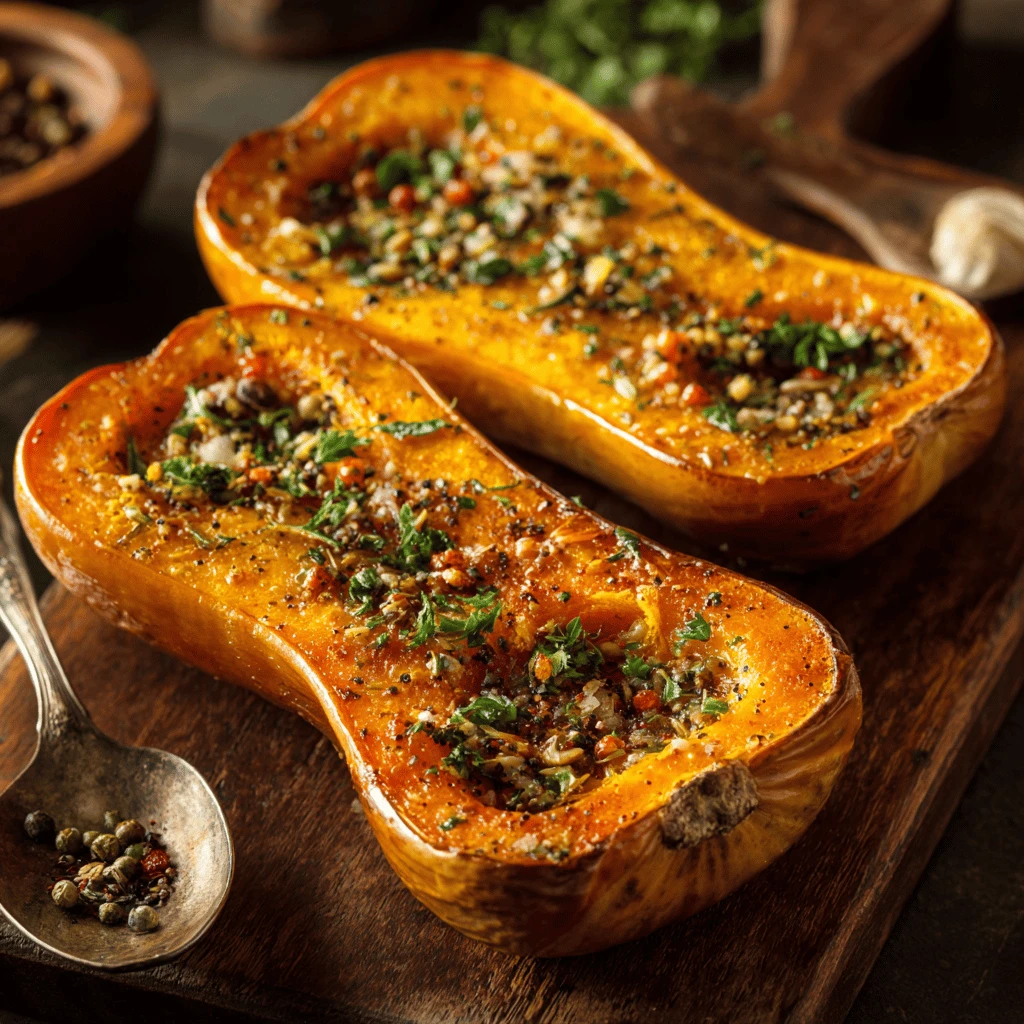
Roasted Butternut Squash: The Perfect Thanksgiving Dish Butternut squash, with its sweet, nutty flavor and vibrant orange hue, is a quintessential autumn ingredient. Roasting it brings out its natural sugars, creating a caramelized, deeply satisfying dish that’s perfect for your Thanksgiving table. This guide will explore how to roast butternut squash flawlessly, offering variations and…
Roasted Butternut Squash: The Perfect Thanksgiving Dish
Butternut squash, with its sweet, nutty flavor and vibrant orange hue, is a quintessential autumn ingredient. Roasting it brings out its natural sugars, creating a caramelized, deeply satisfying dish that’s perfect for your Thanksgiving table. This guide will explore how to roast butternut squash flawlessly, offering variations and tips to create a standout holiday side.
Preparing Your Butternut Squash
The first step towards a perfect roasted butternut squash is proper preparation. This involves selecting a good squash, peeling (or not peeling!), and cubing it correctly.
Selecting the Right Squash
Look for a butternut squash that feels heavy for its size, with a hard, matte skin. Avoid squash with soft spots, bruises, or cracks. A deep beige color indicates ripeness and sweetness. The neck should be firm and solid.
Peeling and Cubing (or Not?)
The biggest hurdle for many is peeling and cutting the squash. Here’s a breakdown:
- Peeling: A sharp vegetable peeler is your best friend. Work from top to bottom, removing all the skin. If the squash is too hard, microwave it for 2-3 minutes to soften it slightly (pierce the skin first!).
- Cutting: Use a sturdy knife to cut the squash in half lengthwise. Scoop out the seeds and stringy pulp with a spoon. Place the flat side down on the cutting board for stability.
- Cubing: Cut each half into 1-inch cubes. Aim for uniform size to ensure even roasting.
Alternatively, you can roast the squash whole or in halves. This method requires a longer cooking time but simplifies the prep work. Just pierce the skin several times with a fork and roast until tender, then scoop out the flesh and mash or cube it. Leaving the skin on when roasting halved squashes is also an option that some cooks prefer. It can easily be peeled off after roasting.
Pre-Roasting Considerations: To Soak or Not to Soak?
Some chefs recommend soaking the cubed squash in cold water for 30 minutes before roasting. The idea is that this hydrates the squash, allowing it to steam slightly during the initial roasting process, resulting in a softer interior and preventing the edges from burning before the center is cooked through. This is a matter of personal preference. Experiment to see if you prefer the results.
Roasting for Flavor Perfection
Roasting brings out the best in butternut squash. The high heat caramelizes the sugars, creating a rich, sweet flavor that’s hard to resist.
Essential Ingredients and Seasonings
Beyond the squash itself, a few key ingredients are crucial:
- Oil: Olive oil is a classic choice, but other neutral oils like avocado or canola oil work well. Use enough to coat the squash evenly.
- Salt and Pepper: Season generously. Salt enhances the squash’s sweetness, while pepper adds a subtle savory note.
- Optional Add-ins: Fresh herbs (sage, rosemary, thyme), spices (cinnamon, nutmeg, ginger), maple syrup, brown sugar, balsamic vinegar, and garlic are all excellent additions.
The Perfect Roasting Temperature and Time
Preheat your oven to 400°F (200°C). This high temperature is ideal for caramelization. Toss the cubed squash with oil, salt, pepper, and any desired seasonings. Spread the squash in a single layer on a baking sheet lined with parchment paper.
Roast for 20-30 minutes, or until the squash is tender and lightly browned. Flip the cubes halfway through for even cooking. The exact roasting time will depend on the size of your cubes and your oven. You should be able to easily pierce a cube with a fork when it is ready.
Tips for Avoiding Soggy Squash
- Don’t overcrowd the baking sheet: Overcrowding steams the squash instead of roasting it. Use multiple baking sheets if necessary.
- Use parchment paper: This prevents sticking and helps with cleanup.
- Roast at a high temperature: High heat promotes caramelization and prevents sogginess.
- Flip halfway through: This ensures even browning.
Flavor Variations for Your Thanksgiving Table
Roasted butternut squash is delicious on its own, but it’s also a blank canvas for creative flavor combinations. Consider these variations for your Thanksgiving feast:
Sweet and Savory Combinations
- Maple-Glazed: Toss the roasted squash with maple syrup and a pinch of cinnamon during the last 5 minutes of roasting.
- Brown Sugar and Pecan: Sprinkle brown sugar and chopped pecans over the squash before roasting.
- Balsamic Glazed: Drizzle balsamic glaze over the roasted squash before serving.
Herb-Infused Delight
- Sage and Garlic: Toss the squash with fresh sage leaves and minced garlic before roasting.
- Rosemary and Thyme: Add sprigs of rosemary and thyme to the baking sheet while roasting.
- Chili and Lime: For a different flavor profile, toss the roasted squash with chili powder and lime juice.
Adding Other Vegetables
- Brussels Sprouts: Roast butternut squash and Brussels sprouts together for a colorful and flavorful side dish.
- Apples: Add diced apples to the squash during the last 15 minutes of roasting for a touch of sweetness.
- Onions: Roasting squash with sliced red onion can provide a great depth of flavor.
Serving and Storing Roasted Butternut Squash
Once your butternut squash is roasted to perfection, it’s time to serve it and enjoy! Here are some tips on how to do so and how to store any leftovers.
Presentation Matters
A beautiful presentation can elevate your Thanksgiving table.
- Garnish: Sprinkle fresh herbs, toasted nuts, or a drizzle of balsamic glaze over the squash before serving.
- Serving Dish: Choose an attractive serving dish that complements the squash’s vibrant color.
- Temperature: Serve the squash warm for the best flavor and texture.
Complementary Dishes for Thanksgiving
Roasted butternut squash pairs well with a variety of Thanksgiving dishes.
- Turkey: The sweetness of the squash complements the savory flavor of turkey.
- Stuffing: Butternut squash adds a touch of sweetness to traditional stuffing recipes.
- Cranberry Sauce: The tartness of cranberry sauce balances the sweetness of the squash.
- Mashed Potatoes: Adding roasted butternut squash to mashed potatoes creates a creamy, flavorful side dish.
Storing and Reheating Leftovers
Leftover roasted butternut squash can be stored in an airtight container in the refrigerator for up to 3-4 days. Reheat it in the oven or microwave. Roasting it again in the oven is best for maintaining the caramelized texture. You can also freeze it for longer storage; the texture might change slightly upon thawing.
Frequently Asked Questions
Here are some common questions about roasting butternut squash:
How do I make butternut squash taste better?
Roasting brings out the natural sweetness, but adding herbs, spices, maple syrup, or balsamic vinegar can enhance the flavor even more.
What temp should butternut squash be cooked at?
400°F (200°C) is ideal for roasting butternut squash.
How do you know when butternut squash is done roasting?
The squash is done when it’s tender and can be easily pierced with a fork. The edges should be lightly browned.
How long does it take to roast a whole butternut squash?
A whole butternut squash typically takes 45-60 minutes to roast at 400°F (200°C).
Is butternut squash healthy?
Yes, butternut squash is packed with nutrients, including vitamins A and C, fiber, and potassium.
What flavors go well with butternut squash?
Maple syrup, cinnamon, nutmeg, sage, rosemary, thyme, balsamic vinegar, garlic, and chili powder all pair well with butternut squash.
Can you eat butternut squash skin?
The skin is edible, especially after roasting, but it can be tough. Most people prefer to peel the squash before roasting. Leaving it on can add nutrients and fiber and can simply be peeled off after cooking!