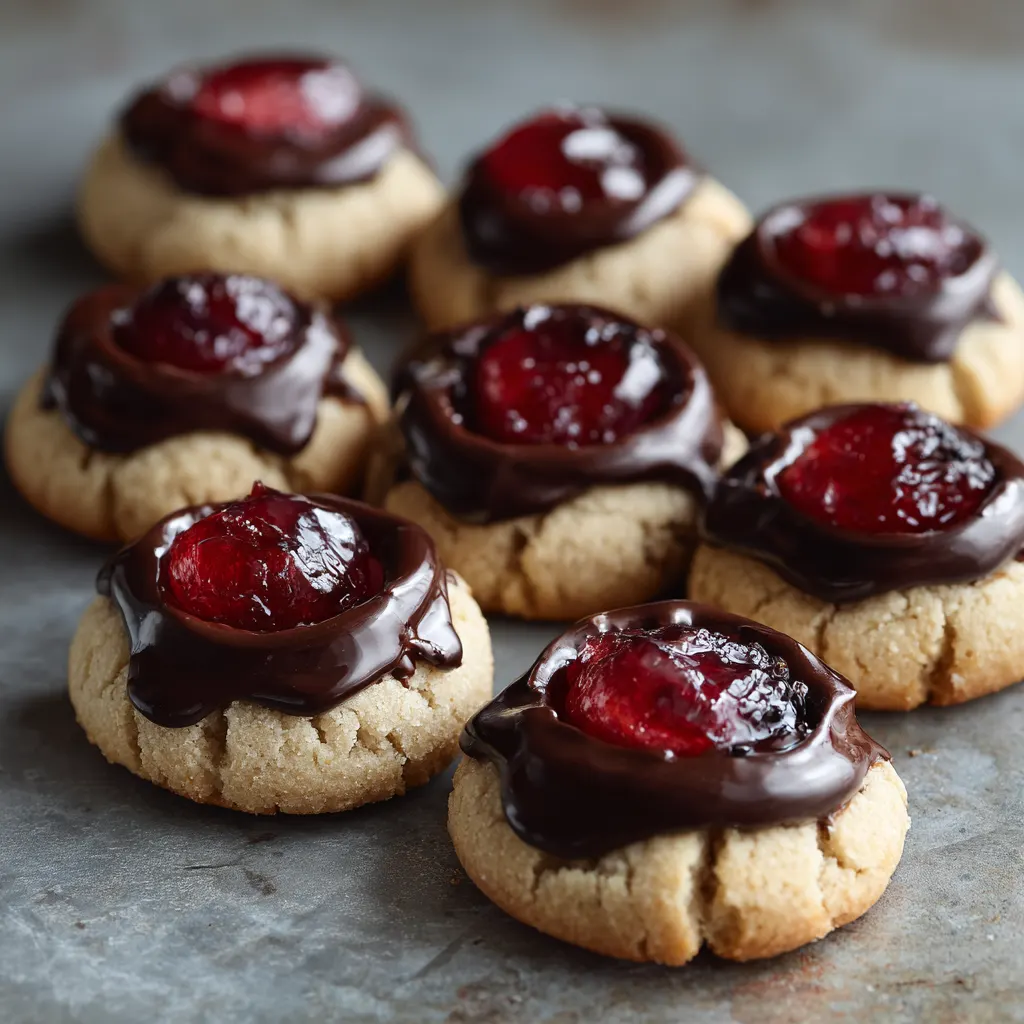
A classic staple of the holiday season, the Chocolate Covered Cherry Thumbprint cookie transforms the beloved cordial candy into a rich, fudgy bite. These cookies feature a tender, brownie-like base, a sweet burst of cherry, and a luxurious chocolate topping—a perfect blend of intense cocoa and bright fruit. Unlike simple jam thumbprints, this recipe requires…
A classic staple of the holiday season, the Chocolate Covered Cherry Thumbprint cookie transforms the beloved cordial candy into a rich, fudgy bite. These cookies feature a tender, brownie-like base, a sweet burst of cherry, and a luxurious chocolate topping—a perfect blend of intense cocoa and bright fruit. Unlike simple jam thumbprints, this recipe requires precision in dough preparation and careful attention to the decadent filling, resulting in a show-stopping treat that is simultaneously festive and timeless. Follow this essential guide to craft a batch of these bakery-quality, chocolate-cherry masterpieces.
Ingredients
For the Chocolate Dough
-
1 ½ cups (180g) all-purpose flour
-
½ cup (45g) unsweetened cocoa powder, preferably Dutch-process
-
½ teaspoon baking soda
-
¼ teaspoon salt
-
½ cup (1 stick or 113g) unsalted butter, softened to room temperature
-
½ cup (100g) granulated sugar
-
⅓ cup (70g) packed light brown sugar
-
1 large egg, room temperature
-
1 teaspoon pure vanilla extract
-
Optional: ½ teaspoon almond extract
For the Filling and Topping
-
1 jar (about 10 oz) maraschino cherries, drained, stems removed, and patted very dry
-
1 cup (6 oz) semi-sweet chocolate chips or chopped baking chocolate
-
½ cup (120ml) sweetened condensed milk
-
2 teaspoons reserved maraschino cherry juice (or more, for thinning)
Instructions
Part I: Preparing the Cookie Dough
-
Combine Dry Ingredients: In a medium bowl, whisk together the flour, cocoa powder, baking soda, and salt. Set aside.
-
Cream Butter and Sugars: In a large mixing bowl or the bowl of a stand mixer fitted with the paddle attachment, beat the softened butter, granulated sugar, and brown sugar on medium speed until light and fluffy (about 2–3 minutes). Scrape down the sides of the bowl as needed.
-
Add Wet Ingredients: Beat in the egg, vanilla extract, and optional almond extract until just combined.
-
Incorporate Dry Ingredients: Gradually add the dry ingredients to the wet mixture, mixing on low speed until the dough just comes together. Do not overmix. The dough will be soft and fudgy, resembling firm Play-Doh.
-
Chill (Optional but Recommended): Wrap the dough tightly in plastic wrap and chill for 30 minutes to 1 hour. Chilling helps the dough hold its shape and prevents excessive spreading.
Part II: Shaping and Baking
-
Preheat and Prep: Preheat your oven to 350°F (175°C). Line two baking sheets with parchment paper.
-
Roll and Shape: Scoop the dough into 1-inch balls (using a small cookie scoop helps ensure uniform size). Roll each portion between your palms until smooth.
-
Create the Thumbprint: Place the balls 2 inches apart on the prepared baking sheets. Using your thumb, the back of a rounded teaspoon, or a cork, gently press a deep indentation into the center of each cookie. If the edges crack, gently smooth them back together.
-
Bake: Bake for 10–12 minutes. The cookies will look soft when removed, but the edges should be set.
-
Reinforce Indents: Immediately after removing the cookies from the oven, use the same tool (thumb, spoon, etc.) to gently reinforce the indentation, as the cookies may puff up slightly during baking.
-
Cool: Let the cookies cool on the baking sheet for 2 minutes before carefully transferring them to a wire rack to cool completely.
Part III: Filling and Finishing
-
Make the Fudge Filling: In a small saucepan or microwave-safe bowl, combine the chocolate chips and sweetened condensed milk. Heat over low heat or in 20-second microwave intervals, stirring until the chocolate is completely melted and the mixture is smooth and glossy.
-
Add Cherry Flavor: Stir in the reserved maraschino cherry juice. If the filling seems too thick to easily spoon, add another teaspoon of cherry juice or a half-teaspoon of milk until it reaches a spreadable, fudgy consistency.
-
Assemble: Spoon about 1 teaspoon of the chocolate fudge mixture into the indentation of each cooled cookie, filling it nearly to the top.
-
Top with Cherry: Gently press one drained, patted-dry maraschino cherry into the center of the fudge filling.
-
Set: Allow the cookies to sit at room temperature for at least 30 minutes, or until the chocolate filling has fully set before serving or storing.
Decoding the Perfect Thumbprint Dough
The success of a great thumbprint cookie lies in its structural integrity. The dough must be firm enough to hold its shape through the rolling and baking process, yet tender enough to melt in your mouth.
The Science of the Crack-Free Cookie
Cracks around the edges are the most common pitfall when making thumbprints. This occurs when a cold, stiff dough is shaped and then bakes too quickly, causing the outside to set before the inside relaxes.
-
The Sugar Solution: Using a blend of granulated and brown sugar, as suggested in the recipe, is crucial. Granulated sugar promotes spread and crispness, while brown sugar adds moisture and acidity, leading to a softer, chewier final texture reminiscent of a rich brownie.
-
The Temperature Factor: Ensure your butter is truly softened, not melted or greasy. Creaming softened butter with sugar incorporates air, leading to a lighter, more tender crumb.
-
The Chilling Imperative: While some recipes skip it, chilling the dough for 30–60 minutes is the simplest way to prevent excessive spreading and cracking. Cold fat ensures the cookie holds its round form. However, if the dough becomes rock hard after chilling, let it sit at room temperature for 5-10 minutes before rolling; trying to roll a rock-solid dough will guarantee cracks.
-
Shaping Technique: When pressing the indentation, twist your thumb or the spoon slightly as you press down. This movement smooths the edges of the depression, minimizing the stress on the surrounding cookie dough and preventing cracks from forming.
Introducing Texture: The Oat Variation
For those seeking a slightly heartier, more rustic cookie, incorporating oats offers a delightful textural contrast. Replace a quarter cup of the all-purpose flour with quick-cooking oats. The oats absorb moisture and create a chewier texture that complements the rich chocolate base, adding a unique depth often found in classic holiday cookie assortments.
Mastering the Chocolate and Cherry Center
The chocolate and cherry combination is where this cookie truly shines. The topping options are versatile, but each provides a distinct texture and flavor profile.
The Three Pillars of Topping
The recipe above utilizes the Fudge Icing method, which is ideal for a thick, luxurious mouthfeel, mimicking the creamy center of a traditional cordial.
-
The Fudge Icing (Sweetened Condensed Milk Base): This method results in a stable, glossy, and intensely sweet filling that sets up beautifully without becoming brittle. The condensed milk acts as a binder, and the addition of cherry juice ensures the filling holds that essential fruity note. Use high-quality semi-sweet chocolate for the best melting consistency.
-
The Ganache (Heavy Cream Base): For a more sophisticated and less-sweet filling, use a simple 2:1 ratio of chocolate to heavy cream (e.g., 4 oz chocolate to 2 oz cream). Heat the cream until barely simmering, pour it over the chopped chocolate, let it stand for 5 minutes, then whisk until smooth. Ganache provides a deeper, darker chocolate flavor and a smooth, velvety texture.
-
The Glaze (Juice Base): A glaze is a lighter alternative, often used when the cookie already includes a cherry (like the recipes where the cherry is baked inside). This involves mixing cocoa powder or melted chocolate with reserved cherry juice, powdered sugar, and a small amount of water or milk until it reaches a thin, drizzling consistency. This method works well for a delicate finish but does not offer the same decadent filling as fudge or ganache.
Cherry Selection and Preparation
The type of cherry you select impacts both the flavor and stability of the cookie:
-
Maraschino Cherries: The standard choice, known for their bright red color and distinct almond-like flavor. Crucial Tip: They must be patted bone-dry. Any excess moisture will leach into the cookie or the filling, leading to a soggy spot.
-
Glace or Dried Cherries: Glace cherries offer a slightly denser, candied texture, while dried cherries (rehydrated in warm brandy or cherry liqueur) offer a more intense, less artificial flavor. If using dried cherries, they should be finely chopped before being placed in the cookie.
-
The Cherry-First vs. Filling-First Debate: The standard thumbprint method involves placing the cherry after baking, pressed into the cooled chocolate filling. However, some traditional recipes place the cherry directly into the indentation before baking. If you choose to bake the cherry, note that the heat will cause some cherry juice to seep into the surrounding dough, resulting in a slightly softer center. This is a matter of preference, but the filling-first method ensures a more distinct line between the cookie and its topping.
Creative Flavor Swaps and Professional Finishes
Elevating the Chocolate Covered Cherry Thumbprint from a simple cookie to a professional-grade dessert is easy with a few mindful substitutions and finishing touches.
Amping Up the Flavor Profile
-
The Almond Accent: A combination of vanilla and almond extract (1 teaspoon vanilla, ½ teaspoon almond) in the dough is a classic pairing for cherry flavors. Almond extract heightens the complex aroma that is naturally present in cherry pits and cordials.
-
The Coffee Boost: Adding 1 teaspoon of espresso powder to the cocoa powder and flour mixture intensifies the chocolate notes without adding a coffee flavor. It provides a deep, dark richness, making the cookie taste more “brownie-like.”
-
A Splash of Liquor: For an adult twist, substitute the vanilla extract in the dough with cherry liqueur (like Kirsch or Maraschino Liqueur) or a fine brandy. Alternatively, substitute the reserved cherry juice in the fudge filling with a tablespoon of liquor for a deeper, warmer flavor.
Achieving a Bakery-Quality Finish
-
The Sugar Roll: For a rustic, sparkling finish, lightly roll the dough balls in granulated or coarse sanding sugar before baking. This adds a beautiful crunch and prevents the dough from sticking to your thumb during indentation.
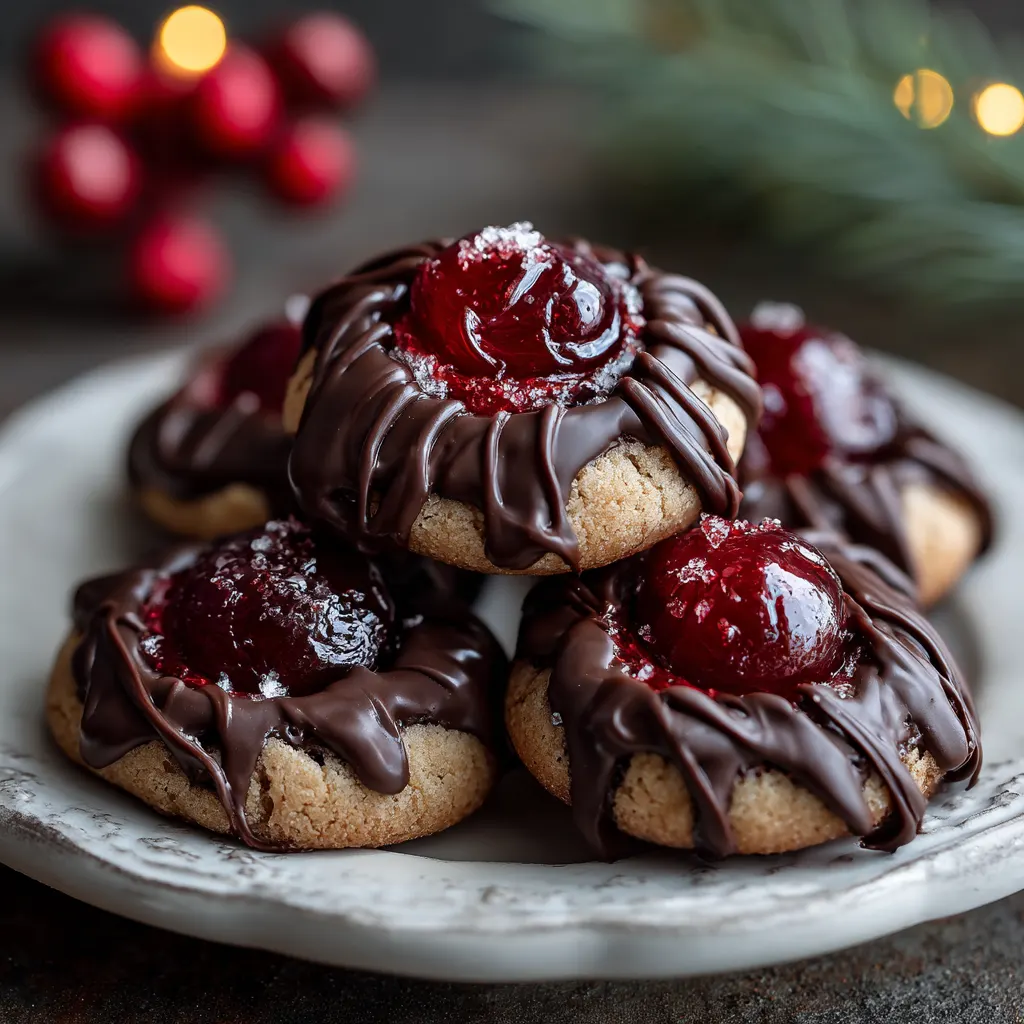
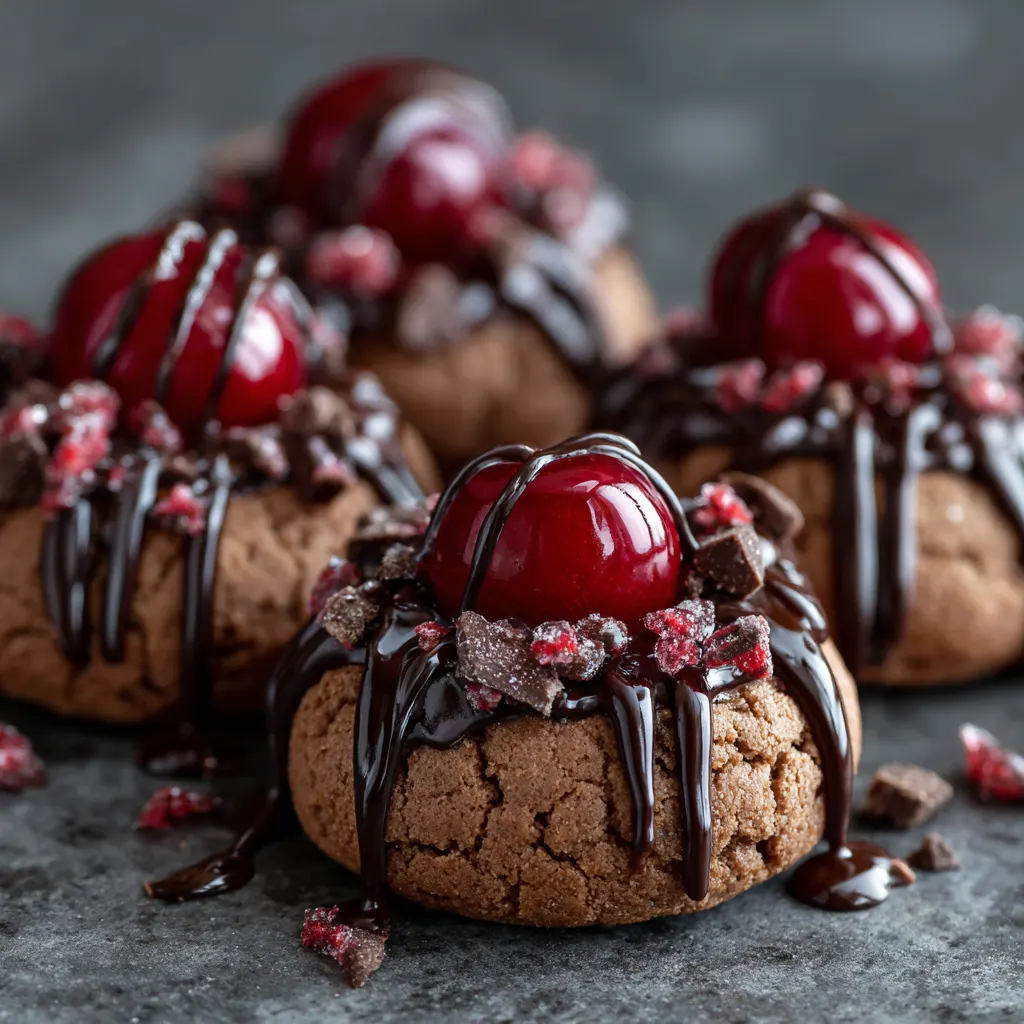
-
Drizzling for Detail: If you are using a ganache or fudge filling, consider saving a small portion of melted chocolate or preparing a separate thin drizzle. Use a piping bag with a tiny tip, or a fork, to zigzag melted dark chocolate across the finished cookies. This adds visual interest and a professional touch.
-
Nutty Coatings: Before baking, dip the shaped dough balls in a whisked egg white, then roll them in finely chopped walnuts, pecans, or almonds. The nuts provide an extra layer of texture and prevent cracking while baking, while the egg white acts as a glue for the coating.
Baking, Storage, and Serving Wisdom
Proper baking and storage are key to maximizing the flavor and shelf life of your Chocolate Covered Cherry Thumbprints, especially since they contain moist fillings and cherries.
Baking for Ideal Doneness
The most critical mistake is over-baking. Over-baked chocolate cookies become dry, crumbly, and lose their rich, fudgy interior.
-
Don’t Wait for Brown: Unlike sugar cookies, chocolate cookies do not turn golden brown when done. Look for the edges to appear set and slightly firm, while the center still looks slightly soft or puffed.
-
The Toothpick Test is Out: Inserting a toothpick won’t work perfectly here. Instead, judge by the appearance and a gentle touch. If the cookie holds its shape when nudged gently, it is ready to be removed.
-
Adjusting for Puffs: If the indentation closes up significantly during baking, don’t worry. As detailed in the main instructions, use the back of a measuring spoon to gently press the indentation back into shape immediately after the tray comes out of the oven, while the cookies are still hot and pliable.
Storage and Shelf Life
Because the filling often contains dairy (in the form of condensed milk or heavy cream) and the cherry introduces moisture, these cookies require special storage.
-
Short-Term (Room Temperature): If the cookies are to be consumed within 1-2 days, they can be stored in an airtight container at cool room temperature.
-
Long-Term (Refrigerated): For longer freshness (up to 1 week), store the cookies in a sealed container in the refrigerator. Allow them to come back to room temperature for 15 minutes before serving for the best texture and flavor.
-
Freezing Dough: The cookie dough freezes exceptionally well. Roll the dough into balls, place them on a baking sheet to freeze until solid, and then transfer them to a freezer-safe bag for up to three months. Thaw overnight in the refrigerator before rolling, shaping, and baking.
Serving Suggestions and Pairings
The deep, dark flavors of the chocolate and cherry pair beautifully with beverages and other confections. Serve these cookies alongside:
-
Drinks: A dry red wine like a Cabernet Sauvignon, a strong French-press coffee, or a creamy cup of hot cocoa with a splash of orange zest.
-
Contrasting Flavors: Pair them on a cookie platter with contrasting flavors like crisp shortbread or bright, citrus-based cookies to cleanse the palate between rich bites.
-
Dessert Applications: Place a cooled cookie in the bottom of a martini glass and top it with a scoop of vanilla bean ice cream for an impromptu, decadent dessert sundae.