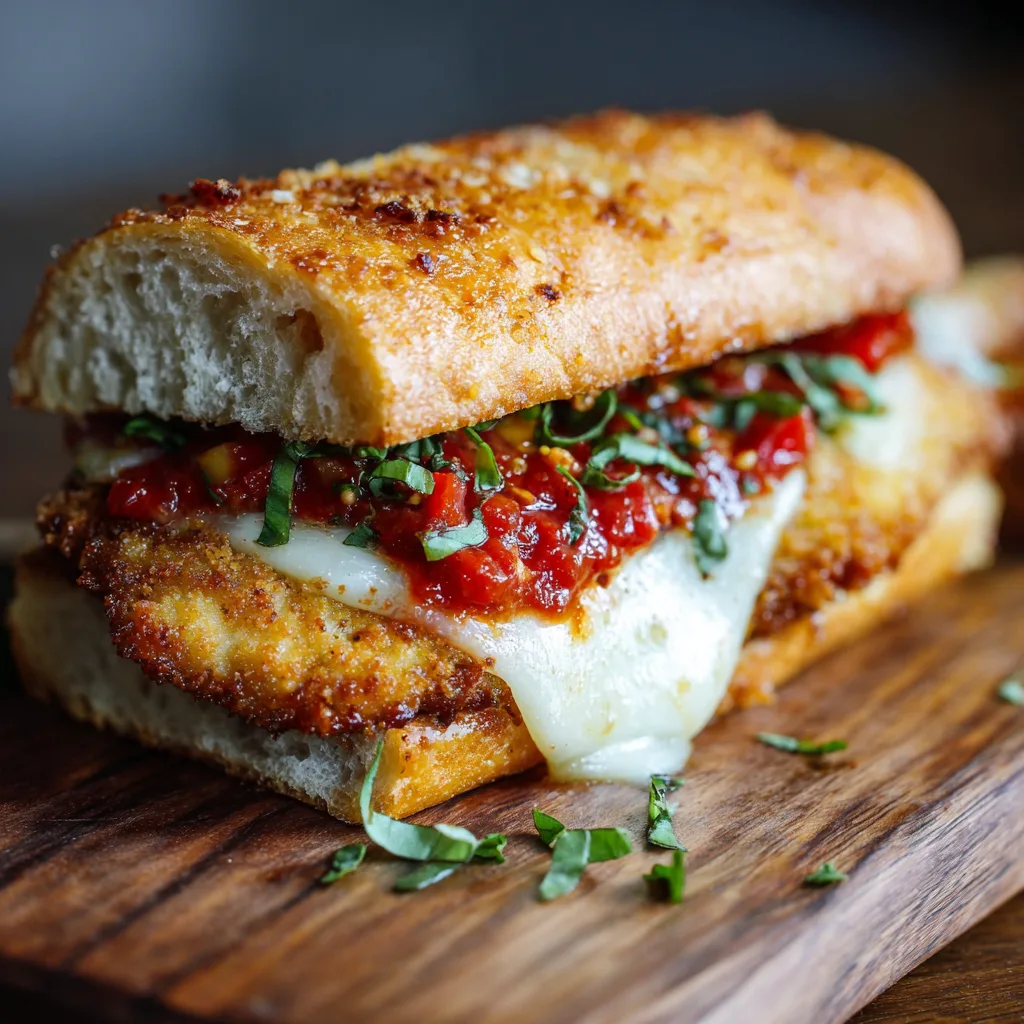
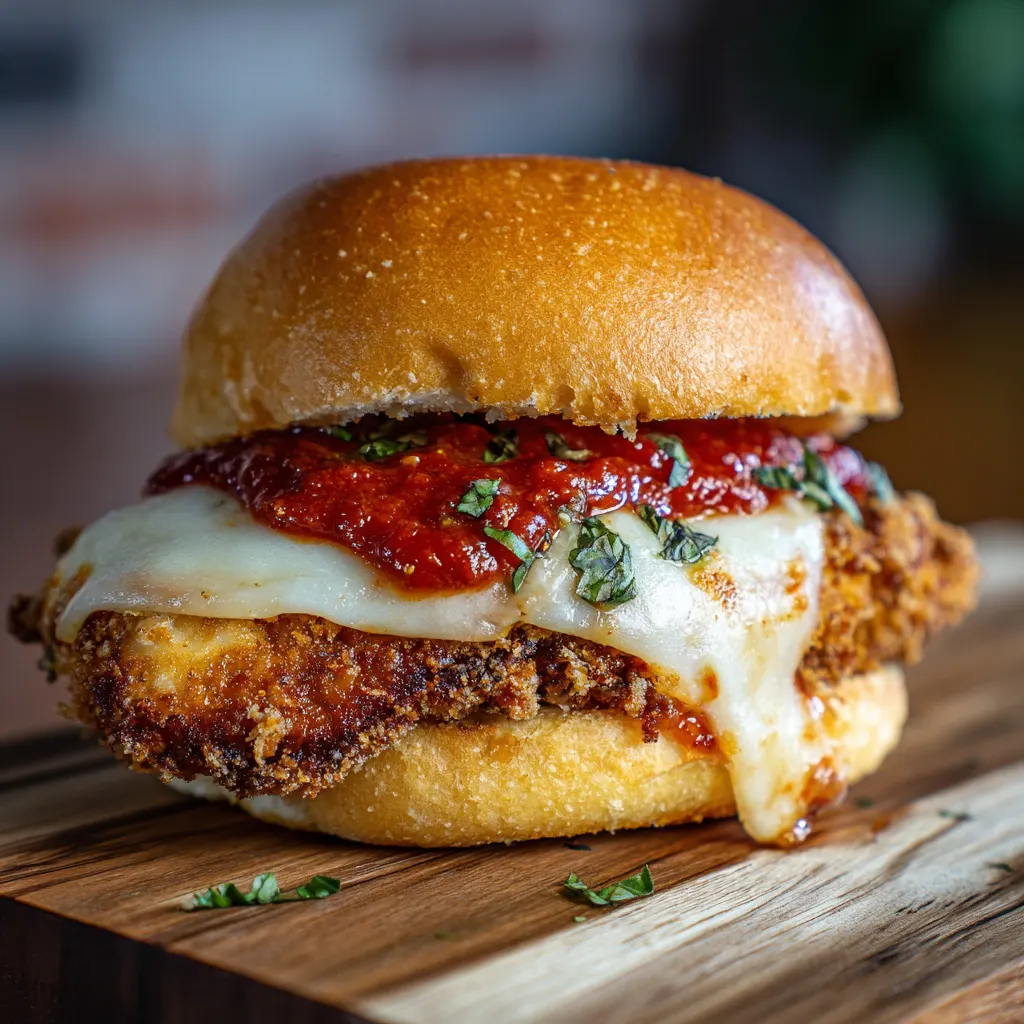
The Chicken Parmesan Sandwich, or “Chicken Parm Hero,” stands as a monumental pillar of Italian-American cuisine, transforming a classic pasta dish into a portable, handheld masterpiece. At its heart, this sandwich is a study in contrasts: the crunch of the perfectly fried chicken, the molten pull of fresh mozzarella, and the bright, tangy embrace of…
The Chicken Parmesan Sandwich, or “Chicken Parm Hero,” stands as a monumental pillar of Italian-American cuisine, transforming a classic pasta dish into a portable, handheld masterpiece. At its heart, this sandwich is a study in contrasts: the crunch of the perfectly fried chicken, the molten pull of fresh mozzarella, and the bright, tangy embrace of marinara sauce, all encased in a sturdy, toasted roll. Achieving true excellence, however, depends entirely on the word “crispy.” A soggy chicken cutlet transforms this culinary hero into a zero. By focusing on expert preparation techniques for the chicken, optimizing the components, and mastering the final assembly, you can create a sandwich that rivals the best Italian delis and holds its crunch right down to the last bite.
Ingredients
(Yields 4 Sandwiches)
For the Crispy Chicken Cutlets:
-
2 large boneless, skinless chicken breasts (or 4 pre-sliced cutlets)
-
1 cup all-purpose flour
-
1 teaspoon Kosher salt (plus more for seasoning)
-
1/2 teaspoon black pepper
-
1 teaspoon garlic powder
-
2 large eggs, whisked
-
1 1/2 cups Panko breadcrumbs (preferred for maximum crispiness)
-
1/2 cup finely grated fresh Parmesan cheese
-
1 teaspoon dried Italian seasoning
-
Vegetable or canola oil, for frying (about 1 inch deep)
For the Marinara & Assembly:
-
2 cups high-quality marinara sauce (or homemade)
-
8 ounces fresh mozzarella cheese, sliced or torn (preferred for melting)
-
1/4 cup finely grated Parmesan cheese, for topping
-
4 sturdy sub rolls, hoagie rolls, or ciabatta rolls
-
2 tablespoons olive oil or garlic butter (for toasting rolls)
-
1/4 cup fresh basil leaves, roughly chopped (for garnish)
Step-by-Step Instructions
1. Prepare the Chicken Cutlets: If starting with full chicken breasts, slice them in half horizontally to create four thin cutlets. Place each cutlet between two sheets of plastic wrap and pound gently with a mallet or rolling pin until they are about 1/4 inch thick and even. Season both sides lightly with salt and pepper.
2. Set Up the Breading Station: Arrange three shallow dishes in an assembly line:
-
Dish 1 (Flour): Combine flour, 1 teaspoon salt, black pepper, and garlic powder.
-
Dish 2 (Egg): Pour in the whisked eggs.
-
Dish 3 (Breadcrumbs): Combine Panko breadcrumbs, Parmesan cheese, and Italian seasoning.
3. Dredge the Chicken: Working one cutlet at a time, follow the standard dredge method:
-
Dip the chicken in the flour mixture, coating completely and shaking off any excess.
-
Dip the floured chicken in the egg wash, ensuring it is fully moistened.
-
Finally, press the chicken firmly into the breadcrumb mixture on both sides, ensuring the Panko adheres completely. Place the breaded cutlets on a wire rack set over a baking sheet and refrigerate for 15-30 minutes; this helps the coating set and stick during frying.
4. Cook the Chicken: Heat about 1 inch of cooking oil in a large, heavy-bottomed skillet (cast iron is ideal) over medium-high heat until it reaches 350°F. Working in batches, carefully place the cutlets into the hot oil, ensuring the pan is not crowded. Fry for 3–4 minutes per side, or until deeply golden brown and the internal temperature reaches 165°F. Remove the cutlets and place them back on the clean wire rack.
5. Prep and Toast the Rolls: While the chicken cooks, preheat your broiler. Slice the rolls lengthwise, almost all the way through, and brush the cut sides with olive oil or garlic butter. Place the rolls cut-side up on the baking sheet and broil for 1–2 minutes, or until lightly golden and crisp. Watch carefully to prevent burning. Remove and set aside.
6. Build and Broil the Parm: Heat the marinara sauce in a small saucepan. Ladle about 1/4 cup of the heated sauce onto each cooked cutlet (which is still on the wire rack). Top each sauced cutlet with 2-3 slices of fresh mozzarella and a light sprinkle of grated Parmesan. Return the baking sheet with the chicken (and its wire rack) to the broiler for 2–3 minutes, until the cheese is completely melted, bubbly, and starting to brown slightly.
7. Assemble and Serve: Spoon a small amount of marinara onto the bottom half of the toasted roll. Carefully transfer one cheesy, saucy chicken cutlet onto the roll. Garnish generously with fresh basil leaves. Close the sandwich and serve immediately alongside any remaining warm marinara for dipping.
Mastering the Crisp: The Art of the Perfect Cutlet
The “crispy” in a Crispy Chicken Parmesan Sandwich is non-negotiable, and it is entirely dependent on the preparation of the chicken cutlet. Achieving a coating that withstands both hot oil and wet sauce requires precision in three critical areas: thinning the meat, selecting the right breading, and controlling the cooking temperature.
First, the thickness of the chicken is key to a crisp crust. Large chicken breasts must be sliced horizontally into thin cutlets and then gently pounded to a uniform thickness of about 1/4 inch. This ensures the chicken cooks through quickly and evenly at the same rate that the breading achieves its golden-brown crispness. A thick cutlet requires a longer cook time, which leads to a dark, hard, or even burnt crust before the center reaches 165°F.
Second, Panko breadcrumbs are essential. Traditional Italian breadcrumbs produce a finer, softer coating, but Panko, the Japanese style of light, flaky breading, absorbs less oil and fries up with a superior, airy, jagged texture. For maximum flavor, the Panko should be aggressively seasoned with salt, Italian herbs, and, crucially, freshly grated Parmesan cheese.
Third, optimizing the dredge and rest. While the standard flour-egg-crumb process works, many top results suggest techniques for reinforcing the coating. One professional tip is to let the breaded cutlets rest on a wire rack in the refrigerator for at least 15 minutes before frying. This chilling period allows the egg proteins to solidify and the flour-crumb mixture to bond firmly to the chicken, significantly reducing the chance of the coating falling off when it hits the hot oil. For an even more intense crunch, try the double-dip method: flour, egg, panko, then back into the egg, and finally into a fresh bowl of panko.
Finally, temperature management is paramount when frying. The oil should be maintained around 350°F (175°C). Oil that is too cool will saturate the breading, resulting in a greasy, soft cutlet. Oil that is too hot will burn the crust before the chicken is cooked. Shallow frying in a sturdy pan, like cast iron, offers better temperature stability and heat retention than lighter alternatives.
The Foundation of Flavor: Sauce, Cheese, and Bread Selection
While the cutlet provides the texture, the quality of the accompanying components delivers the classic Italian-American flavor profile. Attention to detail in the sauce, cheese, and bread can elevate the sandwich from good to unforgettable.
The Marinara Sauce: A great chicken parm sandwich relies on a bright, robust marinara that cuts through the richness of the fried chicken and cheese. While time-permitting, a slow-simmered homemade sauce offers superior depth, using a high-quality jarred option is perfectly acceptable. Key flavor notes often seen in optimized recipes include San Marzano style tomatoes, a touch of basil, and a subtle sweetness balanced by garlic and oregano. Importantly, the sauce should be heated before assembly; adding cold sauce to a hot cutlet will cool the entire sandwich and hasten the path to sogginess. For a decadent twist, some recipes opt for a creamy, spicy vodka sauce.
The Cheese Selection: The ultimate melty texture comes from fresh mozzarella. Its high water content and soft structure make it superior to pre-shredded varieties, which often contain anti-caking agents that hinder a smooth, creamy melt. Fresh mozzarella should be sliced or torn thinly and placed on the cutlet for the final broil. The initial flavor foundation, however, comes from the Parmesan cheese mixed directly into the breading, which adds a salty, umami depth to the crust itself.
The Bread Vehicle: The sandwich’s downfall is often weak, flimsy bread. A high-moisture, saucy sandwich requires a vessel with structural integrity. Crusty Italian hero rolls, firm hoagie rolls, or ciabatta are the universal favorites because their thick crust provides necessary resistance to the moisture of the sauce and the weight of the chicken. The crucial step is to toast the rolls—either under the broiler with a brush of olive oil or garlic butter, or on a grill—until the interior is crisp and golden. This acts as a protective moisture barrier, dramatically slowing down the inevitable softening process when the hot, saucy components are introduced.
Beyond the Classic: Variations and Flavor Enhancements
The Chicken Parmesan Sandwich is a flexible canvas, and subtle additions can introduce new levels of complexity and interest. Mastering the classic recipe opens the door to inventive variations suited for any palate or occasion.
Alternative Cooking Methods: While pan-frying delivers the most authentic texture, modern appliances offer healthier and quicker alternatives.
-
Air Fryer Chicken Parm: This method is a fantastic way to achieve near-fried crispness with minimal oil. After breading, spray the cutlets generously with cooking spray or olive oil, and air fry at 375°F (190°C) for about 8–10 minutes, flipping halfway. Add the sauce and cheese and broil briefly in the oven to melt.
-
Baked Chicken Parm: For larger batches, baking is convenient. Place the cutlets on a wire rack over a foil-lined baking sheet and bake at 400°F (200°C) until cooked through, again using a spray of oil for a crispier finish.
Sauce and Cheese Swaps:
-
Spice and Richness: Substitute marinara with arrabbiata (spicy red sauce) or a high-quality roasted red pepper sauce.
-
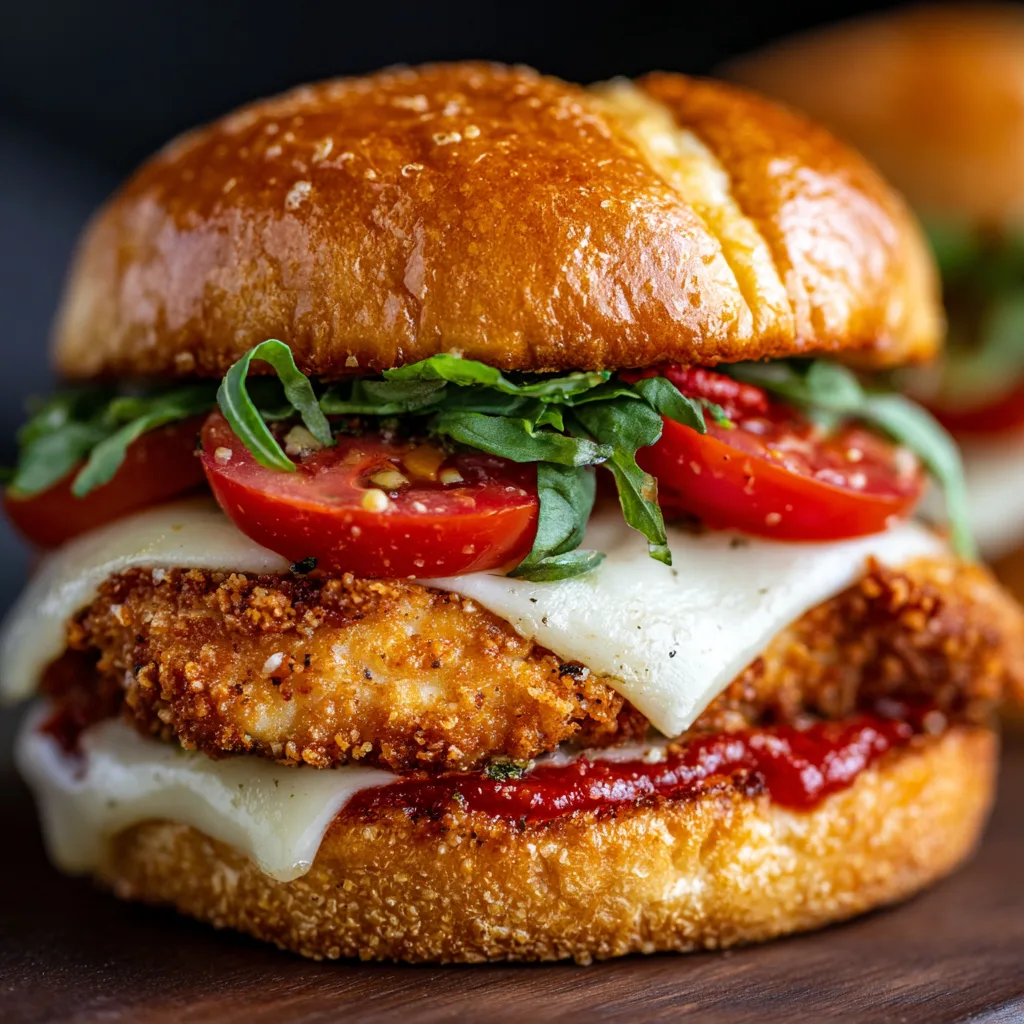
Cheese Upgrade: Replace mozzarella with sliced Provolone (for a sharper, deli-style tang) or Smoked Mozzarella for a depth of flavor. In gourmet preparations, a dollop of fresh, creamy Burrata (added after the chicken comes out of the broiler) can provide a luxurious ooze.
Deli-Inspired Toppings: The classic is minimal (chicken, sauce, cheese, basil), but regional delis often incorporate extra elements to enhance the experience:
-
Pesto: A smear of basil pesto or sun-dried tomato pesto on the toasted top bun adds a vibrant, herbal complexity that plays beautifully against the richness of the cheese.
-
Prosciutto: For a salty, savory kick, a thin slice of prosciutto can be laid directly on top of the melted mozzarella just before closing the sandwich.
-
Greens: While controversial among purists, a light layer of peppery arugula or thinly sliced onions can provide a textural contrast and a fresh counterpoint to the heavy ingredients.
Assembly & Serving Secrets: Keeping the Crunch Alive
The biggest challenge in serving a Chicken Parmesan sandwich is maintaining the cutlet’s coveted crispness when marrying it with hot, wet marinara and melted cheese. The secret lies in the sequence of assembly and the rapid execution of the final steps.
The single most critical step is to broil the chicken, sauce, and cheese separately from the bread. As detailed in the main instructions, the cutlets should be sauced and topped with mozzarella while resting on a wire rack. The high heat of the broiler quickly melts the cheese and bubbles the sauce onto the crust without exposing the bread to excessive moisture. This focused heat minimizes the time the bread is in contact with the wet components, preserving its structural integrity.
Strategic Sauce Placement: Avoid soaking the bread with sauce. Instead, think of the sauce as a binder. The majority of the sauce should be on the chicken itself. A light smear of sauce on the bottom bun is enough to add flavor without creating a moisture trap.
Resting vs. Serving: There is a crucial dichotomy in the serving style of a Chicken Parm Sandwich.
-
Maximum Crispness: For the ultimate crunch, the sandwich must be assembled immediately after the cheese melts and served piping hot. The residual heat will still be intense, but the crust remains dry and firm.
-
Deli-Style Softness: The classic Italian deli experience often involves wrapping the finished sandwich tightly in foil for 3 to 5 minutes. This allows the steam to soften the bread, melding the flavors and creating a tender, cohesive, albeit less crispy, result. If you prioritize the integrity of the bread roll and the melding of flavors over the crust’s snap, this technique offers a nostalgic, softer outcome.
To round out the meal, serve the sandwiches with a simple side that complements the Italian flavors. Classic pairings include a light arugula salad dressed with lemon and olive oil, garlic Parmesan fries, or, keeping with the comfort theme, a side of crispy fried zucchini or potato chips for an extra textural contrast.