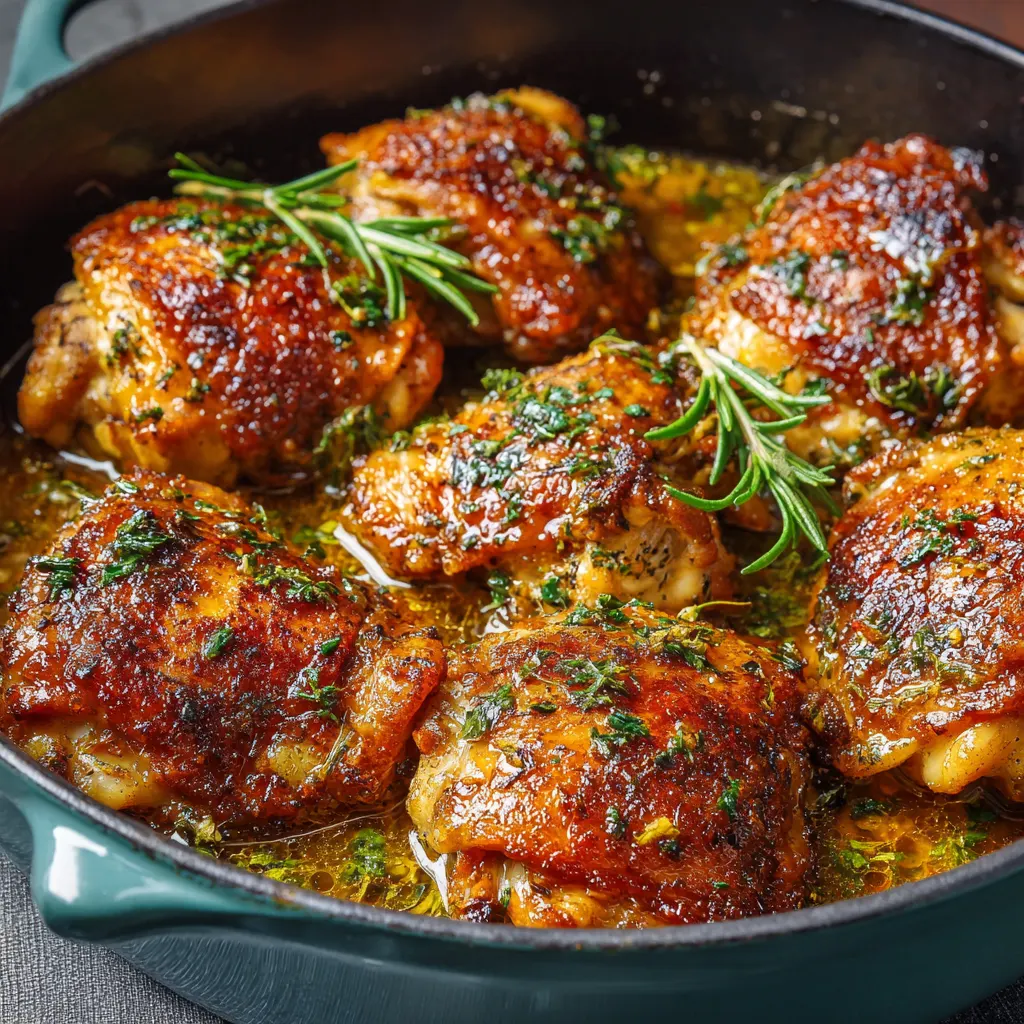
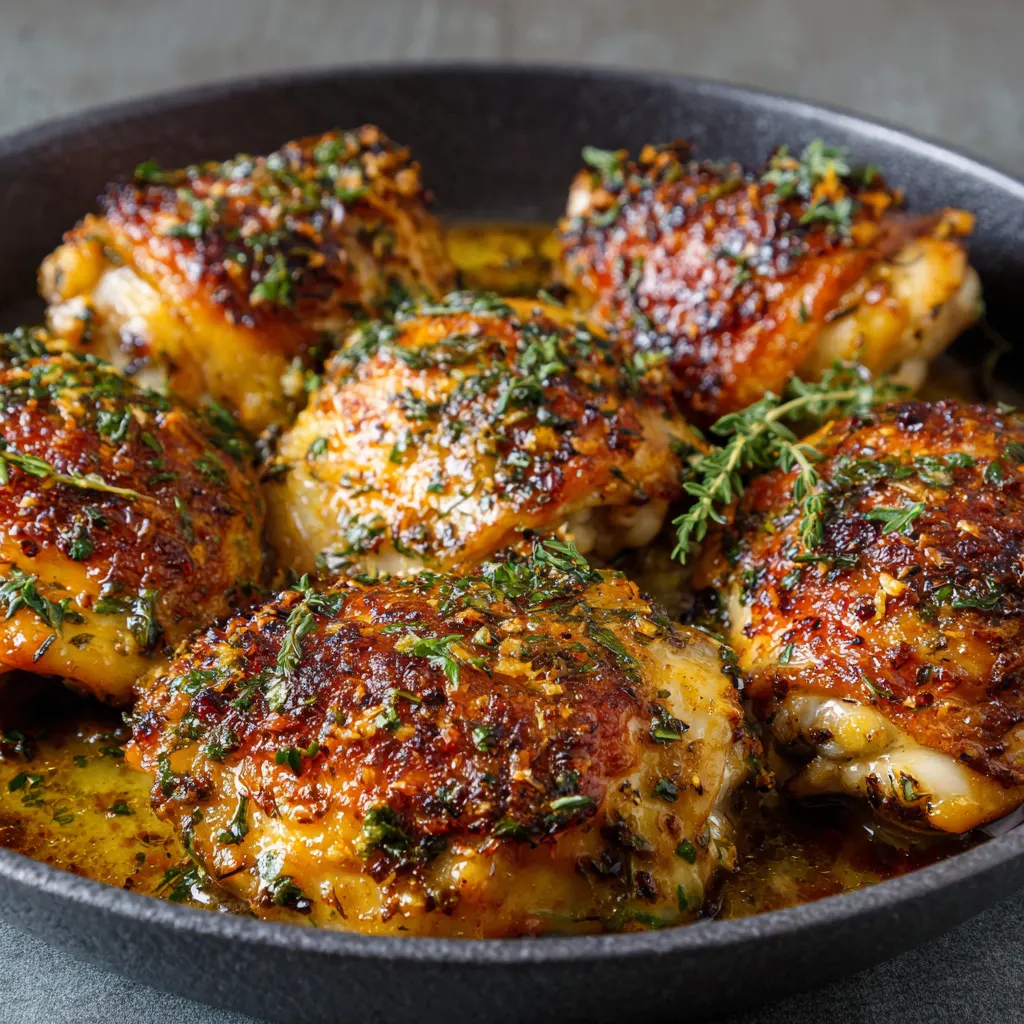
Baked chicken thighs are the unsung heroes of weeknight cooking. Their natural fat content ensures they remain succulent and flavorful, resisting the dryness that often plagues chicken breasts, while their versatility allows them to anchor nearly any flavor profile. Economical, easy to prepare, and inherently forgiving, a perfectly baked chicken thigh recipe is an essential…
Baked chicken thighs are the unsung heroes of weeknight cooking. Their natural fat content ensures they remain succulent and flavorful, resisting the dryness that often plagues chicken breasts, while their versatility allows them to anchor nearly any flavor profile. Economical, easy to prepare, and inherently forgiving, a perfectly baked chicken thigh recipe is an essential tool in any home chef’s arsenal for achieving a restaurant-quality meal with minimal effort. The secret to perfection lies in a few simple techniques: using high heat to render the fat and crisp the skin, and a well-balanced seasoning blend that complements the meat’s rich flavor.
Classic Herb and Paprika Baked Chicken Thighs
This foundational recipe utilizes a blend of pantry staples to create a savory crust and a perfectly tender interior, serving as the basis for countless variations.
Ingredients:
-
4 Bone-in, skin-on chicken thighs (about 6-8 ounces each)
-
2 tablespoons olive oil (or avocado oil)
-
1 tablespoon smoked paprika
-
1 teaspoon onion powder
-
1 teaspoon garlic powder
-
1 teaspoon dried Italian seasoning (or a mix of dried thyme and rosemary)
-
1 teaspoon kosher salt
-
½ teaspoon black pepper
-
Optional: 1/4 teaspoon cayenne pepper or chili flakes for heat
Step-by-Step Instructions:
-
Preheat and Prep: Preheat your oven to 425°F (220°C). Line a baking sheet with foil or parchment paper for easy cleanup. If you plan to roast vegetables alongside the chicken, place a wire rack on the baking sheet to allow air circulation beneath the thighs for crispier skin.
-
Dry the Skin (Crucial Step): Pat the chicken thighs completely dry using paper towels. This is the single most important step for achieving crispy skin. Excess moisture turns to steam, preventing browning.
-
Seasoning Blend: In a small bowl, whisk together the olive oil, paprika, onion powder, garlic powder, Italian seasoning, salt, and pepper until a thick paste or rub forms.
-
Season the Chicken: Place the chicken thighs on the prepared baking sheet (or rack). Generously coat all sides of the chicken, working the rub under the skin slightly to ensure the meat is also seasoned, but primarily focusing on the skin side.
-
Bake: Place the thighs skin-side up in the preheated oven. Bake for 30 to 40 minutes. The exact time depends on the size of the thighs and whether they are bone-in or boneless.
-
Check Temperature: The chicken is done when an internal meat thermometer inserted into the thickest part of the thigh (avoiding the bone) reads 165°F (74°C). However, many cooks prefer to cook thighs to 175°F-180°F (79°C-82°C) as the connective tissue breaks down further, resulting in an even more tender and “fall-off-the-bone” texture.
-
Crisp the Skin (Optional Broil): If the skin is not as crispy as desired, move the baking sheet to the top rack and broil for 2 to 3 minutes, watching carefully to prevent burning.
-
Rest and Serve: Let the baked chicken thighs rest for 5 to 10 minutes before serving. This allows the juices to redistribute, ensuring a tender and moist final product.
Mastering the Crispy-Juicy Balance: Techniques for Perfect Thighs
The difference between merely cooked chicken and truly spectacular baked chicken thighs lies in achieving a golden, shatteringly crispy skin while maintaining maximum moisture within the meat. This balance is simple to master with the right knowledge.
The Science of Crispy Skin
The goal is to eliminate surface moisture and subject the skin to high, dry heat.
1. Pat It Bone Dry: As mentioned in the main recipe, moisture is the enemy of crispy skin. Before seasoning, spend a moment pressing paper towels onto the skin until it is entirely dry. If time allows, you can even leave the seasoned chicken uncovered in the refrigerator for an hour or two; the cold, dry air helps dehydrate the skin.
2. High Heat is Essential: Do not bake chicken thighs below 400°F (200°C). The high heat quickly renders the fat located under the skin, allowing it to turn into a crispy layer rather than remaining flabby and soft. A range of 400°F to 425°F (200°C-220°C) is ideal for most recipes.
3. Use a Rack or Elevate: Placing the chicken thighs directly on a flat baking sheet causes the bottom side to steam in its own fat and juices. Using a wire rack set over a baking sheet allows air to circulate around the entire piece of meat, resulting in crispier skin all around.
4. The Finishing Broil: If your thighs are perfectly cooked but the skin lacks that deep mahogany color and crunch, utilize your oven’s broiler. Set the rack about six inches from the heat source and broil for 1–3 minutes. Crucial Note: Watch the chicken continuously during this step, as skin can go from perfect to burnt in seconds.
Ensuring Internal Juiciness and Safety
While thighs are naturally juicy, overcooking can still lead to dryness. Proper temperature control is paramount.
Temperature Targets: The USDA standard for cooked poultry is 165°F (74°C). However, chicken thighs contain more fat and connective tissue (collagen) than breasts. Collagen begins to dissolve into gelatin around 170°F (77°C), which adds tremendous moisture and tenderness. Cooking thighs to a final temperature between 175°F and 180°F (79°C-82°C) will result in a more tender, succulent, and “fall-apart” experience.
Bone-in vs. Boneless:
-
Bone-in, Skin-on: The superior choice for flavor and juiciness. The bone conducts heat slowly and the skin provides a protective, self-basting layer of fat. Requires 35-45 minutes at 425°F.
-
Boneless, Skinless: Excellent for quick meals. Cook time is significantly shorter (20-25 minutes), but they require a closer eye to avoid drying out. Use a good rub or marinade to compensate for the missing fat and skin.
Resting: Always allow the chicken to rest for 5 to 10 minutes after removing it from the oven. The internal temperature will rise a few degrees (known as carryover cooking), and the resting period allows the muscle fibers to relax, reabsorbing the flavorful juices. Skipping this step means all that moisture runs out onto your cutting board.
Four Global Flavor Twists for Variety
One of the greatest attributes of chicken thighs is their adaptability. By changing a few ingredients in the rub or marinade, you can transport your dinner to a different corner of the world. Here are four essential variations to keep your weekly menu exciting.
1. Sticky Honey-Garlic Glaze
This classic combination is universally loved for its sweet, savory, and sticky finish. It works best with boneless, skinless thighs for quick absorption, but can be applied to bone-in.
-
The Glaze: Whisk together 1/2 cup honey, 1/4 cup soy sauce, 2 cloves minced garlic, 1 tablespoon rice vinegar, and 1 teaspoon grated fresh ginger.
-
Method: Season the chicken lightly with salt and pepper. Bake the thighs plain for 20 minutes at 400°F (200°C). Brush generously with the glaze and return to the oven for 10-15 minutes, brushing with remaining glaze every 5 minutes until sticky, glossy, and cooked through (175°F). Garnish with sesame seeds and chopped scallions.
2. Lemon-Herb Mediterranean
A bright, refreshing, and light flavor profile that pairs beautifully with fresh salads and vegetables.
-
The Marinade: Combine 1/4 cup olive oil, the zest and juice of one large lemon, 2 tablespoons fresh chopped oregano (or 1 tbsp dried), 1 tablespoon fresh chopped thyme, 2 cloves minced garlic, 1 teaspoon salt, and 1/2 teaspoon black pepper.
-
Method: Marinate the chicken thighs for at least 30 minutes, or up to 4 hours. Place on a baking sheet and bake at 425°F (220°C). If using bone-in thighs, place a few lemon slices and halved garlic cloves beneath and around the chicken during baking for added aroma.
3. Smoky Tex-Mex BBQ Rub
Skip the sticky sauce initially and create a deeply flavorful, charred crust that evokes a backyard grill.
-
The Rub: Mix 2 tablespoons brown sugar, 1 tablespoon chili powder, 1 tablespoon cumin, 1 teaspoon smoked paprika, 1 teaspoon onion powder, 1 teaspoon garlic powder, 1 teaspoon salt, and 1/2 teaspoon cayenne pepper.
-
Method: Pat the chicken dry and rub generously with the spice mixture. Bake at 400°F (200°C). For the last 5 minutes, if desired, brush a light layer of your favorite BBQ sauce on the skin and broil for a quick caramelization.
4. Asian Soy-Ginger Teriyaki
A punchy, umami-rich option that is perfect when served over a bed of steamed rice.
-
The Sauce: Mix 1/2 cup soy sauce (or coconut aminos), 1/4 cup water, 2 tablespoons brown sugar, 1 tablespoon grated fresh ginger, and 1/2 teaspoon black pepper. For thickening, whisk in 1 teaspoon of cornstarch.
-
Method: Season chicken lightly with salt. Bake at 425°F (220°C). While the chicken bakes, simmer the sauce in a small saucepan until slightly thickened. When the chicken reaches 170°F (77°C), spoon the sauce over the thighs and bake for the remaining 5-10 minutes until the internal temperature is met and the sauce is a deep, sticky glaze.
The Perfect Plate: Side Dishes and Pairings
A baked chicken thigh dinner is truly easy when the side dishes can cook simultaneously. The high oven temperature (400°F+) that is ideal for crisping chicken skin is also perfect for roasting most hearty vegetables.
Sheet Pan Wonders (Cook Alongside)
For the ultimate one-pan meal, toss these vegetables with olive oil, salt, and pepper, and arrange them around the chicken thighs on the baking sheet.
-
Hearty Root Vegetables: Cubed potatoes (russet or sweet), carrots, and parsnips. These require a longer cook time, so cut them into smaller pieces (1-inch cubes) or place them in the oven 10-15 minutes before the chicken.
-
Firm Greens: Broccoli or cauliflower florets, Brussels sprouts (halved). These can be added when the chicken goes in, or about 15 minutes into the cooking time.
-
Aromatics: Halved bell peppers (any color), zucchini, and onion wedges. These cook quickly and can be added halfway through the baking time.
Quick and Fresh Sides (Ready in Minutes)
If you prefer to focus your oven space on the main protein, these sides offer a perfect contrast in texture and temperature.
-
Classic Creamy Pairing: Garlic mashed potatoes or creamy polenta. The rich sauce and drippings from the chicken thighs soak beautifully into these sides.
-
Light and Bright: A simple arugula or spinach salad dressed with lemon vinaigrette. The peppery greens and acid cut through the richness of the chicken fat.
-
Grains: Simple steamed white or brown rice (especially with Asian or Teriyaki variations), or a quick 5-minute couscous.
Elevating the Sauce
Don’t let the flavorful pan drippings go to waste. If you baked the thighs on a foil-lined sheet without a rack, you will have a small pool of rendered fat and seasoned juices. Separate the fat, and the remaining juice can be whisked with a splash of chicken broth or lemon juice to create an instant, light pan sauce to drizzle over the meat and sides.
Prep Ahead and Storage for Smart Weeknight Eating
The ease of baked chicken thighs extends beyond the cooking process. Their robustness makes them an excellent candidate for meal preparation, simplifying busy weekday lunches and dinners.
Meal Prep Strategies
1. The Dry Rub Method (Best for Crispy Skin): Prepare your chosen spice rub and generously coat the chicken thighs. Store the seasoned thighs in an airtight container in the refrigerator for up to 24 hours before baking. The salt begins to tenderize the meat, and the spices fully permeate the flesh.
2. The Marinade Method (Best for Tenderizing): Prepare the marinade (e.g., Lemon-Herb or Teriyaki). Place the chicken and the marinade in a resealable bag or container. Marinate for a minimum of 30 minutes, and ideally no longer than 4 hours, particularly if using an acidic marinade (like lemon juice or vinegar), as prolonged exposure can toughen the meat. When ready to cook, simply transfer the chicken to the baking sheet.
3. Batch Cooking: Since chicken thighs reheat beautifully, consider baking a double batch. You can use the cooked thighs in various ways throughout the week:
-
Salads: Dice cold chicken thighs and add them to lunchtime salads.
-
Tacos/Wraps: Shred the meat and use it for quick chicken tacos or quesadillas.
-
Soup: Chop the meat and drop it into a quick soup base (like chicken noodle or tortilla soup).
Storage and Reheating
Storage: Fully cooked baked chicken thighs can be stored in a sealed, airtight container in the refrigerator for up to 3–4 days.
Reheating Tips: The key to reheating without drying out the meat is to use a gentle, moist heat, or a quick blast of high, dry heat to re-crisp the skin.
-
Oven/Toaster Oven (Best Method for Crispy Skin): Preheat your oven to 300°F (150°C). Place the thighs on a baking sheet and cover them loosely with foil. Heat for 10-15 minutes until warmed through. Remove the foil for the last 5 minutes to restore a slight crispness to the skin.
-
Microwave (Quickest Method): Use only if necessary, as this method often sacrifices the crispy skin. Place the chicken on a microwave-safe plate and cover it with a damp paper towel. Heat in 30-second bursts until warm.
-
Air Fryer (Excellent Re-Crisper): This is arguably the best way to reheat leftovers. Place the thighs in the air fryer basket and heat at 350°F (175°C) for 3-5 minutes, which effectively warms the meat while making the skin beautifully crispy again.