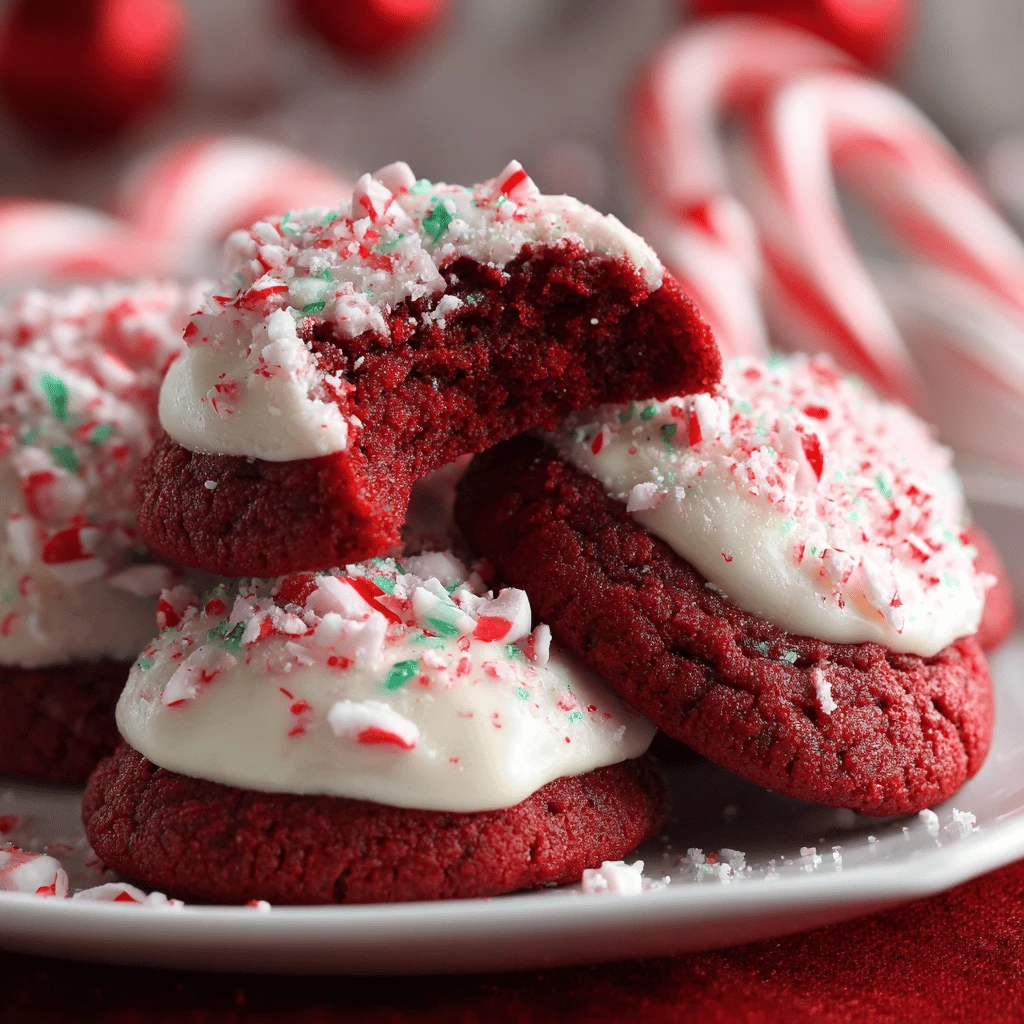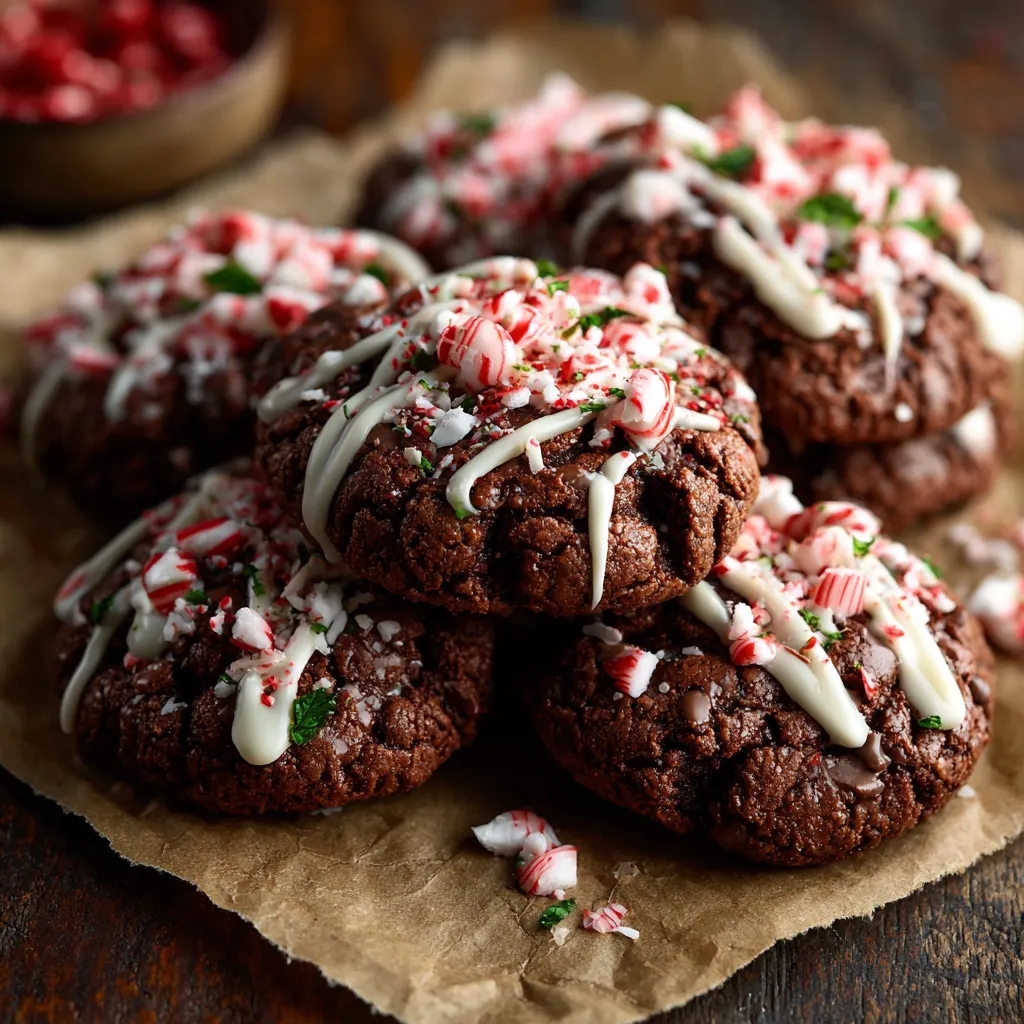
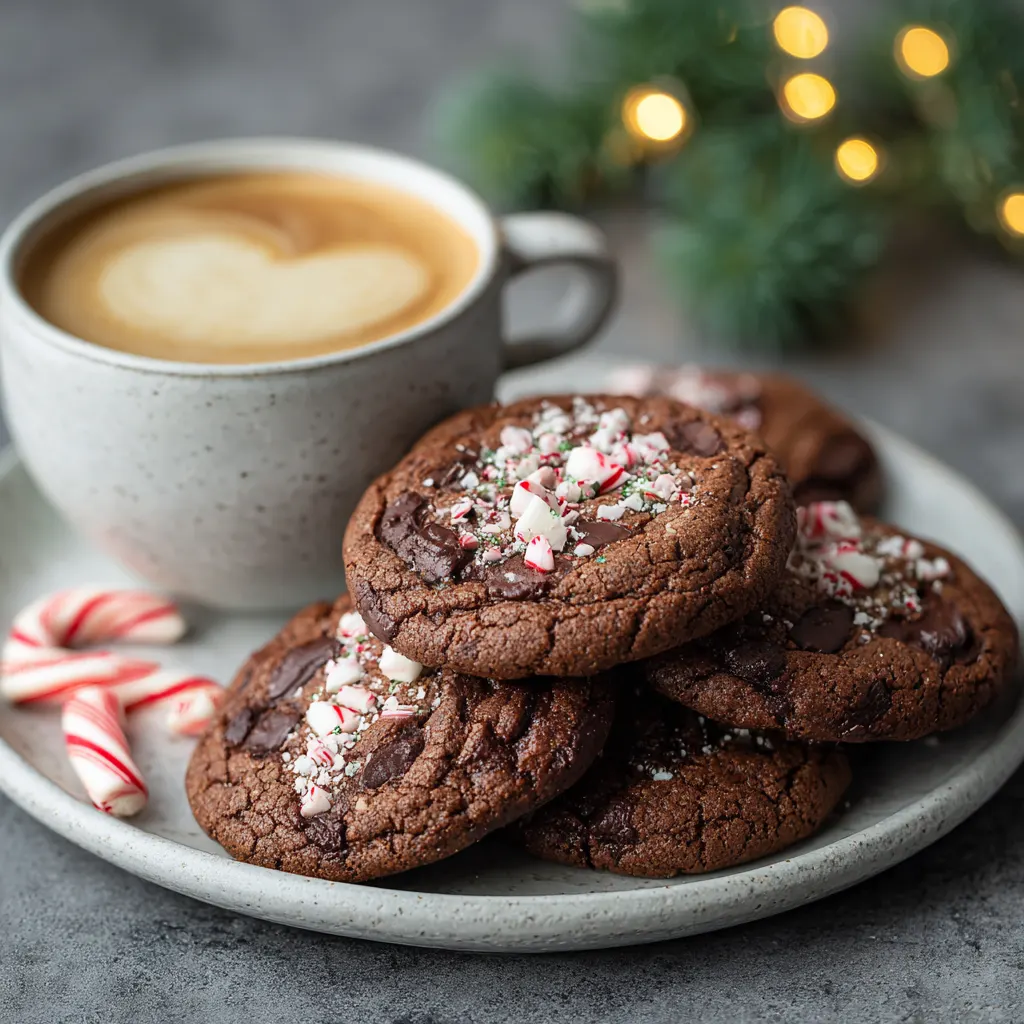
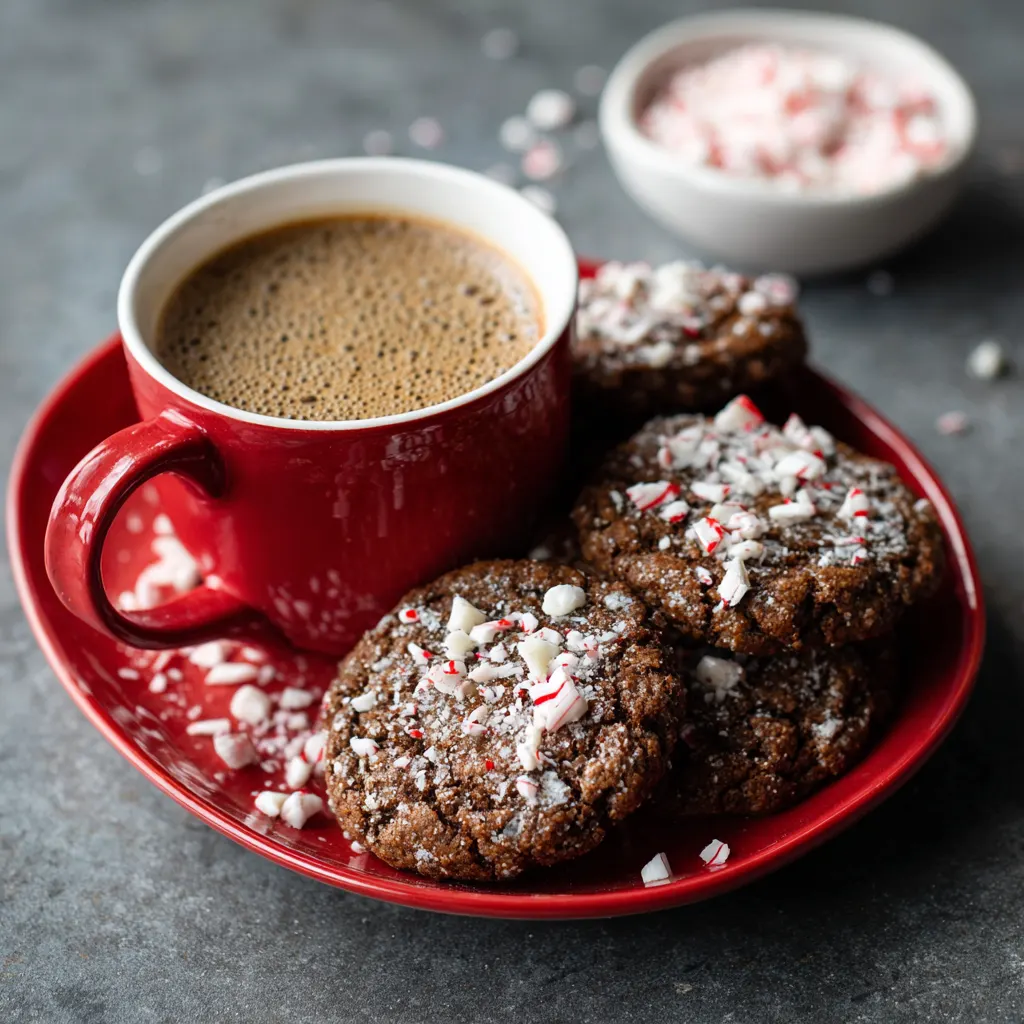
The Peppermint Mocha Espresso Cookie is a true marriage of holiday cheer and coffee shop indulgence, capturing the quintessential flavors of the season in a single, rich, fudgy bite. This is more than just a chocolate cookie; it is a complex dessert where deep cocoa notes are amplified by high-quality espresso powder, balanced by the…
The Peppermint Mocha Espresso Cookie is a true marriage of holiday cheer and coffee shop indulgence, capturing the quintessential flavors of the season in a single, rich, fudgy bite. This is more than just a chocolate cookie; it is a complex dessert where deep cocoa notes are amplified by high-quality espresso powder, balanced by the bright, cooling rush of peppermint, and finished with a crisp, festive crunch. Perfectly soft in the center with slightly chewy edges, this recipe is designed for the serious baker looking to create a memorable treat that elevates any holiday platter or cookie exchange. The secret lies in precise measurement and a critical chilling period, ensuring that every batch delivers optimal flavor and a professional, bakery-quality texture.
Ingredients Yields 18–24 cookies
For the Cookies:
-
2 cups All-Purpose Flour
-
½ cup Unsweetened Dutch-Process Cocoa Powder (or Special Dark)
-
2 teaspoons Fine Espresso Powder
-
1 teaspoon Baking Soda
-
¼ teaspoon Salt
-
1 cup (2 sticks) Unsalted Butter, softened to room temperature
-
¾ cup Packed Light Brown Sugar
-
½ cup Granulated Sugar
-
1 large Egg, at room temperature
-
1 large Egg Yolk, at room temperature (for extra chewiness)
-
1 teaspoon Vanilla Extract
-
1 teaspoon Peppermint Extract (adjust based on potency)
-
1 cup Semi-Sweet Chocolate Chips or Chunks
For the Finish:
-
8 ounces High-Quality White Chocolate, chopped or chips
-
½ cup Crushed Peppermint Candy Canes or Peppermint Crunch Baking Chips
Step-by-Step Instructions
-
Combine Dry Ingredients: In a medium bowl, whisk together the flour, cocoa powder, espresso powder, baking soda, and salt. Set aside.
-
Cream Wet Ingredients: In the bowl of a stand mixer fitted with the paddle attachment (or using a hand mixer), beat the softened butter, brown sugar, and granulated sugar on medium-high speed until the mixture is light, fluffy, and noticeably paler in color (3–4 minutes). This aeration is key to texture.
-
Add Eggs and Extracts: Scrape down the sides of the bowl. Add the egg, egg yolk, vanilla extract, and peppermint extract. Beat until fully incorporated, scraping the bowl once more. Be careful not to over-mix at this stage.
-
Form the Dough: Gradually add the dry ingredient mixture to the wet ingredients with the mixer on low speed. Mix only until just combined and no streaks of flour remain. Fold in the chocolate chips using a rubber spatula. The dough will be thick and slightly sticky.
-
Chill the Dough (Crucial Step): Cover the dough tightly and refrigerate for a minimum of 1 hour, and up to 3 days. Chilling prevents spreading and intensifies the flavor.
-
Preheat and Scoop: Preheat your oven to 350°F (175°C) and line two large baking sheets with parchment paper or silicone mats. Scoop the dough using a 1.5 to 2-tablespoon cookie scoop. Roll the dough into balls, slightly taller than they are wide, and place them 2 inches apart on the prepared sheets.
-
Bake: Bake for 10–12 minutes. The edges should look set, but the centers should still appear soft. For flatter, chewier cookies, gently lift and drop the baking sheet onto the counter (the “pan-bang” technique) midway through baking.
-
Cool and Finish: Remove from the oven and allow the cookies to cool on the baking sheet for 5 minutes before transferring them to a wire rack to cool completely.
-
Decorate: Once fully cooled, melt the white chocolate in a double boiler or microwave (in 30-second intervals, stirring until smooth). Dip each cookie halfway into the melted chocolate, allowing the excess to drip off. Immediately sprinkle the crushed peppermint candies over the wet chocolate. Allow the chocolate to set completely before serving or storing.
Mastering the Mocha-Mint Balance: A Deep Dive into Flavor Components
The exceptional flavor profile of these cookies hinges on the delicate yet powerful balance of the three core elements: the dark, rich mocha base, and the cool, sharp peppermint finish. Achieving this requires attention to ingredient quality and understanding their roles in the overall sensory experience.
Espresso: The Chocolate Amplifier
The “mocha” flavor relies on more than just cocoa powder; it requires true coffee essence. Espresso powder is the gold standard here, offering a deep, concentrated coffee flavor without the acidity or grit of brewed coffee. Crucially, espresso powder doesn’t just taste like coffee—it acts as an accelerator for the chocolate, deepening the cocoa notes and making the cookie taste intensely fudgy. When selecting your powder, look for a fine, shelf-stable product specifically marketed for baking.
Substitution Notes: If fine espresso powder is unavailable, instant coffee granules can be used, though the flavor intensity may be slightly reduced. For maximum effectiveness, dissolve the instant coffee in a teaspoon of hot water before adding it to the wet ingredients, or ensure the granules are pulverized to prevent a grainy texture. Avoid using standard coffee grounds, which will not dissolve and will leave a gritty residue.
Cocoa Choices for Depth
The choice of cocoa powder significantly impacts the final cookie color and flavor. While natural unsweetened cocoa powder works, for a truly dark and rich “mocha” hue that mimics a coffee house drink, consider using Dutch-processed cocoa powder or a blend that includes black cocoa powder. Dutch-processed cocoa has been treated to reduce acidity, resulting in a darker, smoother, and richer chocolate flavor that complements the espresso perfectly without the slight sourness sometimes associated with natural cocoa.
The Peppermint Prudence
Peppermint extract is potent and must be handled with care. The standard recipe calls for approximately one teaspoon, but bakers must use caution, as too much can quickly overpower the delicate coffee and chocolate flavors, resulting in an unbalanced taste. Always use peppermint extract, not spearmint or general “mint” extract, which has a distinctly different, often less desirable flavor profile. If your extract is especially strong, start with ¾ teaspoon. The crushed candy topping provides the visual appeal and a burst of texture, but the extract is responsible for distributing the refreshing cooling sensation throughout the cookie’s interior.
Essential Techniques for Ultimate Cookie Perfection
While the ingredient list is straightforward, the method requires specific steps to achieve the desired chewy-center, set-edge texture that defines a perfect drop cookie. These techniques are what separate a good cookie from a great one and ensure consistency batch after batch.
The Creaming Stage: Achieving Aeration
The initial step of creaming the butter and sugars is vital for developing structure and a tender crumb. Do not rush this process. Use softened, room-temperature butter and beat it with the sugars until the mixture is lightened in color and visibly fluffy—a process that often takes a full three to four minutes on medium-high speed. This incorporates microscopic air bubbles into the dough’s fat structure. When the cookie bakes, these air pockets expand, preventing a dense, cake-like texture and ensuring a tender interior. The careful balance of granulated sugar (for spread and crispness) and brown sugar (for moisture and chewiness) also dictates the final mouthfeel.
The Mandatory Chill Time
Chilling the dough is arguably the most critical technique for this specific recipe, serving two essential functions:
-
Flavor Integration: It allows the espresso and peppermint extracts time to fully penetrate and integrate with the dry ingredients, leading to a richer, more cohesive final taste.
-
Spread Control: Cold fat melts slower in the oven. When the butter is cold, the dough holds its shape longer, allowing the edges to set before the center fully spreads, resulting in a thicker, chewier cookie with a soft middle. Aim for a minimum of one hour, but overnight chilling yields the absolute best results. If the dough is chilled longer than two hours, let it sit on the counter for 15–20 minutes before scooping for easier handling.
Baking for the Ideal Texture
When baking, the goal is to under-bake slightly to preserve a soft, fudgy interior. Remove the cookies from the oven when the edges are set and the tops are cracked and matte, but the centers still look slightly soft or puffy. The residual heat from the baking sheet will continue to cook the cookie as it rests, achieving the perfect balance without becoming dry or crumbly.
For bakers seeking that characteristic bakery-style crinkly edge and flatter profile, employ the pan-banging technique. Gently lift the baking sheet and drop it onto the counter halfway through the bake time (around the 5-minute mark). This deliberate step releases trapped air and forces the cookies to deflate, creating those desirable ripples and helping the edges set into a perfect chewy frame.
Decadent Finishes and Festive Presentation
The final presentation is what transforms the Peppermint Mocha Espresso Cookie from a simple chocolate treat into a stunning holiday centerpiece. The finishing step offers the greatest opportunity for customization and creative flair, allowing the baker to choose between a classic, crisp coating and a richer, more gourmet finish.
The Signature White Chocolate Dip
The most common and visually striking finish is the white chocolate dip. This adds a layer of creamy sweetness that expertly balances the slight bitterness of the dark mocha base. Use high-quality white chocolate or specialized melting wafers for a smooth, glossy finish that sets quickly without turning chalky. After melting the chocolate, dip one half of the completely cooled cookie, ensuring the coating is even.
Beyond the Dip: Ganache and Glazes
For an extra layer of richness, consider substituting the melted white chocolate with a Dark Chocolate Espresso Ganache. A simple ganache—made by pouring hot heavy cream over chopped dark chocolate and a pinch of espresso powder—provides a luxurious, fudgy coating. Drizzle the ganache artistically instead of dipping, or spoon a dollop onto the center of a slightly cooled cookie before it sets. This method offers a softer, more decadent mouthfeel.
Topping Variations and Garnish
Crushed candy canes are the traditional topping, providing a vibrant red-and-white visual and a welcome textural crunch. For a more sophisticated look, try:
-
Peppermint Crunch Chips: These chips contain stabilized peppermint pieces that soften slightly when baked or sprinkled on wet chocolate, providing a gentler bite than hard candy cane pieces.
-
Flaky Sea Salt: A tiny sprinkle of flaky sea salt on the dark, undipped side of the cookie can enhance the chocolate depth and cut the sweetness, a trick used by professional chocolatiers.
-
Contrasting Drizzle: If dipping in white chocolate, use a tiny amount of melted semi-sweet chocolate to drizzle fine lines across the white surface for a contrasting effect.
Make-Ahead Strategies and Perfect Pairings
The Peppermint Mocha Espresso Cookie is an excellent candidate for make-ahead baking and freezing, ensuring you have fresh, impressive treats on demand throughout the busy holiday season with minimal effort.
Storage and Freshness
Baked cookies, when stored in an airtight container at room temperature, will retain their fresh, chewy texture for up to one week. However, if the cookies are decorated with white chocolate and crushed candy canes, it is best to store them in a single layer or with parchment paper between layers to prevent the toppings from sticking or melting together. For optimal flavor and aroma, ensure the cookies are completely cooled before sealing them in the container, which prevents condensation.
Freezing for the Future
This recipe is exceptionally freezer-friendly in both dough and baked form, offering versatility for busy schedules:
-
Freezing the Dough: This is the best approach for long-term storage. Scoop and roll the dough balls as directed, then arrange them on a parchment-lined tray and freeze until solid. Once frozen, transfer the balls to a heavy-duty freezer bag or container. Label and freeze for up to three months. To bake, simply remove the desired number of dough balls and place them on a baking sheet. You may need to add 1–2 minutes to the standard bake time since the dough is frozen.
-
Freezing Baked Cookies: Undecorated baked cookies also freeze well. Place them in an airtight container, separated by parchment paper, and freeze for up to three months. Thaw them overnight at room temperature. The cookies can then be dipped in chocolate and topped with candy canes just before serving for that final, crisp finish.
Ideal Pairings
Given their intense, complex flavor profile, these cookies pair beautifully with beverages and other desserts that either complement their richness or provide a refreshing contrast. They are sublime alongside a strong black coffee, an Americano, or a simple cup of espresso, mirroring the flavor elements within the cookie itself. For a classic comfort pairing, a cold glass of whole milk provides a soothing contrast to the chocolate and peppermint heat. For an elevated experience, the cookie’s dark chocolate and mint notes are often complemented by a small glass of ruby port or a rich, fruit-forward red wine.