Chicken Enchilada Meal Prep: Your Guide to Delicious, Healthy, and Convenient Meals Chicken enchiladas are a perennial favorite, but the process of making them can seem daunting for a busy week. That’s where meal prepping comes in! Preparing chicken enchiladas in advance allows you to enjoy this flavorful dish without the stress of last-minute cooking….
Chicken Enchilada Meal Prep: Your Guide to Delicious, Healthy, and Convenient Meals
Chicken enchiladas are a perennial favorite, but the process of making them can seem daunting for a busy week. That’s where meal prepping comes in! Preparing chicken enchiladas in advance allows you to enjoy this flavorful dish without the stress of last-minute cooking. This comprehensive guide will walk you through everything you need to know, from choosing the right ingredients to portioning and storing your enchiladas for the week ahead.
Section 1: Why Chicken Enchiladas are Perfect for Meal Prep
Chicken enchiladas offer a multitude of benefits for meal prepping. Firstly, they are incredibly versatile. You can easily customize the filling to your liking, swapping out ingredients or adjusting the spice level. Want it spicier? Add some chipotle peppers in adobe sauce. Prefer a milder flavor? Opt for a milder chili powder. The possibilities are endless.
Secondly, chicken enchiladas reheat beautifully. Whether you prefer microwaving, baking, or using an air fryer, your enchiladas will retain their delicious flavor and texture, making them a perfect grab-and-go lunch or dinner option. The sauce helps keep them moist and prevents them from drying out during reheating.
Thirdly, they are nutritionally balanced. Chicken provides lean protein, while the tortillas and filling contribute carbohydrates and fiber. You can further enhance the nutritional value by adding plenty of vegetables like bell peppers, onions, and corn to the filling. This makes them a satisfying and nourishing meal that will keep you feeling full and energized throughout the day.
Finally, chicken enchiladas are a crowd-pleaser. Whether you’re meal prepping for yourself or your family, everyone will appreciate having a delicious and satisfying meal readily available. They are also a great option for potlucks or gatherings, as they are easy to transport and serve.
Customizing Your Enchiladas for Optimal Meal Prep
One of the best things about chicken enchiladas is their adaptability. Here are a few ideas to tailor them to your specific needs and preferences:
- Lower-Carb Option: Substitute corn tortillas with whole-wheat or low-carb tortillas.
- Vegetarian/Vegan Option: Replace chicken with black beans, pinto beans, or a plant-based protein alternative. Use vegan cheese and enchilada sauce.
- Spice Level: Adjust the amount of chili powder, cayenne pepper, or hot sauce to your liking.
- Vegetable Boost: Add chopped bell peppers, onions, corn, zucchini, or spinach to the filling for added nutrients and flavor.
- Cheese Choices: Experiment with different types of cheese, such as Monterey Jack, cheddar, or a Mexican blend.
Section 2: The Ultimate Chicken Enchilada Meal Prep Recipe
This recipe is designed for easy meal prepping, yielding approximately 6-8 servings. Feel free to adjust the quantities based on your needs.
Ingredients:
- 1.5 lbs cooked chicken, shredded (rotisserie chicken works great!)
- 1 tablespoon olive oil
- 1 medium onion, chopped
- 1 bell pepper (any color), chopped
- 1 (15 ounce) can black beans, rinsed and drained
- 1 (15 ounce) can corn, drained
- 1 (10 ounce) can diced tomatoes and green chilies (such as Rotel), undrained
- 1 packet taco seasoning
- 1 cup shredded cheese (cheddar, Monterey Jack, or Mexican blend)
- 1 (28 ounce) can red enchilada sauce
- 8-10 corn or flour tortillas
- Optional toppings: sour cream, guacamole, cilantro, green onions
Instructions:
1. Prepare the Chicken Filling: If not already cooked, cook and shred your chicken. A rotisserie chicken is a huge time-saver.
2. Sauté Vegetables: Heat olive oil in a large skillet over medium heat. Add onion and bell pepper and cook until softened, about 5-7 minutes.
3. Combine Filling Ingredients: Add black beans, corn, diced tomatoes and green chilies, taco seasoning, and shredded chicken to the skillet. Stir well to combine. Cook for another 5 minutes, allowing the flavors to meld. Stir in ½ cup of the shredded cheese.
4. Assemble the Enchiladas: Preheat oven to 350°F (175°C). Spread a thin layer of enchilada sauce on the bottom of a 9×13 inch baking dish.
5. Warm the tortillas slightly, either in a dry skillet or microwave, to make them more pliable.
6. Spoon about ½ cup of the chicken filling into each tortilla. Roll up tightly and place seam-side down in the prepared baking dish.
7. Top with Sauce and Cheese: Pour the remaining enchilada sauce evenly over the enchiladas. Sprinkle with the remaining ½ cup of shredded cheese.
8. Bake: Bake for 20-25 minutes, or until the cheese is melted and bubbly and the enchiladas are heated through.
Tips for Recipe Success
- Use pre-cooked chicken: Rotisserie chicken is a great time-saver for meal prep. You can also cook chicken breasts in advance and shred them.
- Don’t overfill the tortillas: Overfilling can cause the tortillas to tear.
- Warm the tortillas: Warming the tortillas makes them more pliable and prevents them from cracking when rolled.
- Don’t skip the sauce: The enchilada sauce is essential for keeping the enchiladas moist and flavorful.
- Customize the filling: Feel free to add other vegetables or ingredients to the filling, such as zucchini, spinach, or jalapeños.
Section 3: Portioning and Storing Your Chicken Enchiladas
Proper portioning and storage are crucial for successful meal prepping. This ensures that your enchiladas stay fresh and delicious throughout the week.
Portioning:
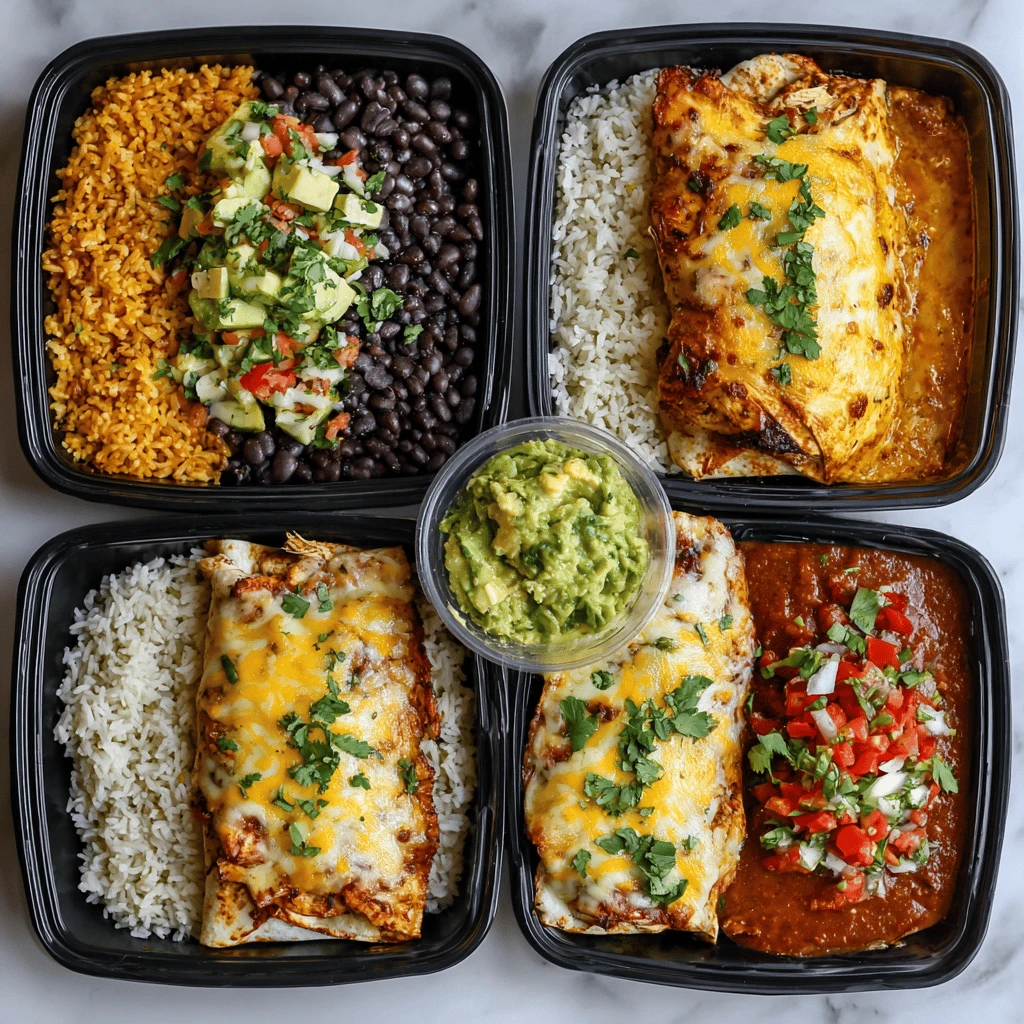
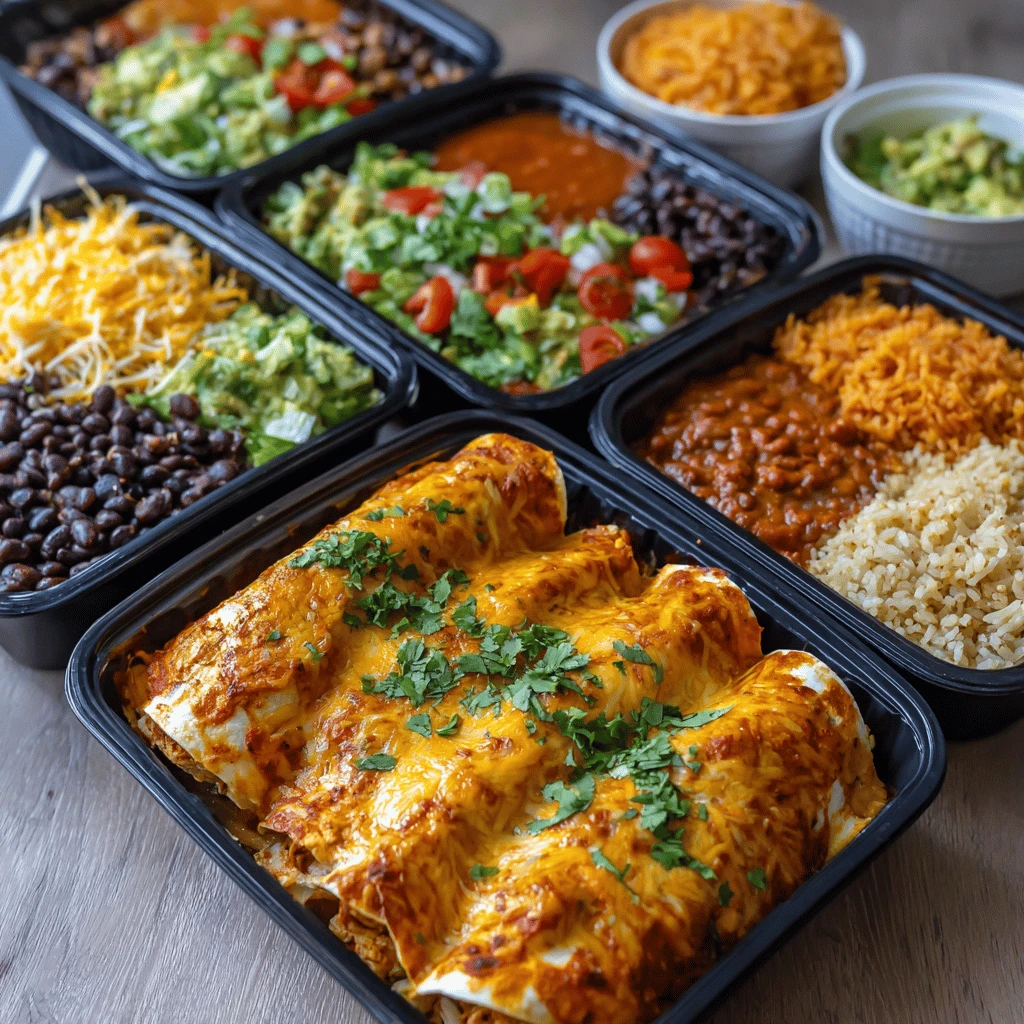
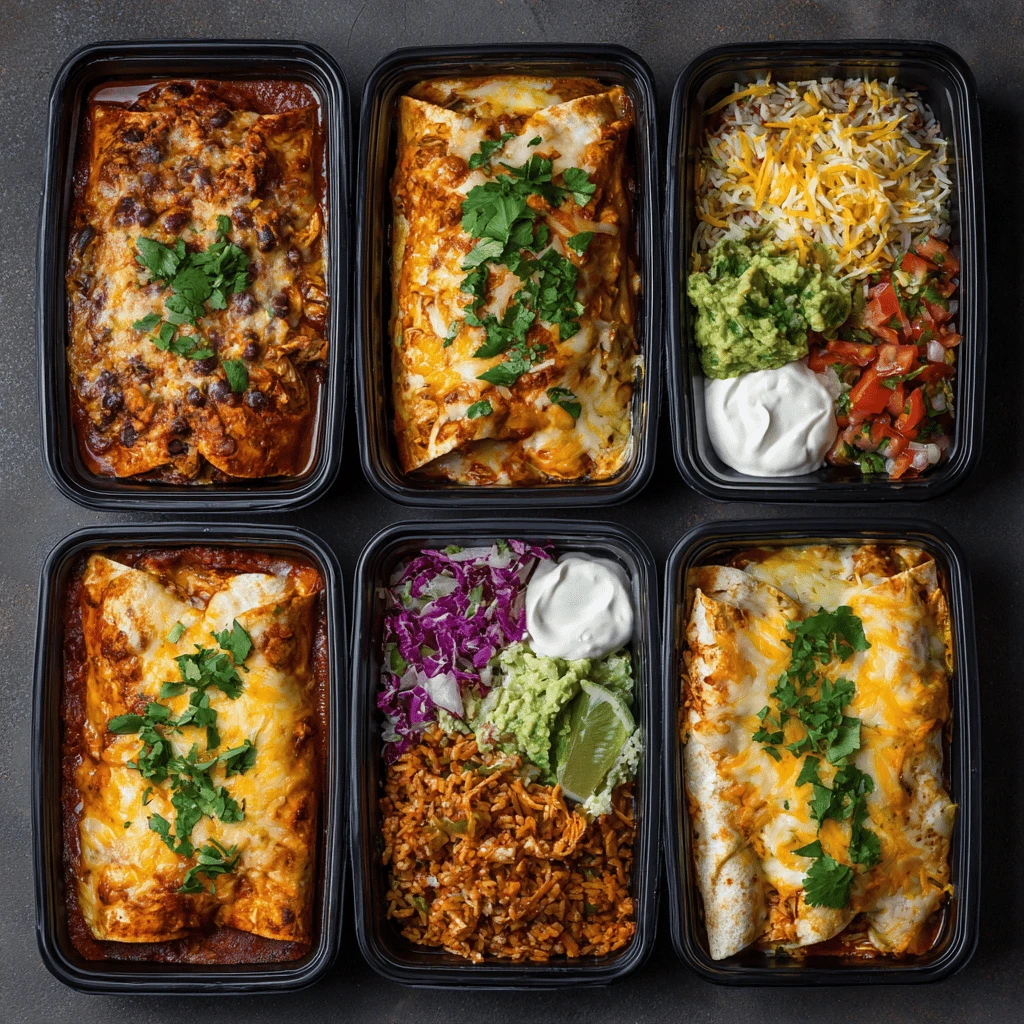
- Individual Containers: Divide the baked enchiladas into individual meal prep containers. This is ideal for taking to work or school.
- Family-Size Portions: If you’re meal prepping for a family, you can store the enchiladas in larger containers.
- Serving Size: Aim for 2-3 enchiladas per serving, depending on your appetite and dietary needs.
- Add Sides: Consider adding a side dish, such as rice, beans, or a salad, to your meal prep containers for a more complete meal.
Storage:
- Refrigeration: Allow the enchiladas to cool completely before storing them in the refrigerator. Store them in airtight containers to prevent them from drying out. Properly stored, chicken enchiladas will last for 3-4 days in the refrigerator.
- Freezing: For longer storage, you can freeze your chicken enchiladas. Wrap each enchilada individually in plastic wrap, then place them in a freezer-safe bag or container. Alternatively, you can freeze the entire baking dish of enchiladas. Thaw overnight in the refrigerator before reheating. Frozen enchiladas will last for up to 2-3 months.
- Labeling: Don’t forget to label your containers with the date of preparation. This will help you keep track of how long the enchiladas have been stored.
Choosing the Right Containers
Selecting the right containers is essential for maintaining the quality and freshness of your meal-prepped enchiladas.
- Airtight Containers: Opt for airtight containers to prevent moisture loss and keep your enchiladas from drying out.
- Microwave-Safe Containers: If you plan to reheat your enchiladas in the microwave, make sure your containers are microwave-safe.
- Freezer-Safe Containers: If you plan to freeze your enchiladas, use freezer-safe containers to prevent freezer burn.
- Glass vs. Plastic: Glass containers are a great option as they are non-reactive and don’t absorb odors or flavors. However, they are heavier and more fragile than plastic containers. Plastic containers are lightweight and durable, but they may absorb odors or flavors over time.
Section 4: Reheating and Serving Your Meal-Prepped Enchiladas
Reheating your chicken enchiladas is quick and easy. Choose the method that best suits your needs and preferences.
Reheating Methods:
- Microwave: The microwave is the quickest option for reheating individual servings. Place the enchiladas on a microwave-safe plate and heat for 2-3 minutes, or until heated through. Cover with a damp paper towel to prevent them from drying out.
- Oven: For reheating larger portions or the entire baking dish, the oven is a great option. Preheat the oven to 350°F (175°C). Cover the enchiladas with aluminum foil and bake for 15-20 minutes, or until heated through. Remove the foil during the last few minutes to allow the cheese to melt and bubble.
- Air Fryer: The air fryer is a great option for reheating individual enchiladas, giving them a crispy exterior. Preheat the air fryer to 350°F (175°C). Place the enchiladas in the air fryer basket and cook for 5-7 minutes, or until heated through.
- Skillet: You can also reheat enchiladas in a skillet. Heat a lightly oiled skillet over medium heat. Place the enchiladas in the skillet and cook for 5-7 minutes per side, or until heated through and the cheese is melted.
Serving Suggestions:
- Toppings: Top your reheated enchiladas with your favorite toppings, such as sour cream, guacamole, cilantro, green onions, or salsa.
- Side Dishes: Serve your enchiladas with a side of rice, beans, salad, or Mexican street corn.
- Garnishes: Add a squeeze of lime juice for a burst of freshness.
Maintaining Quality During Reheating
- Prevent Drying: To prevent your enchiladas from drying out during reheating, especially in the microwave, cover them with a damp paper towel or a microwave-safe lid.
- Even Heating: Ensure even heating by rotating the enchiladas halfway through the reheating process.
- Monitor Temperature: Use a food thermometer to ensure that the enchiladas are heated to an internal temperature of 165°F (74°C).
Section 5: Variations and Tips for Long-Term Success
Keep your meal prep routine exciting with these delicious variations and practical tips for long-term success.
Flavor Variations:
- Green Chile Chicken Enchiladas: Use green enchilada sauce instead of red enchilada sauce. Add diced green chilies to the filling.
- Creamy Chicken Enchiladas: Add cream cheese or sour cream to the filling for a richer, creamier flavor.
- Spicy Chicken Enchiladas: Add chipotle peppers in adobe sauce or cayenne pepper to the filling.
- BBQ Chicken Enchiladas: Use BBQ sauce instead of enchilada sauce. Add cooked bacon or pulled pork to the filling.
- Buffalo Chicken Enchiladas: Use buffalo wing sauce instead of enchilada sauce. Add blue cheese crumbles to the filling.
Tips for Long-Term Meal Prep Success:
- Plan Ahead: Take some time each week to plan your meals and create a shopping list. This will help you stay organized and avoid impulse purchases.
- Prep Ingredients in Advance: Chop vegetables, cook chicken, and prepare sauces in advance to save time during the week.
- Invest in Quality Containers: Good quality containers will keep your food fresh and prevent leaks.
- Don’t Be Afraid to Experiment: Try new recipes and variations to keep your meal prep routine exciting.
- Track Your Progress: Keep track of what you’re eating and how you’re feeling. This will help you identify what works best for you and make adjustments as needed.
- Make it a Habit: Consistency is key to long-term meal prep success. Make meal prepping a regular part of your routine, just like grocery shopping or exercising.
- Batch Cooking: Double or triple the recipe and freeze the extra portions for future meals.
Troubleshooting Common Meal Prep Issues
- Enchiladas are Dry: Make sure to use enough enchilada sauce and cover the enchiladas while reheating.
- Tortillas are Soggy: Avoid overfilling the tortillas and don’t let them sit in the sauce for too long before baking or reheating.
- Filling is Bland: Add more taco seasoning, chili powder, or other spices to the filling.
- Cheese is Not Melting: Make sure the oven or air fryer is hot enough and that the enchiladas are heated through before removing them.
FAQ: Chicken Enchilada Meal Prep
Can I make chicken enchiladas ahead of time?
Yes, chicken enchiladas are perfect for making ahead of time. You can assemble them, bake them, and then store them in the refrigerator or freezer.
How long do chicken enchiladas last in the fridge?
Properly stored in an airtight container, chicken enchiladas will last for 3-4 days in the refrigerator.
How do you keep enchiladas from getting soggy?
To prevent soggy enchiladas, avoid overfilling the tortillas and don’t let them sit in the sauce for too long before baking or reheating. Warming the tortillas beforehand also helps.
Can you freeze cooked chicken enchiladas?
Yes, you can freeze cooked chicken enchiladas. Wrap them individually in plastic wrap and then place them in a freezer-safe bag or container. They will last for up to 2-3 months in the freezer.
What goes well with chicken enchiladas?
Chicken enchiladas pair well with rice, beans, salad, guacamole, sour cream, salsa, and Mexican street corn.