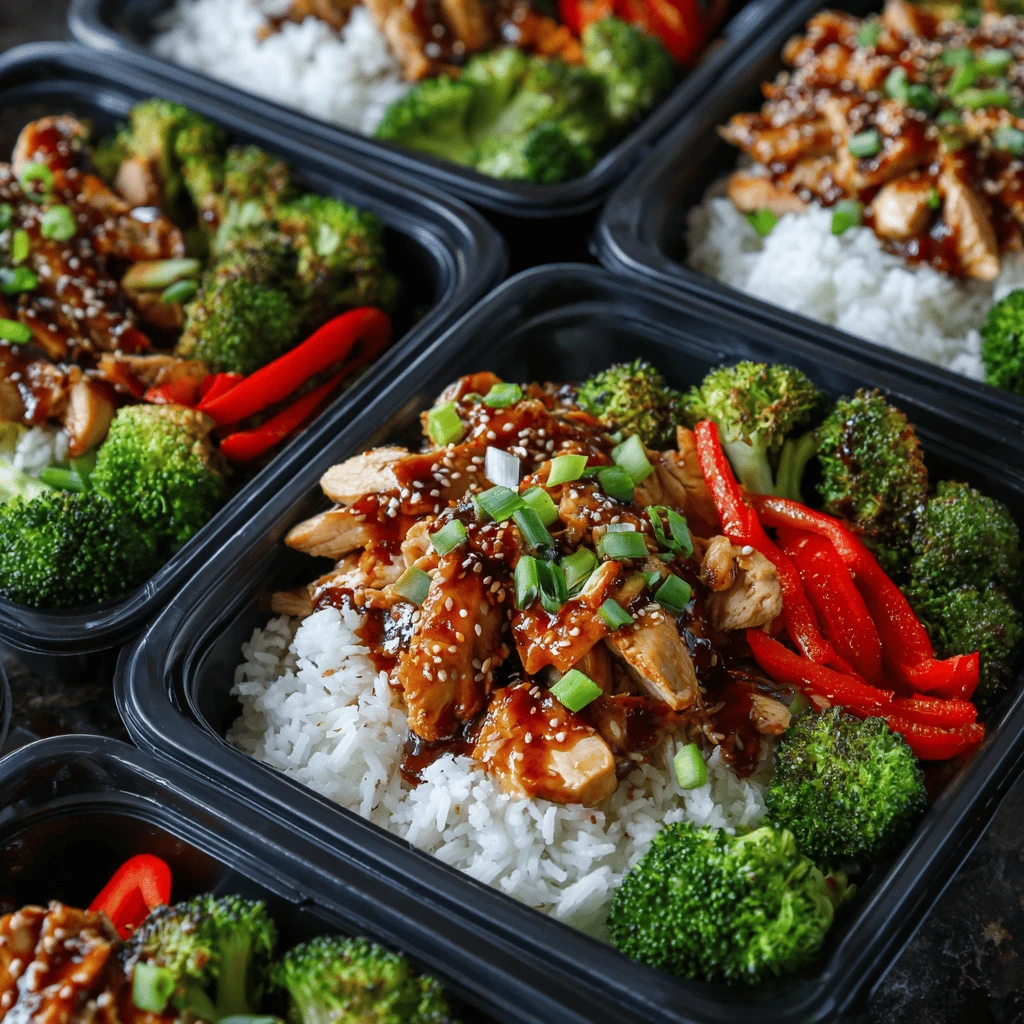
Chicken Teriyaki Meal Prep Bowls: Your Guide to Easy, Healthy Lunches Meal prepping is a fantastic way to save time, eat healthier, and stay organized. Chicken teriyaki meal prep bowls are a delicious and versatile option that’s perfect for lunch or dinner. This guide will walk you through creating the perfect chicken teriyaki meal prep…
Chicken Teriyaki Meal Prep Bowls: Your Guide to Easy, Healthy Lunches
Meal prepping is a fantastic way to save time, eat healthier, and stay organized. Chicken teriyaki meal prep bowls are a delicious and versatile option that’s perfect for lunch or dinner. This guide will walk you through creating the perfect chicken teriyaki meal prep bowls, offering tips, variations, and everything you need to succeed.
Why Choose Chicken Teriyaki Meal Prep Bowls?
Chicken teriyaki meal prep bowls offer a multitude of benefits, making them a great addition to your weekly routine.
Health Benefits and Nutritional Value
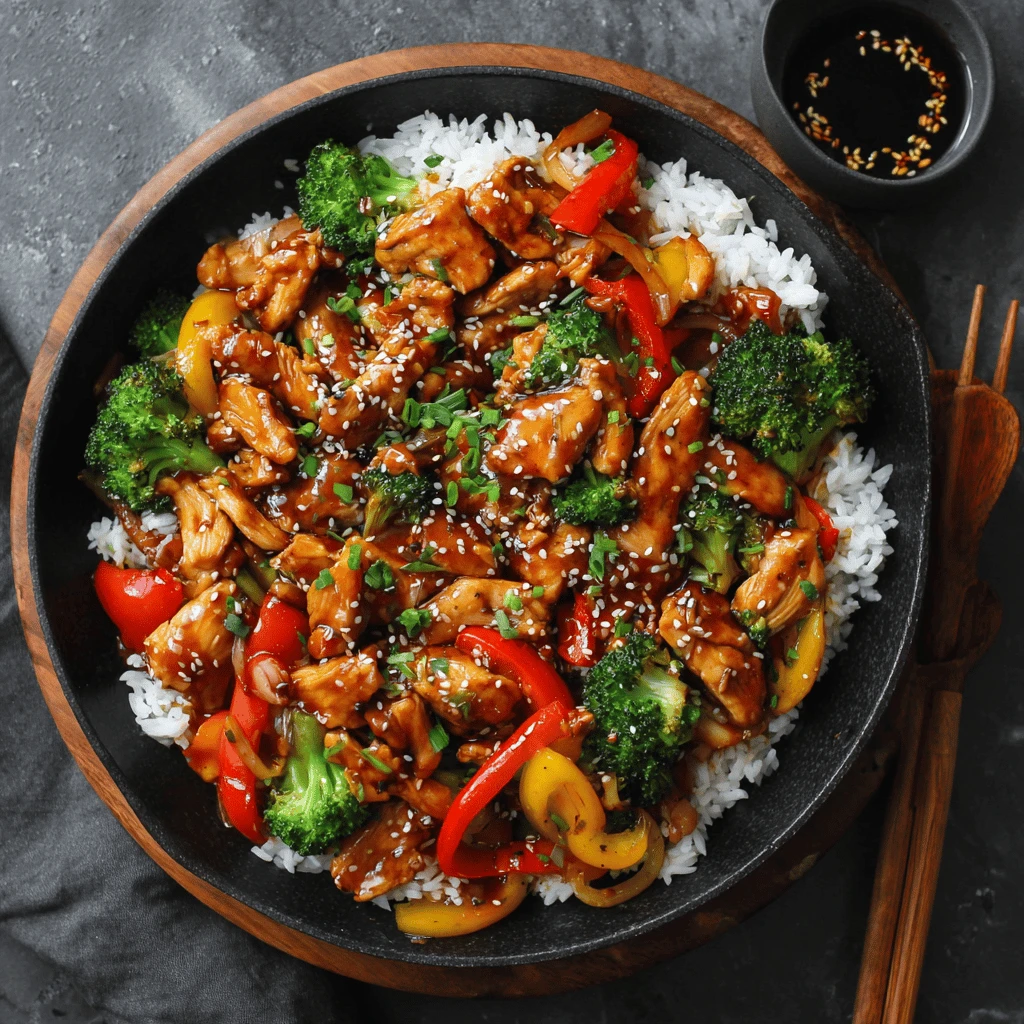
Chicken is a lean protein source, essential for muscle building and repair. Teriyaki sauce, while often perceived as unhealthy due to its sugar content, can be made with healthier alternatives like coconut aminos or low-sodium soy sauce and honey. When paired with vegetables and complex carbohydrates like brown rice or quinoa, these bowls offer a balanced and nutritious meal.
The nutritional value can be tailored to your specific needs. Want more fiber? Add more broccoli or spinach. Need more protein? Increase the chicken portion. The possibilities are endless. Each bowl provides a good source of vitamins and minerals from the vegetables and complex carbs.
Time-Saving and Cost-Effective
One of the biggest advantages of meal prepping is the time it saves during the week. Instead of scrambling to prepare lunch each day, you can simply grab a pre-made bowl from the fridge. This eliminates the temptation to order takeout, saving both time and money.
Preparing ingredients in bulk, such as cooking a large batch of rice or roasting vegetables, is also more cost-effective than buying individual meals. You can often find chicken on sale and stock up, further reducing your expenses.
Versatility and Customization
Chicken teriyaki bowls are incredibly versatile. You can customize the vegetables, grains, and even the sauce to suit your preferences. Don’t like broccoli? Substitute it with bell peppers or zucchini. Prefer cauliflower rice over brown rice? Go for it!
The sauce itself can be adjusted to your liking. Add a pinch of ginger for a spicier kick, or a dash of sesame oil for a nuttier flavor. This adaptability makes chicken teriyaki bowls a meal prep staple that you won’t get tired of easily.
Crafting the Perfect Chicken Teriyaki
The heart of these bowls is the perfectly cooked chicken and flavorful teriyaki sauce. Here’s how to achieve it.
Selecting and Preparing the Chicken
For meal prep, boneless, skinless chicken breasts or thighs are ideal. Breasts are leaner, while thighs offer more flavor and tend to stay moister during reheating.
To prepare the chicken, trim any excess fat and cut it into bite-sized pieces. This ensures even cooking and makes it easier to eat in a bowl. You can also pound the chicken breasts to an even thickness for faster and more consistent cooking.
Homemade vs. Store-Bought Teriyaki Sauce
While store-bought teriyaki sauce is convenient, homemade sauce allows you to control the ingredients and reduce sodium and sugar. A simple homemade teriyaki sauce can be made with soy sauce (or coconut aminos for a gluten-free option), honey or maple syrup, rice vinegar, ginger, garlic, and cornstarch (or arrowroot powder) to thicken.
Experiment with different ratios to find your perfect balance of sweet, salty, and tangy. Making your sauce from scratch also allows you to add other flavor enhancers like sesame oil, red pepper flakes, or pineapple juice.
Cooking Methods for the Chicken
Several cooking methods work well for chicken teriyaki:
- Pan-frying: This is a quick and easy method. Cook the chicken in a skillet over medium-high heat until cooked through and slightly browned. Add the teriyaki sauce during the last few minutes of cooking, allowing it to thicken and glaze the chicken.
- Baking: Baking is a hands-off approach. Toss the chicken with teriyaki sauce and bake in a preheated oven at 375°F (190°C) for about 20-25 minutes, or until cooked through.
- Slow Cooking: For incredibly tender chicken, use a slow cooker. Add the chicken and teriyaki sauce to the slow cooker and cook on low for 4-6 hours, or on high for 2-3 hours. Shred the chicken before serving.
- Air Frying: This method yields crispy chicken. Marinate the chicken in teriyaki sauce and air fry at 375°F (190°C) for about 12-15 minutes, flipping halfway through, until cooked through.
No matter which method you choose, ensure the chicken reaches an internal temperature of 165°F (74°C) to ensure it is safe to eat.
Building Your Meal Prep Bowl
The beauty of meal prep bowls lies in their customization. Here’s how to assemble a balanced and delicious bowl.
Selecting Your Base: Grains and Vegetables
Choose a base of complex carbohydrates and vegetables to provide sustained energy and essential nutrients.
- Grains: Brown rice, quinoa, and farro are excellent choices. They are packed with fiber and provide a steady release of energy. Cook them according to package directions and allow them to cool before assembling the bowls.
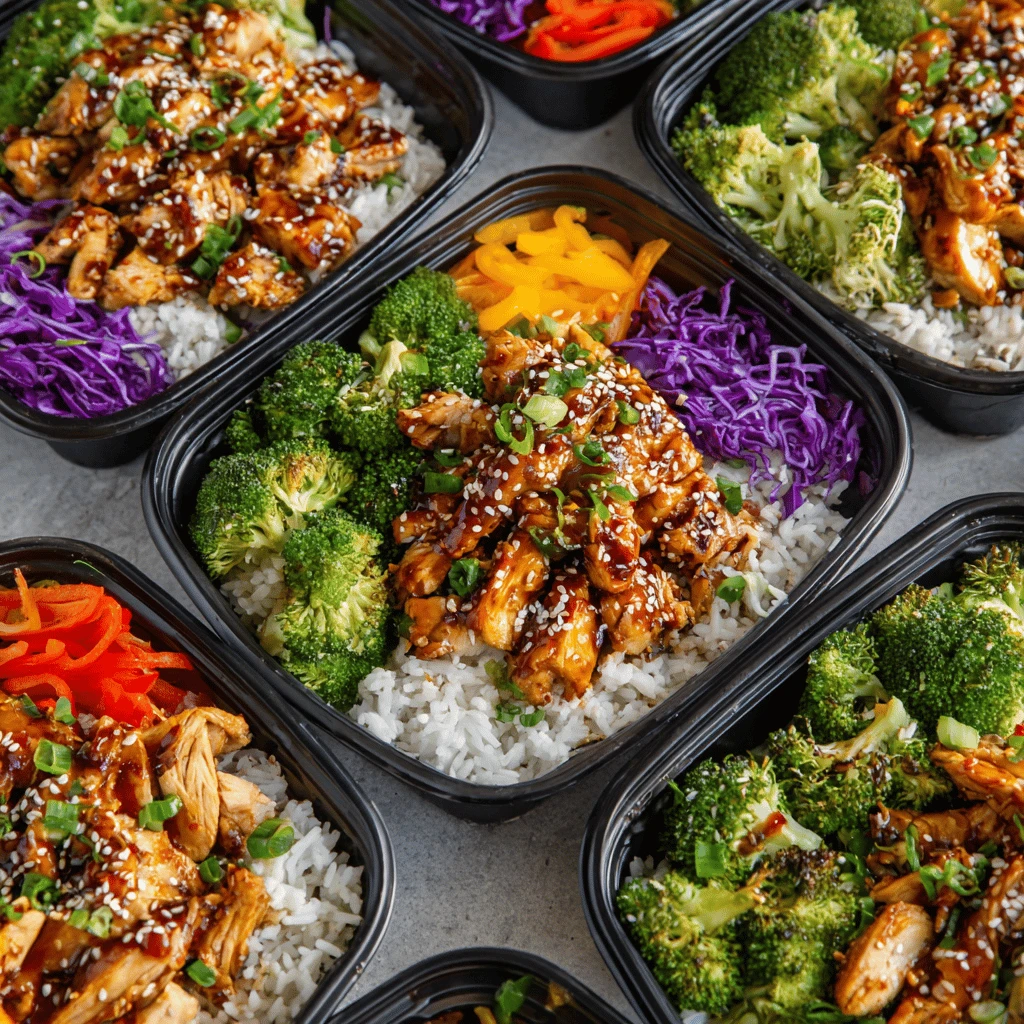
- Vegetables: Broccoli, bell peppers, carrots, snap peas, and edamame are all great additions. Roast them, steam them, or stir-fry them depending on your preference. Roasting brings out the natural sweetness of the vegetables, while steaming preserves their nutrients.
Consider adding leafy greens like spinach or kale for extra vitamins and minerals. You can even add pickled ginger or seaweed salad for added flavor and texture.
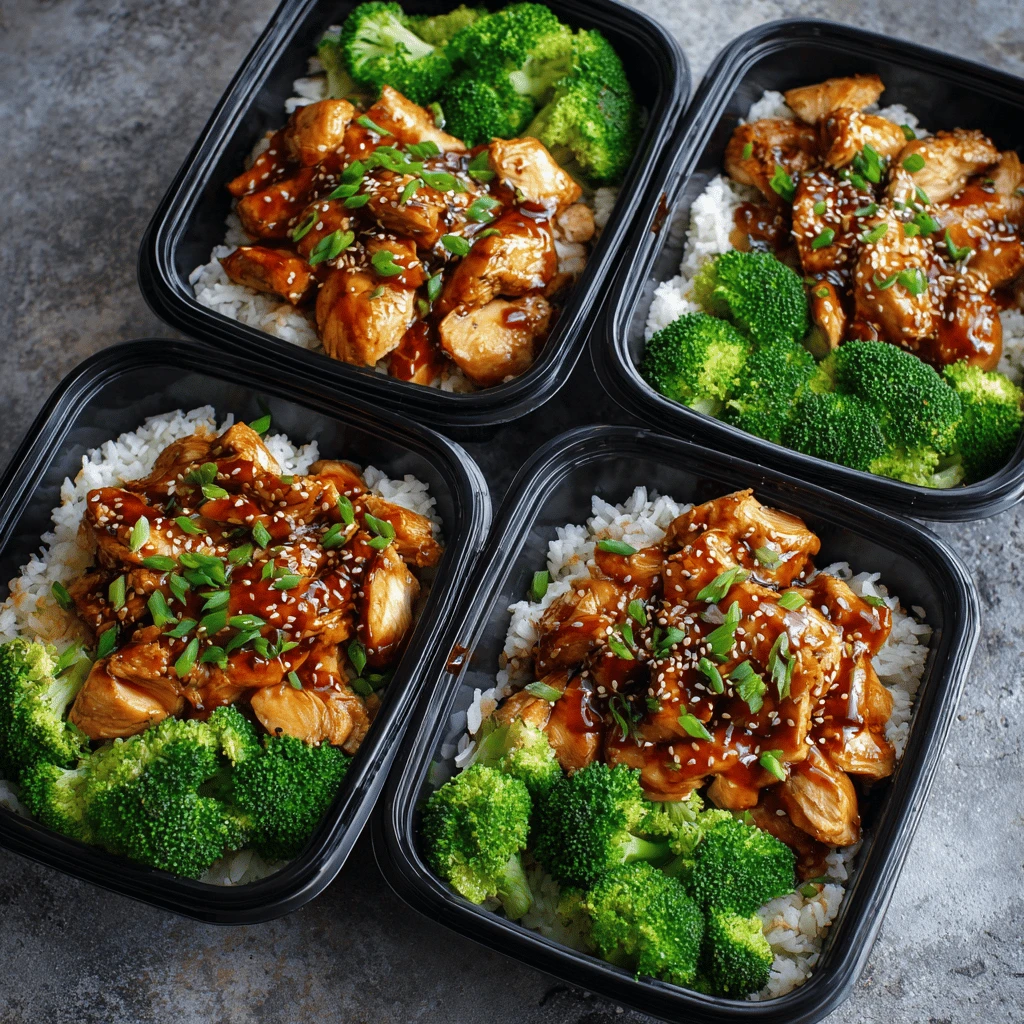
Assembling and Storing the Bowls
To assemble the bowls, divide the cooked rice or quinoa, vegetables, and chicken evenly among your meal prep containers. Allow the ingredients to cool completely before sealing the containers and storing them in the refrigerator.
To prevent the rice from drying out, you can add a small amount of water or broth to the bottom of the container before adding the rice. This will help keep it moist during storage and reheating.
Container Options and Storage Tips
Choose containers that are airtight and freezer-safe. Glass containers are a great option for reheating in the microwave, while plastic containers are lightweight and easy to transport.
Meal prep bowls can be stored in the refrigerator for up to 4 days. If you plan to store them for longer, consider freezing them. Frozen meal prep bowls can last for up to 2 months.
When reheating, microwave the bowls for 2-3 minutes, or until heated through. You may need to add a splash of water to prevent the rice from drying out. If reheating from frozen, allow the bowls to thaw in the refrigerator overnight before microwaving.
Variations and Flavor Enhancements
Keep your meal prep exciting with these variations and additions.
Vegetarian and Vegan Options
To make vegetarian or vegan teriyaki bowls, substitute the chicken with tofu, tempeh, or chickpeas. Tofu and tempeh can be marinated in teriyaki sauce and pan-fried or baked. Chickpeas can be roasted with teriyaki sauce for a crispy and flavorful alternative.
You can also add more vegetables to compensate for the lack of meat. Mushrooms, eggplant, and zucchini are all great options.
Spicy and Sweet Variations
For a spicy kick, add a pinch of red pepper flakes to the teriyaki sauce or sprinkle some sriracha over the finished bowls. You can also add a drizzle of chili oil for extra heat.
For a sweeter variation, add a splash of pineapple juice or a spoonful of brown sugar to the teriyaki sauce. You can also add chunks of pineapple to the bowls for a tropical twist.
Incorporating Different Cuisines
Experiment with different cuisines by adding ingredients like kimchi, gochujang (Korean chili paste), or edamame for an Asian-inspired bowl. You can also add black beans, corn, and avocado for a Southwestern-inspired bowl.
Consider adding nuts or seeds for added crunch and nutrients. Sesame seeds, almonds, or cashews are all great options.
Frequently Asked Questions
-
- How long do chicken teriyaki meal prep bowls last in the fridge?
They typically last for 3-4 days in the refrigerator when stored in airtight containers.
-
- Can I freeze chicken teriyaki meal prep bowls?
Yes, you can freeze them for up to 2 months. Ensure they are cooled completely before freezing, and thaw them overnight in the refrigerator before reheating.
-
- How do I prevent the rice from drying out?
Add a small amount of water or broth to the bottom of the container before adding the rice. This will help keep it moist during storage and reheating.
-
- What are some good vegetable alternatives?
Bell peppers, carrots, snap peas, edamame, zucchini, and mushrooms are all great alternatives to broccoli.
-
- Is teriyaki sauce healthy?
Store-bought teriyaki sauce can be high in sodium and sugar. Making your own teriyaki sauce allows you to control the ingredients and reduce sodium and sugar. Use low-sodium soy sauce (or coconut aminos), honey or maple syrup, and fresh ginger and garlic for a healthier option.
-
- Can I use chicken thighs instead of chicken breasts?
Yes, chicken thighs are a great alternative. They are more flavorful and tend to stay moister during reheating.
-
- How do I reheat chicken teriyaki bowls?
Microwave the bowls for 2-3 minutes, or until heated through. You may need to add a splash of water to prevent the rice from drying out.
-
- What other toppings can I add to my chicken teriyaki bowls?
Sesame seeds, green onions, avocado, pickled ginger, and seaweed salad are all great toppings.