Quick Beef Taco Skillet Craving tacos but short on time? This Quick Beef Taco Skillet is your answer! It’s a delicious, one-pan meal packed with flavor, ready in under 30 minutes, and perfect for busy weeknights. Ditch the individual tacos and enjoy a hearty, satisfying skillet dinner the whole family will love. Why You’ll Love…
Quick Beef Taco Skillet
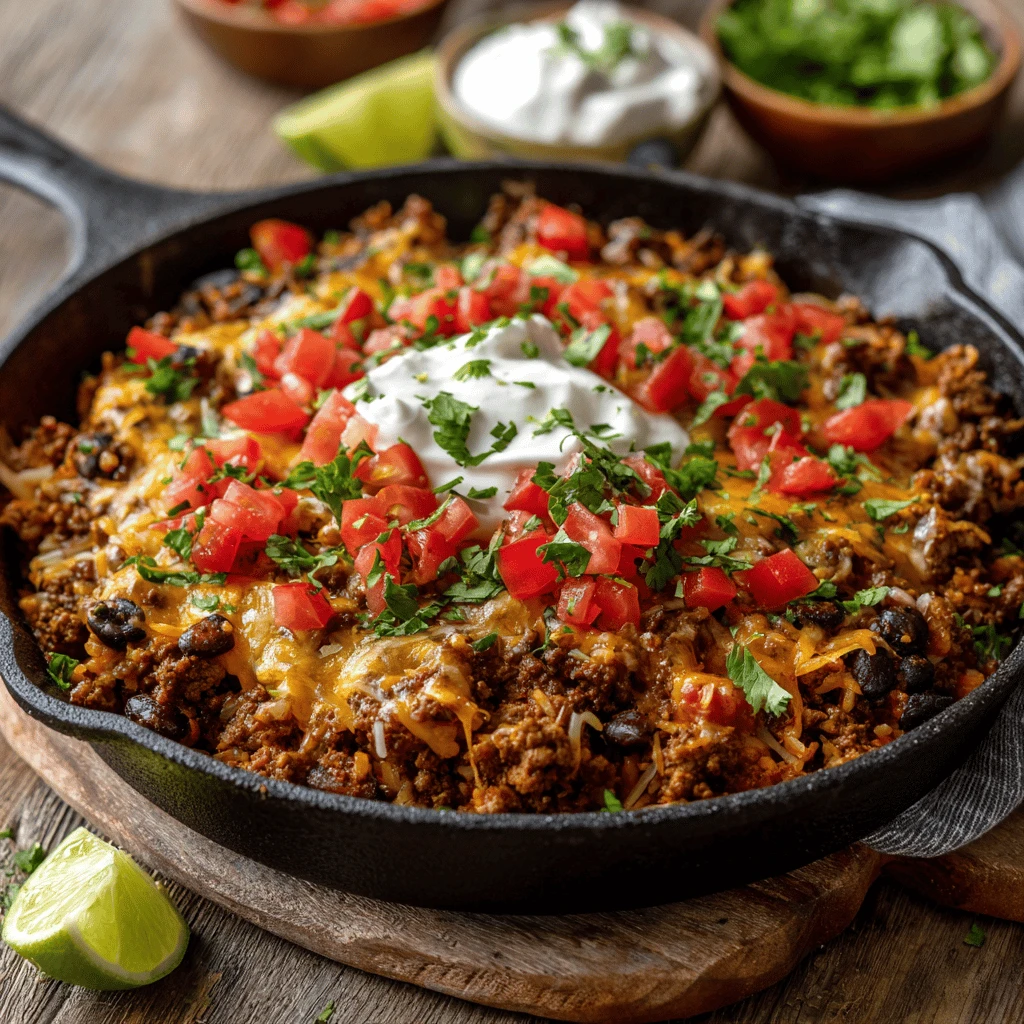
Craving tacos but short on time? This Quick Beef Taco Skillet is your answer! It’s a delicious, one-pan meal packed with flavor, ready in under 30 minutes, and perfect for busy weeknights. Ditch the individual tacos and enjoy a hearty, satisfying skillet dinner the whole family will love.
Why You’ll Love This Taco Skillet
Forget spending ages chopping vegetables and assembling individual tacos. This recipe simplifies the process without sacrificing any of the classic taco taste. Here’s why you’ll be making this skillet again and again:
- Speedy Prep & Cook Time: From start to finish, this meal is ready in about 30 minutes.
- One-Pan Wonder: Fewer dishes mean less cleanup – a major win!
- Customizable: Easily adapt the recipe to your family’s preferences with different toppings and spice levels.
- Budget-Friendly: Uses simple, affordable ingredients you probably already have on hand.
- Versatile: Serve it as is, over rice, or with tortilla chips for scooping.
Ingredients for the Perfect Taco Skillet
The key to a great taco skillet lies in quality ingredients and a balanced blend of flavors. Here’s what you’ll need:
- Ground Beef: Opt for lean ground beef (85/15) to minimize grease. Ground turkey or chicken can also be substituted.
- Onion: Diced yellow or white onion adds a subtle sweetness and aromatic base.
- Bell Pepper: Choose your favorite color (red, yellow, or green) for a pop of color and added nutrients.
- Taco Seasoning: Use a store-bought packet or make your own with chili powder, cumin, paprika, oregano, garlic powder, onion powder, and cayenne pepper.
- Diced Tomatoes: Canned diced tomatoes provide a juicy, flavorful base. Use fire-roasted tomatoes for an extra smoky kick.
- Tomato Sauce: Adds richness and helps bind the ingredients together.
- Corn: Frozen or canned corn adds sweetness and texture.
- Black Beans: Rinsed and drained black beans provide protein and fiber.
- Shredded Cheese: Cheddar, Monterey Jack, or a Mexican blend are all great choices.
- Optional Toppings: Sour cream, salsa, avocado, cilantro, green onions, hot sauce, and lime wedges.
Step-by-Step Instructions: From Skillet to Table in Minutes
Follow these simple steps for a delicious and hassle-free taco skillet:
1. Brown the Beef: In a large skillet over medium-high heat, brown the ground beef, breaking it up with a spatula. Drain off any excess grease.
2. Sauté Vegetables: Add the diced onion and bell pepper to the skillet and cook until softened, about 5-7 minutes.
3. Add Seasoning & Tomatoes: Stir in the taco seasoning, diced tomatoes, and tomato sauce. Bring to a simmer and cook for 5 minutes, allowing the flavors to meld.
4. Incorporate Beans & Corn: Add the corn and black beans to the skillet and stir to combine. Cook for another 3-5 minutes, until heated through.
5. Melt the Cheese: Reduce the heat to low and sprinkle the shredded cheese evenly over the skillet. Cover and cook until the cheese is melted and bubbly, about 2-3 minutes.
6. Serve & Enjoy: Garnish with your favorite toppings and serve immediately.
Pro Tips for Taco Skillet Perfection
- Don’t Overcook the Beef: Overcooked beef can become dry and tough. Cook until just browned and then drain off any excess grease.
- Adjust the Spice Level: Control the heat by adjusting the amount of taco seasoning you use. Start with less and add more to taste.
- Customize the Vegetables: Feel free to add other vegetables, such as zucchini, mushrooms, or jalapeños.
- Make it Vegetarian: Substitute the ground beef with plant-based crumbles or lentils.
- Double the Recipe: This skillet is great for meal prepping. Double the recipe and enjoy leftovers for lunch or dinner throughout the week.
- Serve with Sides: Consider serving with a side of Mexican rice, a simple salad, or a dollop of guacamole.
Variations and Delicious Additions
One of the best things about this Quick Beef Taco Skillet is its versatility. Get creative and try these delicious variations:
- Spicy Taco Skillet: Add diced jalapeños or a pinch of cayenne pepper to the ground beef while browning.
- Creamy Taco Skillet: Stir in a dollop of sour cream or cream cheese after adding the corn and beans.
- Chicken Taco Skillet: Substitute ground beef with ground chicken or shredded rotisserie chicken.
- Turkey Taco Skillet: Ground turkey is a healthy and delicious alternative to ground beef.
- Loaded Taco Skillet: Add a layer of crushed tortilla chips to the bottom of the skillet before adding the filling, then top with cheese and bake until bubbly.
- Taco Pasta Skillet: Add cooked pasta (such as rotini or elbow macaroni) to the skillet for a heartier meal. Reduce liquid accordingly.
- Sweet Potato Taco Skillet: Add diced sweet potatoes along with the onions and bell peppers for a slightly sweet and earthy flavor.
- Green Chile Taco Skillet: Add a can of diced green chilies for a smoky and slightly spicy twist.
- Pizza Taco Skillet: Top the skillet with pepperoni slices before adding the cheese for a fun and kid-friendly meal.
- Vegan Taco Skillet: Use plant-based ground, skip the cheese or use vegan cheese, and top with guacamole and salsa.
Serving Suggestions for Your Taco Skillet
This taco skillet is delicious on its own, but here are some ideas for how to serve it:
- As a Dip: Serve with tortilla chips for a party-friendly appetizer.
- Over Rice: Spoon the skillet mixture over cooked rice for a complete meal.
- In Lettuce Wraps: For a low-carb option, serve in crisp lettuce wraps.
- In Burrito Bowls: Create your own burrito bowl with rice, beans, and your favorite toppings.
- As a Quesadilla Filling: Use the skillet mixture as a filling for quesadillas.
- As a Taco Salad: Spoon the mixture over a bed of lettuce and top with your favorite taco salad toppings.
- Stuffed Peppers: Fill bell peppers with the taco skillet mixture and bake until tender.
- Taco Stuffed Sweet Potatoes: Top baked sweet potatoes with the taco skillet for a satisfying and nutritious meal.
- Nachos: Spread tortilla chips on a baking sheet, top with the taco skillet, cheese, and your favorite toppings, then bake until the cheese is melted and bubbly.
Storage and Reheating Instructions
Storage: Store leftover taco skillet in an airtight container in the refrigerator for up to 3-4 days.
Reheating: Reheat in the microwave or on the stovetop until heated through. Add a splash of water or broth if needed to prevent it from drying out.

Frequently Asked Questions (FAQ)
- Can I use a different type of meat? Yes! Ground turkey, chicken, or even shredded beef work well in this recipe.
- Can I make this ahead of time? Absolutely! Prepare the skillet ahead of time and store it in the refrigerator. Reheat before serving.
- Can I freeze this taco skillet? Yes, this skillet freezes well. Let it cool completely before transferring it to a freezer-safe container. Freeze for up to 2-3 months. Thaw overnight in the refrigerator before reheating.
- What if I don’t have taco seasoning? You can easily make your own taco seasoning blend. Combine chili powder, cumin, paprika, oregano, garlic powder, onion powder, and a pinch of cayenne pepper.
- Is this recipe gluten-free? Yes, this recipe is naturally gluten-free. However, be sure to check the label of your taco seasoning to ensure it is gluten-free.
- Can I add more vegetables? Absolutely! Feel free to add any vegetables you like, such as zucchini, mushrooms, or spinach.
- How can I make this skillet less spicy? Use a mild taco seasoning or reduce the amount of taco seasoning you use.
- What are good toppings for the taco skillet? Popular toppings include sour cream, salsa, avocado, cilantro, green onions, hot sauce, and lime wedges.